本文最后更新于 2024-03-22T23:32:54+00:00
期望这篇 RN 文章,能给你的 React、跨端、底层带来一些提升
移动端演进 第一阶段 浏览器 APP,直接打开 HTML
第二阶段:hybrid 方案 原生 APP,使用 WebView(嵌入式浏览器) 打开 HTML,采用 JSBridge 与 APP 通信。
第三阶段:RN 本质还是写 HTML+CSS+JS(用 React 库写)document.createElement(),生成浏览器所能识别的 DOMUIManager.createView(),生成了面向宿主环境的渲染代码,最终实现渲染。
优点:复用 React 的 diff、reconcile,只需要改最后的原生代码的生成
RN 知识体系
结论:
RN Demo 实战 环境搭建 原生 metro 环境 Facebook 出品的打包工具,类似于 Webpack
沙箱环境 expo 社区提供了 expo-cli,expo 需要注册一下的,用它能简化开发流程
安装:npm i expo-cli -g
初始化项目:expo init yourProjectNameexpo createexpo-app yourProjectName
启动:cd yourProjectName && npm i && npm start ,会生成一个二维码
然后下载Expoapp,可以在 GooglePlay(开启魔法)、iOS Store 内下载
若想在浏览器查看,还需运行npx expo install react-native-web react-dom @expo/metro-runtimew,就会用电脑默认浏览器打开项目,就跟开发 PC 端项目一样了
注意事项:我 mac 电脑启动项目时,竟然要开启魔法~,但Expoapp 扫描时手机不需要魔法
RN 常见的特性与坑点
RN 没有<div />只有自己的标签,常见的为:<View />、<Text />可理解为<div />、<span />,但 RN 里面文本必须用<Text />包裹,否则会报错
所有的布局默认为flex,所以不用显式声明display: flex,但 RN 里面flex-direction默认为: column
需要滚动则要用<ScrollView />包裹
像素:RN 里面的 CSS 像素是根据物理像素与 dpr 计算的,比如 dpr = 2.75,物理像素宽为 1080,则 window.width = 1080 / 2.75 = 392.72727
transform 写法有变:transform: [{ rotate: "45deg" }, { scale: 1.5 }]
表单使用 e.nativeEvent.text,不再是 e.target.value
开始实战 先安装 VSCode 插件:
1、安装 UI 组件 本次选择的是 RN antd
安装对应依赖
1
2
3
4
5
如果你用的是 expo 请确保字体已经加载完成再初始化 app
asyncLoadFont.js
1
2
3
4
5
6
7
8
9
10
11
12
13
14
15
16
17
import { loadAsync } from "expo-font" ;export const asyncLoadFont = (return Promise .all ([loadAsync ("antoutline" ,require ("@ant-design/icons-react-native/fonts/antoutline.ttf" )loadAsync ("antfill" ,require ("@ant-design/icons-react-native/fonts/antfill.ttf" )
App.js
1
2
3
4
5
6
7
8
9
10
11
12
13
14
15
16
17
18
19
20
21
22
23
24
25
26
27
28
29
30
31
32
33
34
35
36
37
38
39
40
41
42
import { StatusBar } from "expo-status-bar" ;import { StyleSheet , Text , View } from "react-native" ;import { useEffect, useState } from "react" ;import { asyncLoadFont } from "./asyncLoadFont" ;export default function App (const [isFontLoaded, setIsFontLoaded] = useState (false );useEffect (() => {asyncLoadFont ().then (() => {setTimeout (() => {setIsFontLoaded (true );5000 );if (!isFontLoaded) {return (<View style ={styles.container} > <Text > Loading...</Text > </View > return (<View style ={styles.container} > <Text > Open up App.js to start working on your app!</Text > <StatusBar style ="auto" /> </View > const styles = StyleSheet .create ({container : {flex : 1 ,backgroundColor : "#fff" ,alignItems : "center" ,justifyContent : "center" ,
使用组件
App.js
1
2
3
4
5
6
7
8
9
10
11
12
13
14
15
16
17
18
19
20
21
22
23
24
25
26
27
28
29
30
31
32
33
34
35
36
37
38
39
40
41
42
43
44
45
46
47
48
49
50
51
import { StatusBar } from "expo-status-bar" ;import { StyleSheet , Text , View } from "react-native" ;import { useEffect, useState } from "react" ;import { asyncLoadFont } from "./asyncLoadFont" ;import Button from "@ant-design/react-native/lib/button" ; export default function App (const [isFontLoaded, setIsFontLoaded] = useState (false );useEffect (() => {asyncLoadFont ().then (() => {setTimeout (() => {setIsFontLoaded (true );5000 );if (!isFontLoaded) {return (<View style ={styles.container} > <Text > Loading...</Text > </View > return (<View style ={styles.container} > <Text > Open up App.js to start working on your app!</Text > // 使用 Button 组件 <Button type ="primary" style ={{ marginTop: 10 }}> // +++ primary // +++ </Button > // +++ <StatusBar style ="auto" /> </View > const styles = StyleSheet .create ({container : {flex : 1 ,backgroundColor : "#fff" ,alignItems : "center" ,justifyContent : "center" ,
效果如下:
补充:找 RN UI 组件的网站(不仅仅是 UI 组件哦)
2、安装路由 本次选择的是 react-navigation
安装依赖
1 npm install @react-navigation/native @react-navigation/native-stack react-native-screens react-native-safe-area-context @react-navigation/bottom-tabs
根目录新建文件夹,直接运行下面命令
1
2
mkdir -p src/navigation/jsx
VSCode 编辑器打开刚创建的 .jsx,输入rnfe回车,然后函数命名为Navigation
1
2
3
4
5
6
7
8
9
10
11
12
import { View , Text } from "react-native" ;import React from "react" ;const Navigation = (return (<View > <Text > Navigation</Text > </View > export default Navigation ;
App.js 导入该组件
1
2
3
4
5
6
7
8
9
10
11
12
13
14
15
16
17
18
19
20
21
22
23
24
25
26
27
28
29
30
31
32
33
34
35
36
37
38
import { StatusBar } from "expo-status-bar" ;import { StyleSheet , Text , View } from "react-native" ;import { useEffect, useState } from "react" ;import { asyncLoadFont } from "./asyncLoadFont" ;import Button from "@ant-design/react-native/lib/button" ;import Navigation from "./src/navigation" ; export default function App (const [isFontLoaded, setIsFontLoaded] = useState (false );useEffect (() => {asyncLoadFont ().then (() => {setTimeout (() => {setIsFontLoaded (true );1000 );if (!isFontLoaded) {return (<View style ={styles.container} > <Text > Loading...</Text > </View > return <Navigation /> const styles = StyleSheet .create ({container : {flex : 1 ,backgroundColor : "#fff" ,alignItems : "center" ,justifyContent : "center" ,
新建文件,作为首页展示
1
2
mkdir -p src/pages/homejsx
更改 src/pages/home/index.jsx 文件
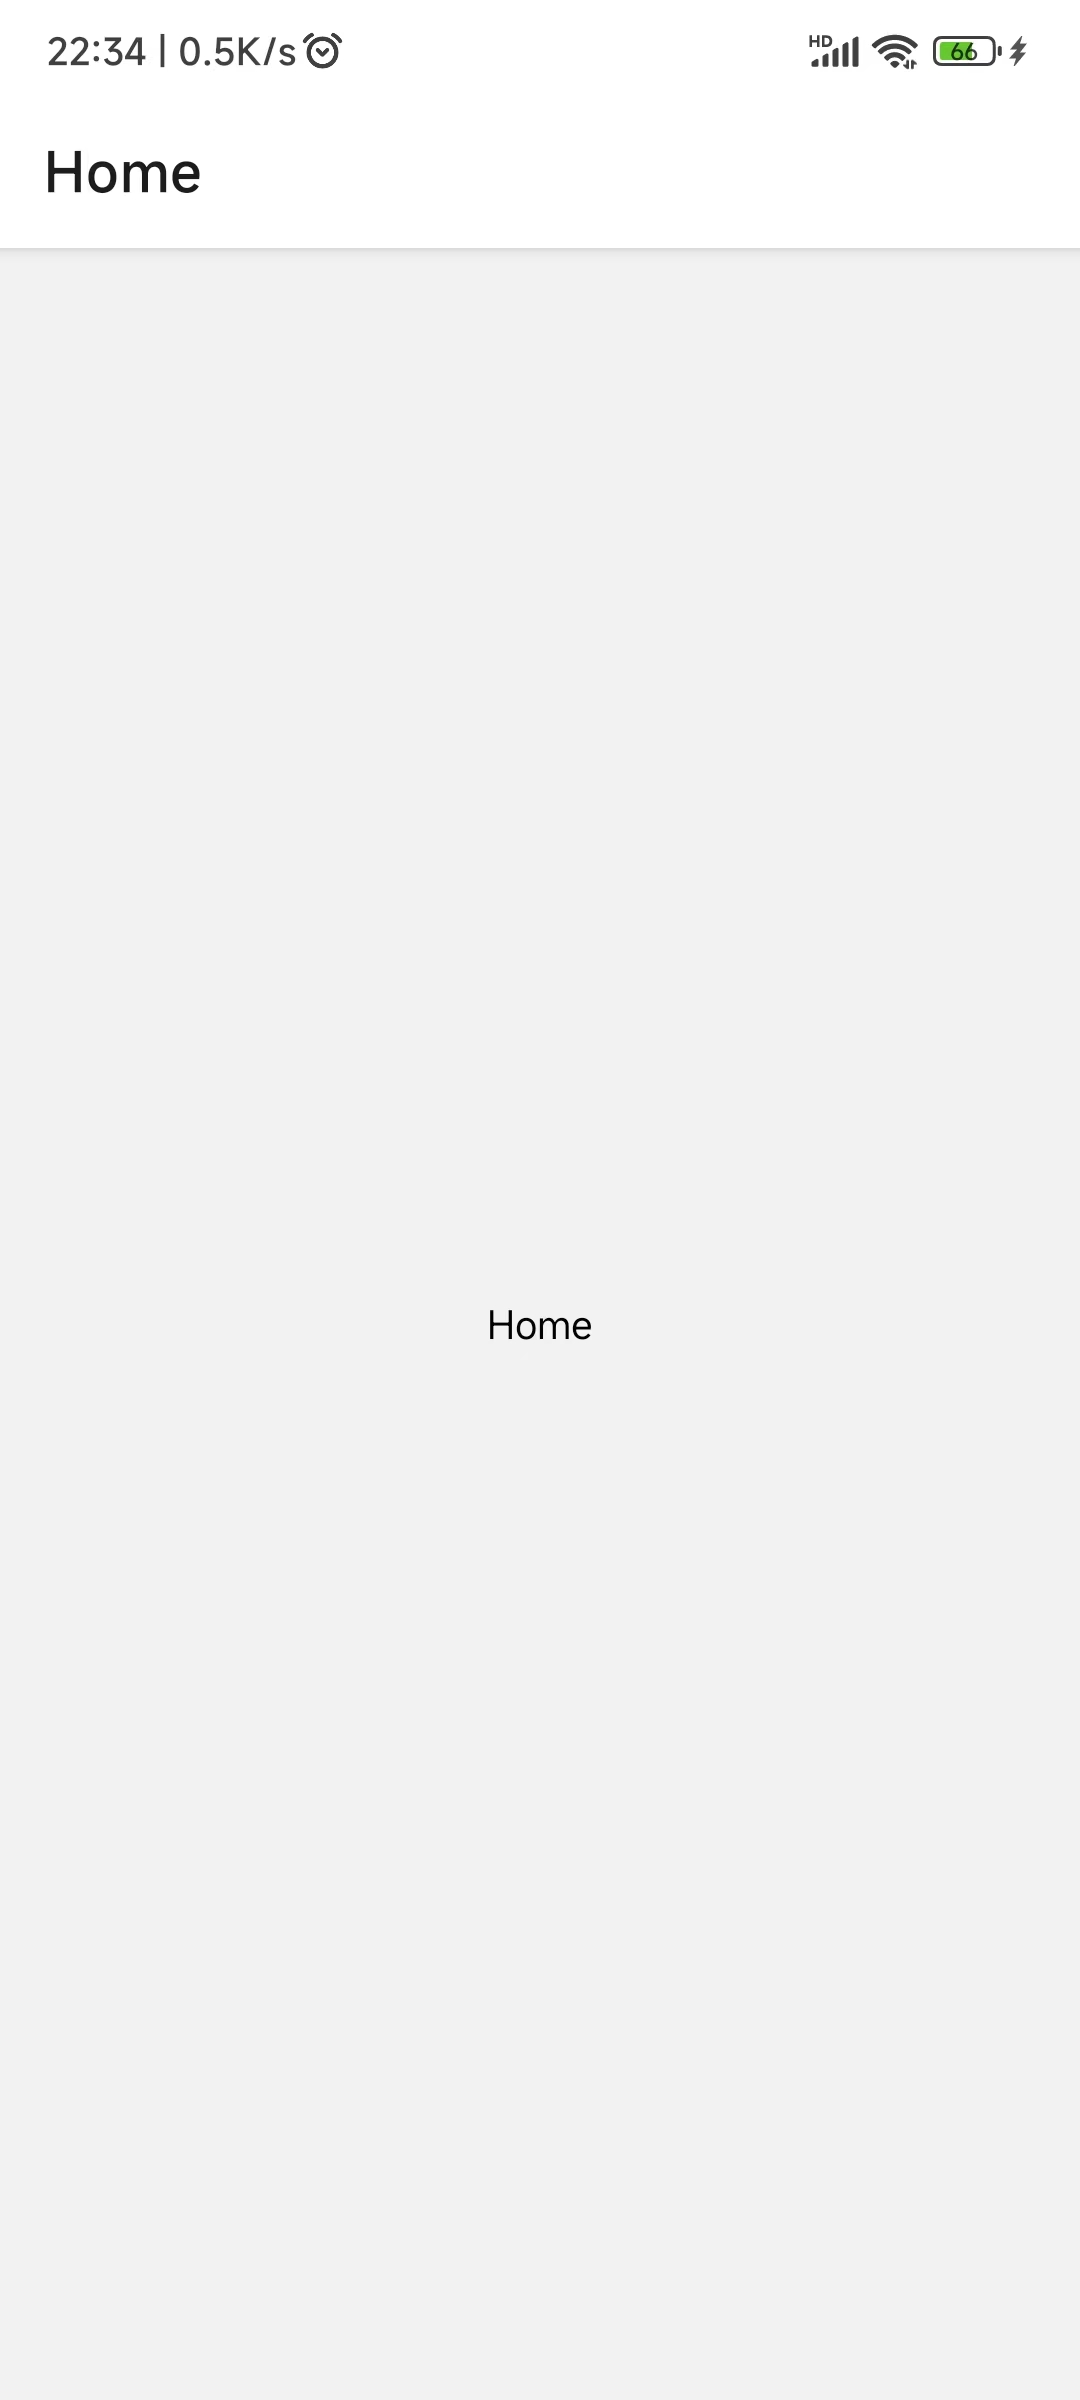
1
2
3
4
5
6
7
8
9
10
11
12
import { View , Text } from "react-native" ;import React from "react" ;const Home = (return (<View style ={{ flex: 1 , alignItems: "center ", justifyContent: "center " }}> <Text > Home</Text > </View > export default Home ;
更改 /src/navigation/index.jsx 文件
1
2
3
4
5
6
7
8
9
10
11
12
13
14
15
16
17
18
19
20
21
22
23
24
import React from "react" ;import { NavigationContainer } from "@react-navigation/native" ;import { createNativeStackNavigator } from "@react-navigation/native-stack" ;import Home from "../pages/home" ;const Stack = createNativeStackNavigator ();const RootStackNavigation = (return (<Stack.Navigator > <Stack.Screen name ="Home" component ={Home} /> </Stack.Navigator > const Navigation = (return (<NavigationContainer > <RootStackNavigation /> </NavigationContainer > export default Navigation ;
页面效果如下
新建文件,作为详情页展示
1
2
mkdir -p src/pages/detailsjsx
更改 src/pages/details/index.jsx 文件
1
2
3
4
5
6
7
8
9
10
11
12
import { View , Text } from "react-native" ;import React from "react" ;const Details = (return (<View style ={{ flex: 1 , alignItems: "center ", justifyContent: "center " }}> <Text > Details</Text > </View > export default Details ;
更改 src/pages/home/index.jsx 文件
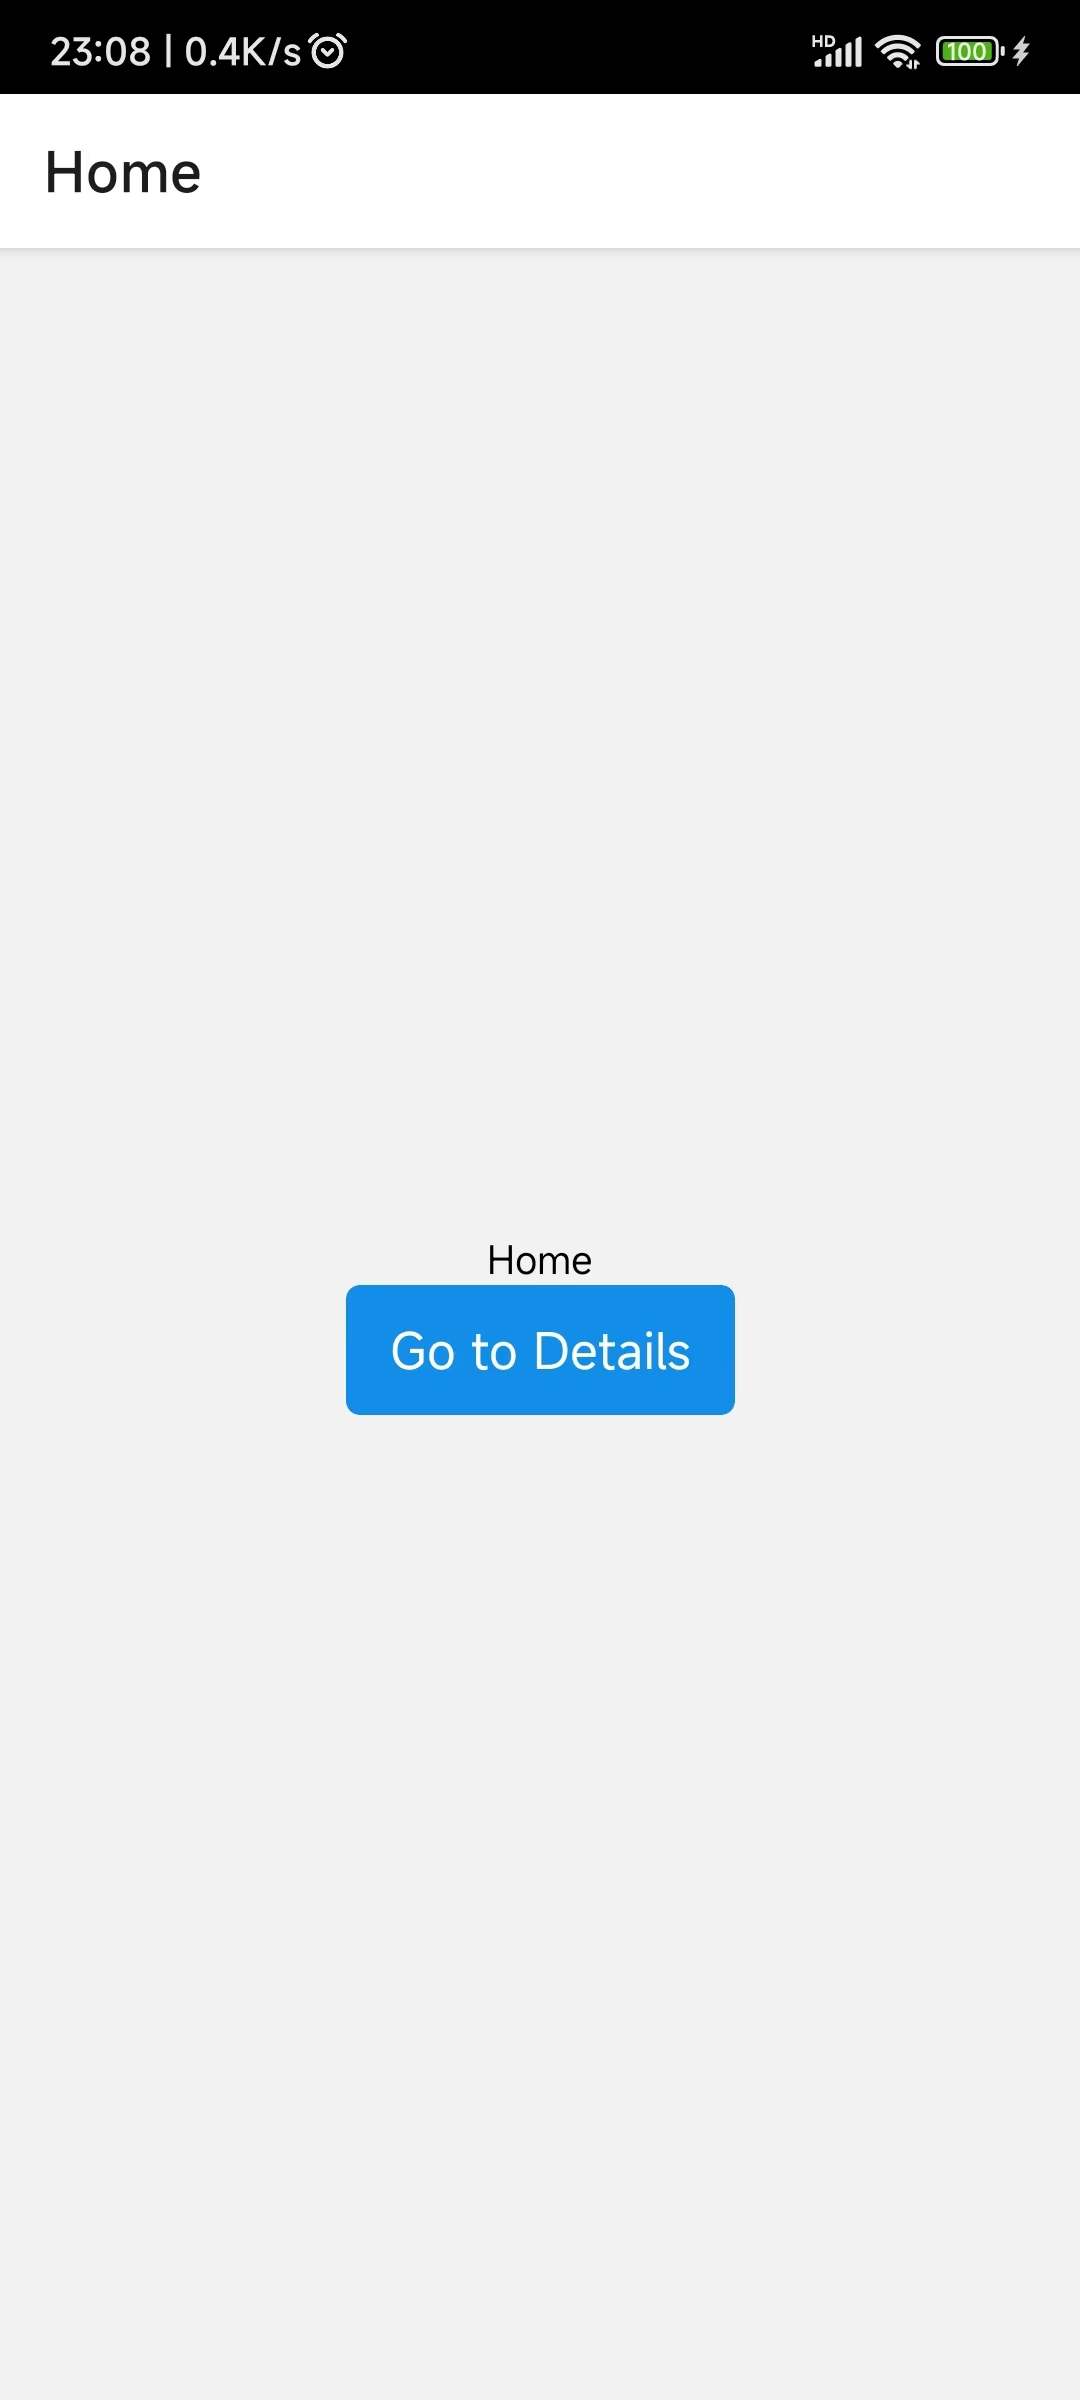
1
2
3
4
5
6
7
8
9
10
11
12
13
14
15
16
17
18
19
import { View , Text } from "react-native" ;import React from "react" ;import Button from "@ant-design/react-native/lib/button" ; const Home = ({ navigation } ) => {return (<View style ={{ flex: 1 , alignItems: "center ", justifyContent: "center " }}> <Text > Home</Text > // +++ 跳转按钮 <Button type ="primary" onPress ={() => navigation.navigate("Details")}> Go to Details </Button > </View > export default Home ;
更改 /src/navigation/index.jsx 文件
1
2
3
4
5
6
7
8
9
10
11
12
13
14
15
16
17
18
19
20
21
22
23
24
25
26
import React from "react" ;import { NavigationContainer } from "@react-navigation/native" ;import { createNativeStackNavigator } from "@react-navigation/native-stack" ;import Home from "../pages/home" ;import Details from "../pages/details" ; const Stack = createNativeStackNavigator ();const RootStackNavigation = (return (<Stack.Navigator initialRouteName ="Home" > <Stack.Screen name ="Home" component ={Home} /> <Stack.Screen name ="Details" component ={Details} /> // +++ </Stack.Navigator > const Navigation = (return (<NavigationContainer > <RootStackNavigation /> </NavigationContainer > export default Navigation ;
效果如下
更多路由操作看官方文档
3、下面讲一下完整的页面布局代码
更改 src/navigation/index.jsx 文件
1
2
3
4
5
6
7
8
9
10
11
12
13
14
15
16
17
18
19
20
21
22
23
24
25
26
27
28
29
30
31
32
33
34
35
36
37
38
39
40
41
42
43
44
45
46
47
48
49
50
51
52
53
54
55
56
57
58
59
60
61
62
63
64
65
66
67
68
69
70
71
72
73
74
75
76
77
78
79
80
81
82
83
84
85
86
87
88
89
90
91
92
93
94
95
96
97
98
99
100
101
102
103
104
105
106
107
108
import React from "react" ;import { NavigationContainer } from "@react-navigation/native" ;import { createNativeStackNavigator } from "@react-navigation/native-stack" ;import { createBottomTabNavigator } from "@react-navigation/bottom-tabs" ;import Icon from "@ant-design/react-native/lib/icon" ;import Home from "../pages/home" ;import Search from "../pages/search" ;import Details from "../pages/details" ;import Setting from "../pages/setting" ;import Profile from "../pages/profile" ;import User from "../pages/user" ;const SettingPageStack = createNativeStackNavigator ();const SettingPage = (return (<SettingPageStack.Navigator > <SettingPageStack.Screen name ="Setting" component ={Setting} options ={{ title: "设置 " }} /> <SettingPageStack.Screen name ="Profile" component ={Profile} options ={{ title: "个人信息 " }} /> </SettingPageStack.Navigator > const HomePageStack = createNativeStackNavigator ();const HomePage = (return (<HomePageStack.Navigator > <HomePageStack.Screen name ="Home" component ={Home} options ={{ title: "首页 " }} /> <HomePageStack.Screen name ="Details" component ={Details} options ={{ title: "详情 " }} /> </HomePageStack.Navigator > const TabStack = createBottomTabNavigator ();const Tab = (return (<TabStack.Navigator > <TabStack.Screen name ="TabHome" component ={HomePage} options ={{ title: "首页 ", headerShown: false , tabBarIcon: ({ color }) => <Icon name ="home" color ={color} /> , }} /> <TabStack.Screen name ="TabSetting" component ={SettingPage} options ={{ title: "设置 ", headerShown: false , tabBarIcon: ({ color }) => <Icon name ="setting" color ={color} /> , }} /> <TabStack.Screen name ="TabUser" component ={User} options ={{ title: "我的 ", tabBarIcon: ({ color }) => <Icon name ="user" color ={color} /> , }} /> </TabStack.Navigator > const RootStack = createNativeStackNavigator ();const RootStackNavigation = (return (<RootStack.Navigator > <RootStack.Screen name ="Tab" component ={Tab} options ={{ headerShown: false }} /> <RootStack.Screen name ="Search" component ={Search} /> </RootStack.Navigator > const Navigation = (return (<NavigationContainer > <RootStackNavigation /> </NavigationContainer > export default Navigation ;
新增 src/pages/setting/index.jsx、src/pages/profile/index.jsx、src/pages/search/index.jsx、src/pages/user/index.jsx 文件,内容自己随便填
效果如下:
补充知识 WebView 是什么? 一种在 APP 内嵌入浏览器引擎的组件
JSBridge 是什么? 一种 JS 与原生通信的技术,包括调用原生方法传递数据、获取返回结果等操作。
npm dedupe 作用:简化依赖树,解决幽灵依赖npm dedupe来简化依赖
1 2 3 4 5 6 7 8 9 10 11 12 13 14 15 16 17 18 原始依赖图如下1.0 .x 1.0 .3 1.0 .9 1.0 .10 1.0 .10
大厂 P6、P7 的区别
技术无关性
框架:handler 后如何触发 UI 的更新
路由:地址的变化后加载对应组件
状态管理:如何设计好观察者或发布订阅模式
团队影响力
一杆到底
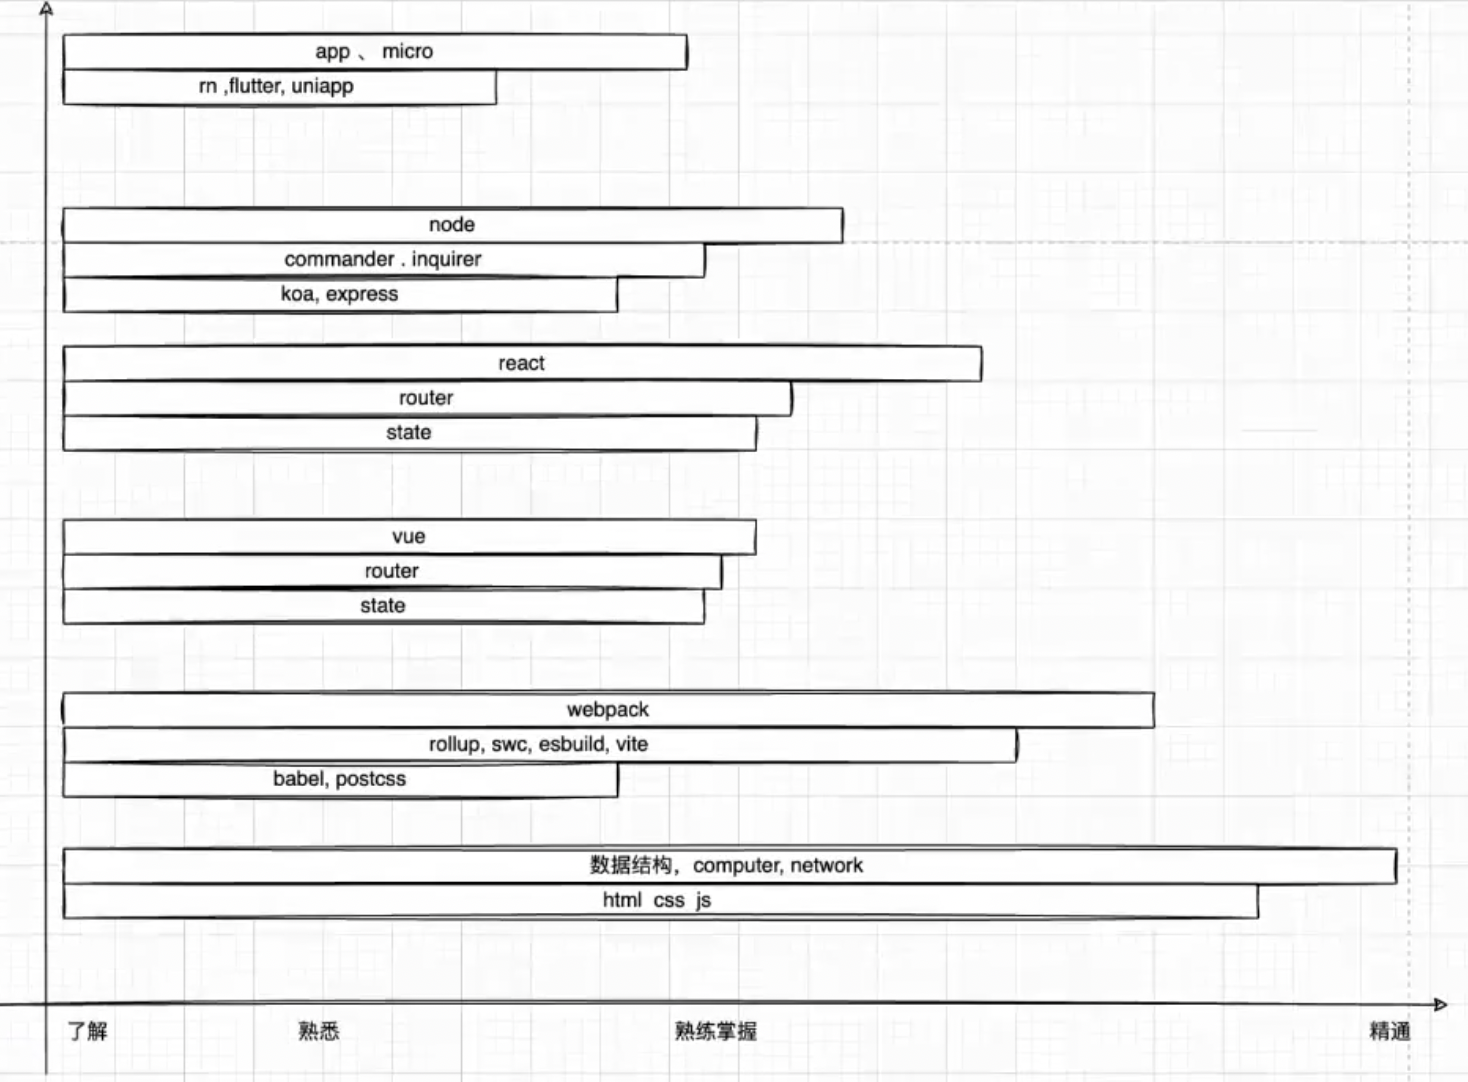
个人能力图谱 最好拥有一个自己的个人能力图谱,类似如下:
平时我们写的 JS 代码是用来干嘛的?谁来识别的? 1 2 3 console .log ('hello' ) document .getElementById ('app' )
JS 代码本质是字符串,需要翻译。
所以 Web 开发本质是用 JS 去调用 DOM、BOM…
mac 下载配置 Android Emulator
点这里 去下载 dmg 文件
下载后,双击打开,然后拖入应用程序内
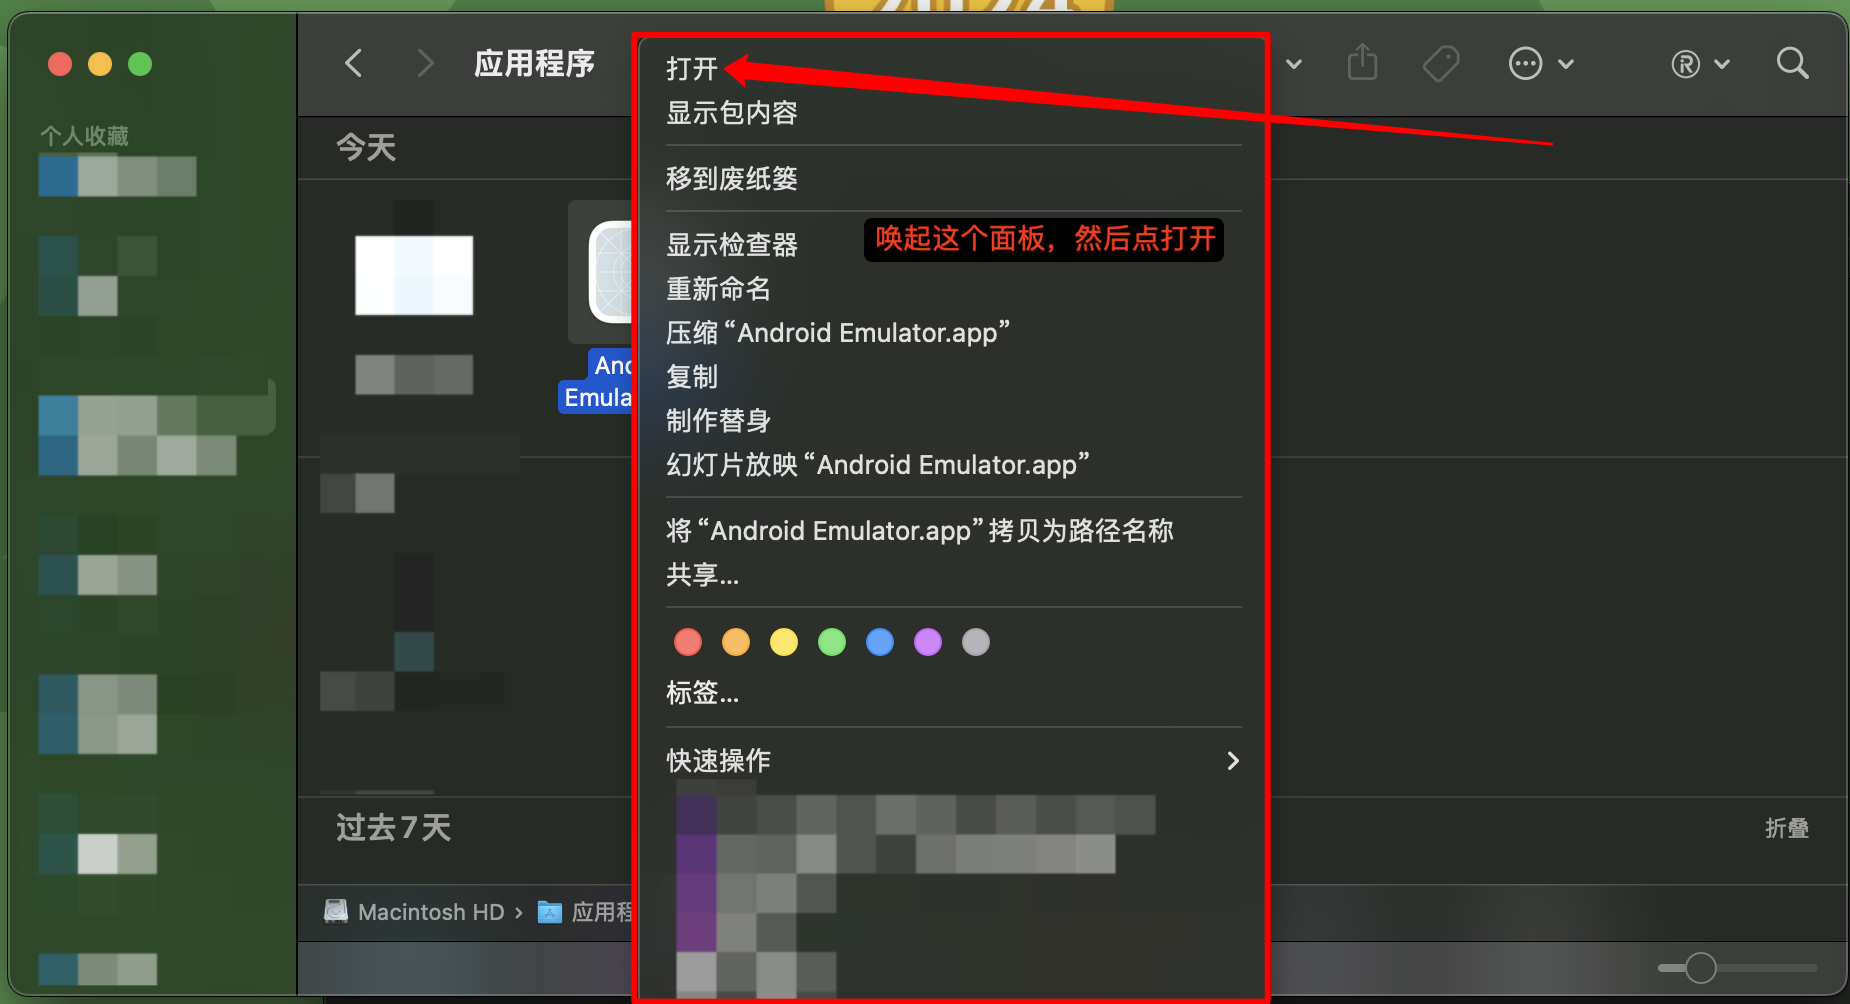
打开
打开会有个报错提示,大概意思是没有识别到 adb 程序。我们稍后就在 Settings 配置。
安装 adb,可看下面的《手动安装 adb》 教程
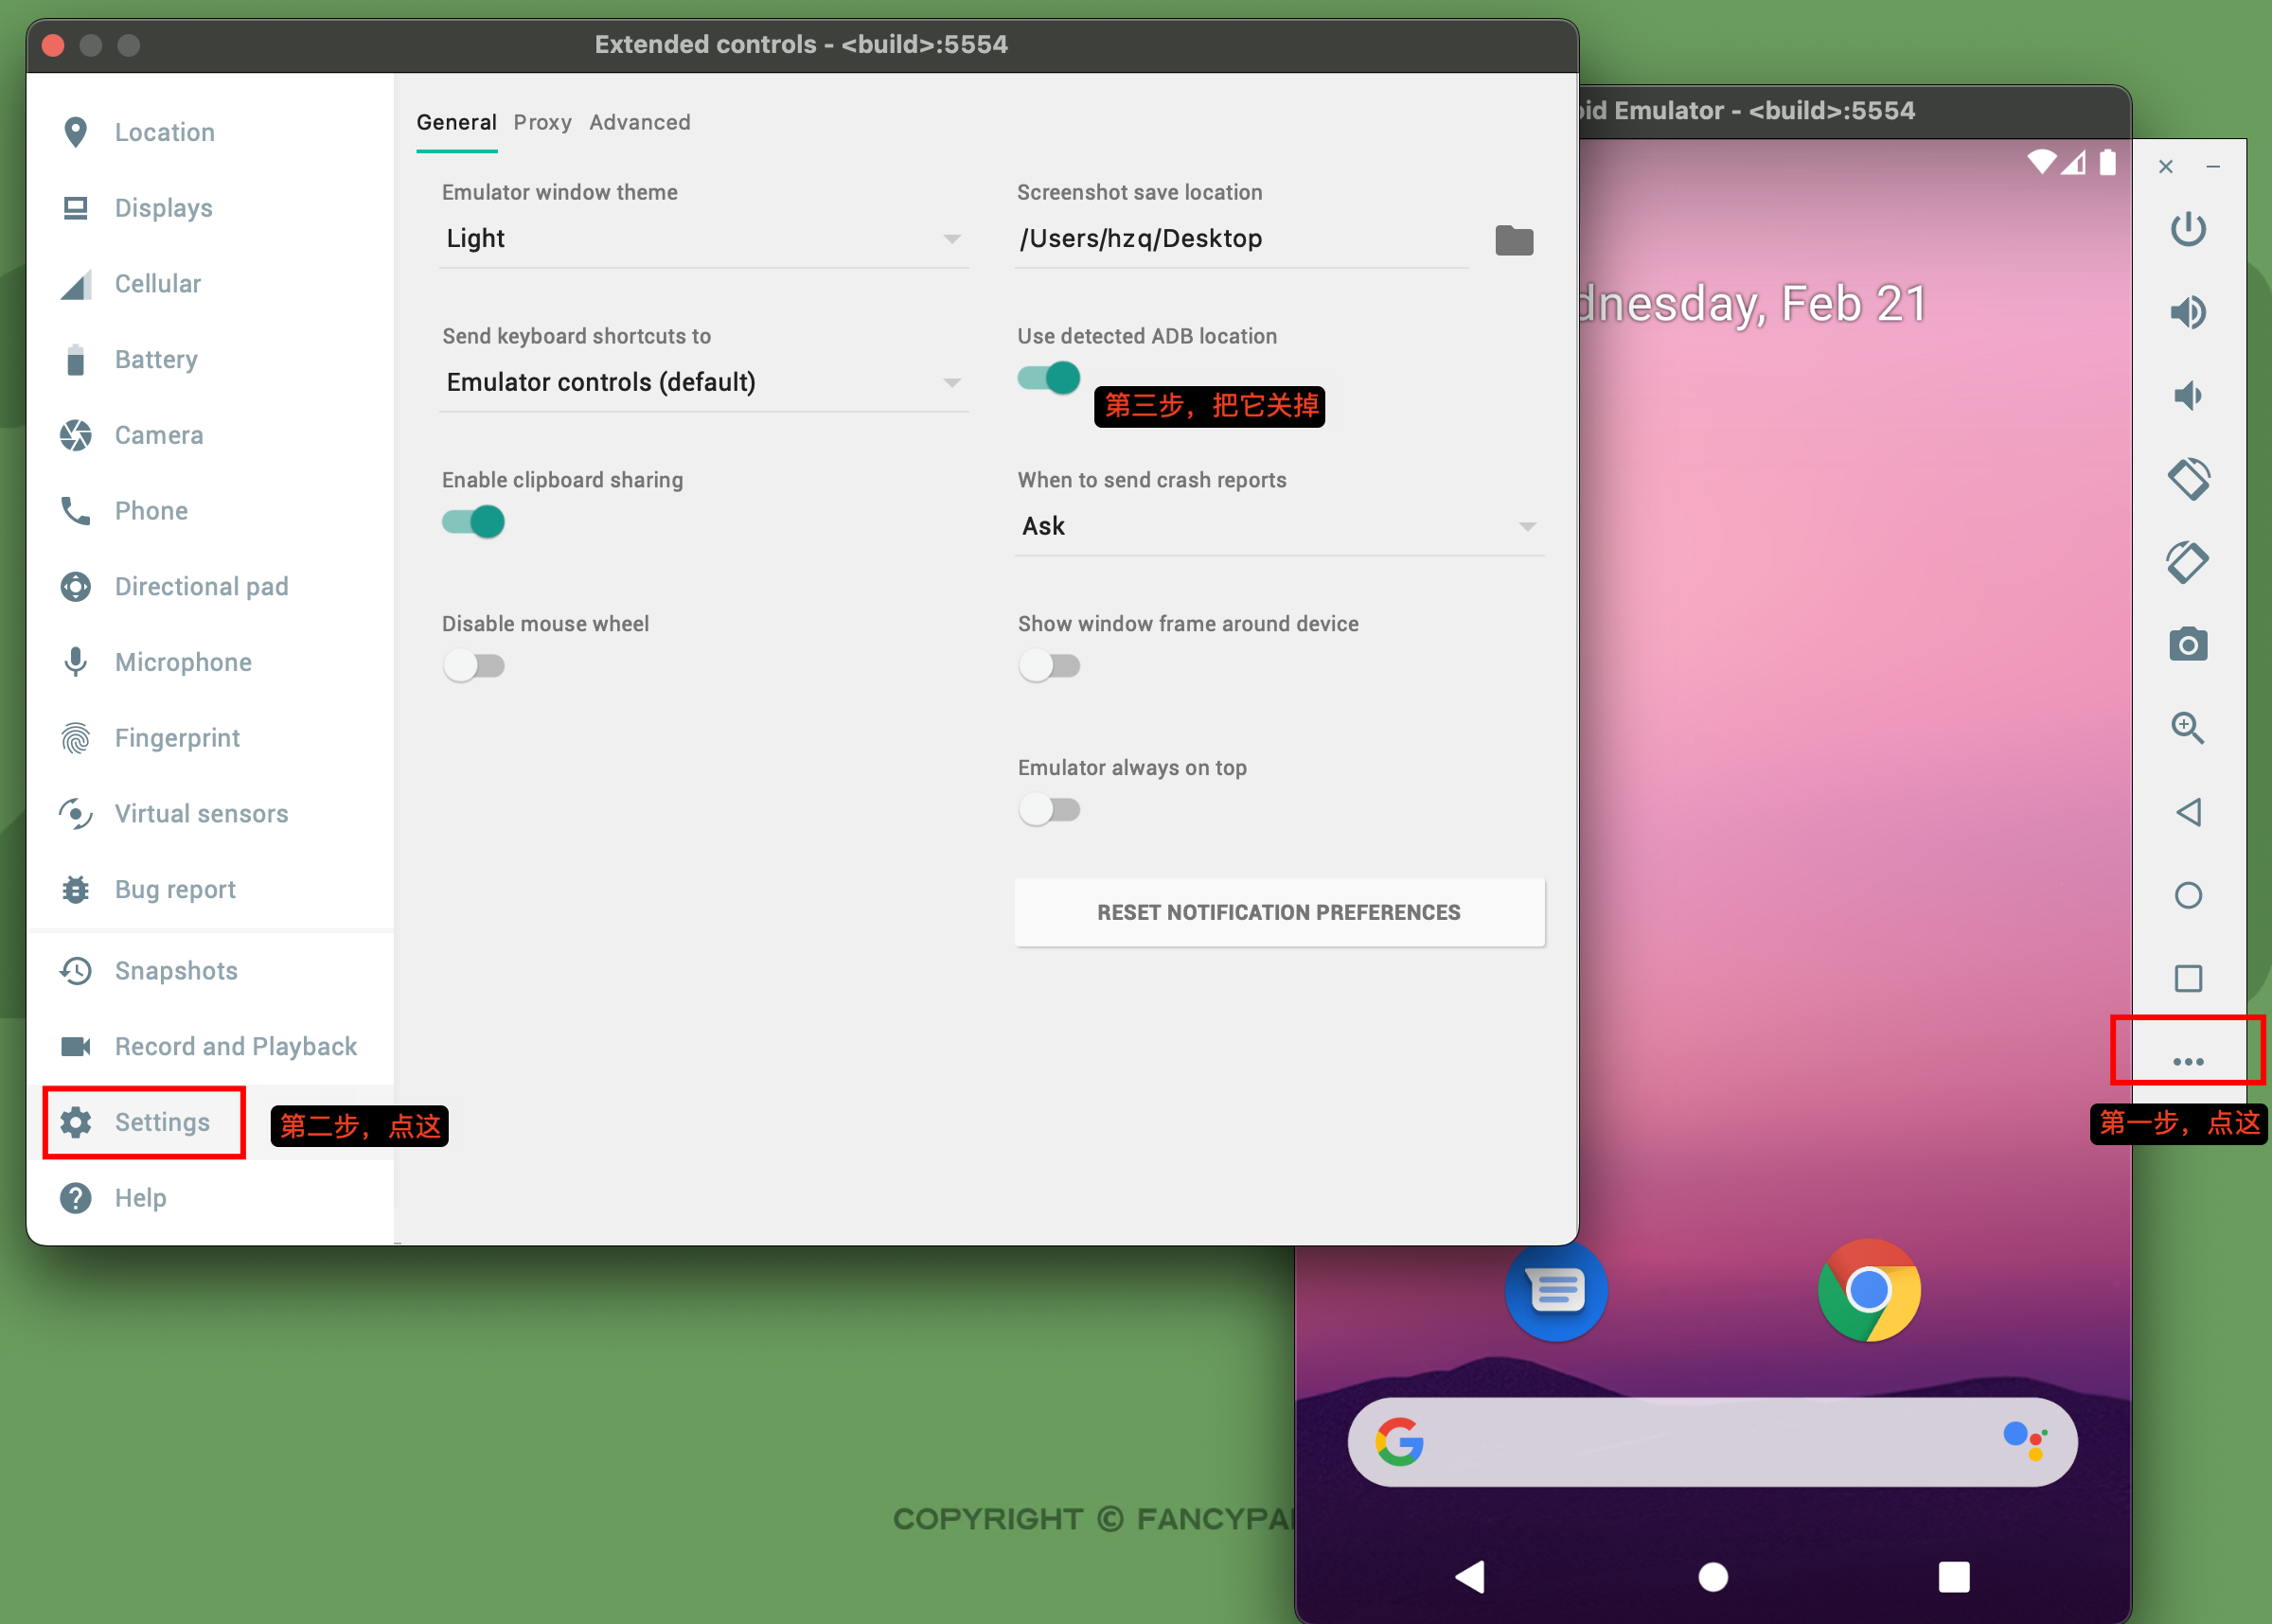
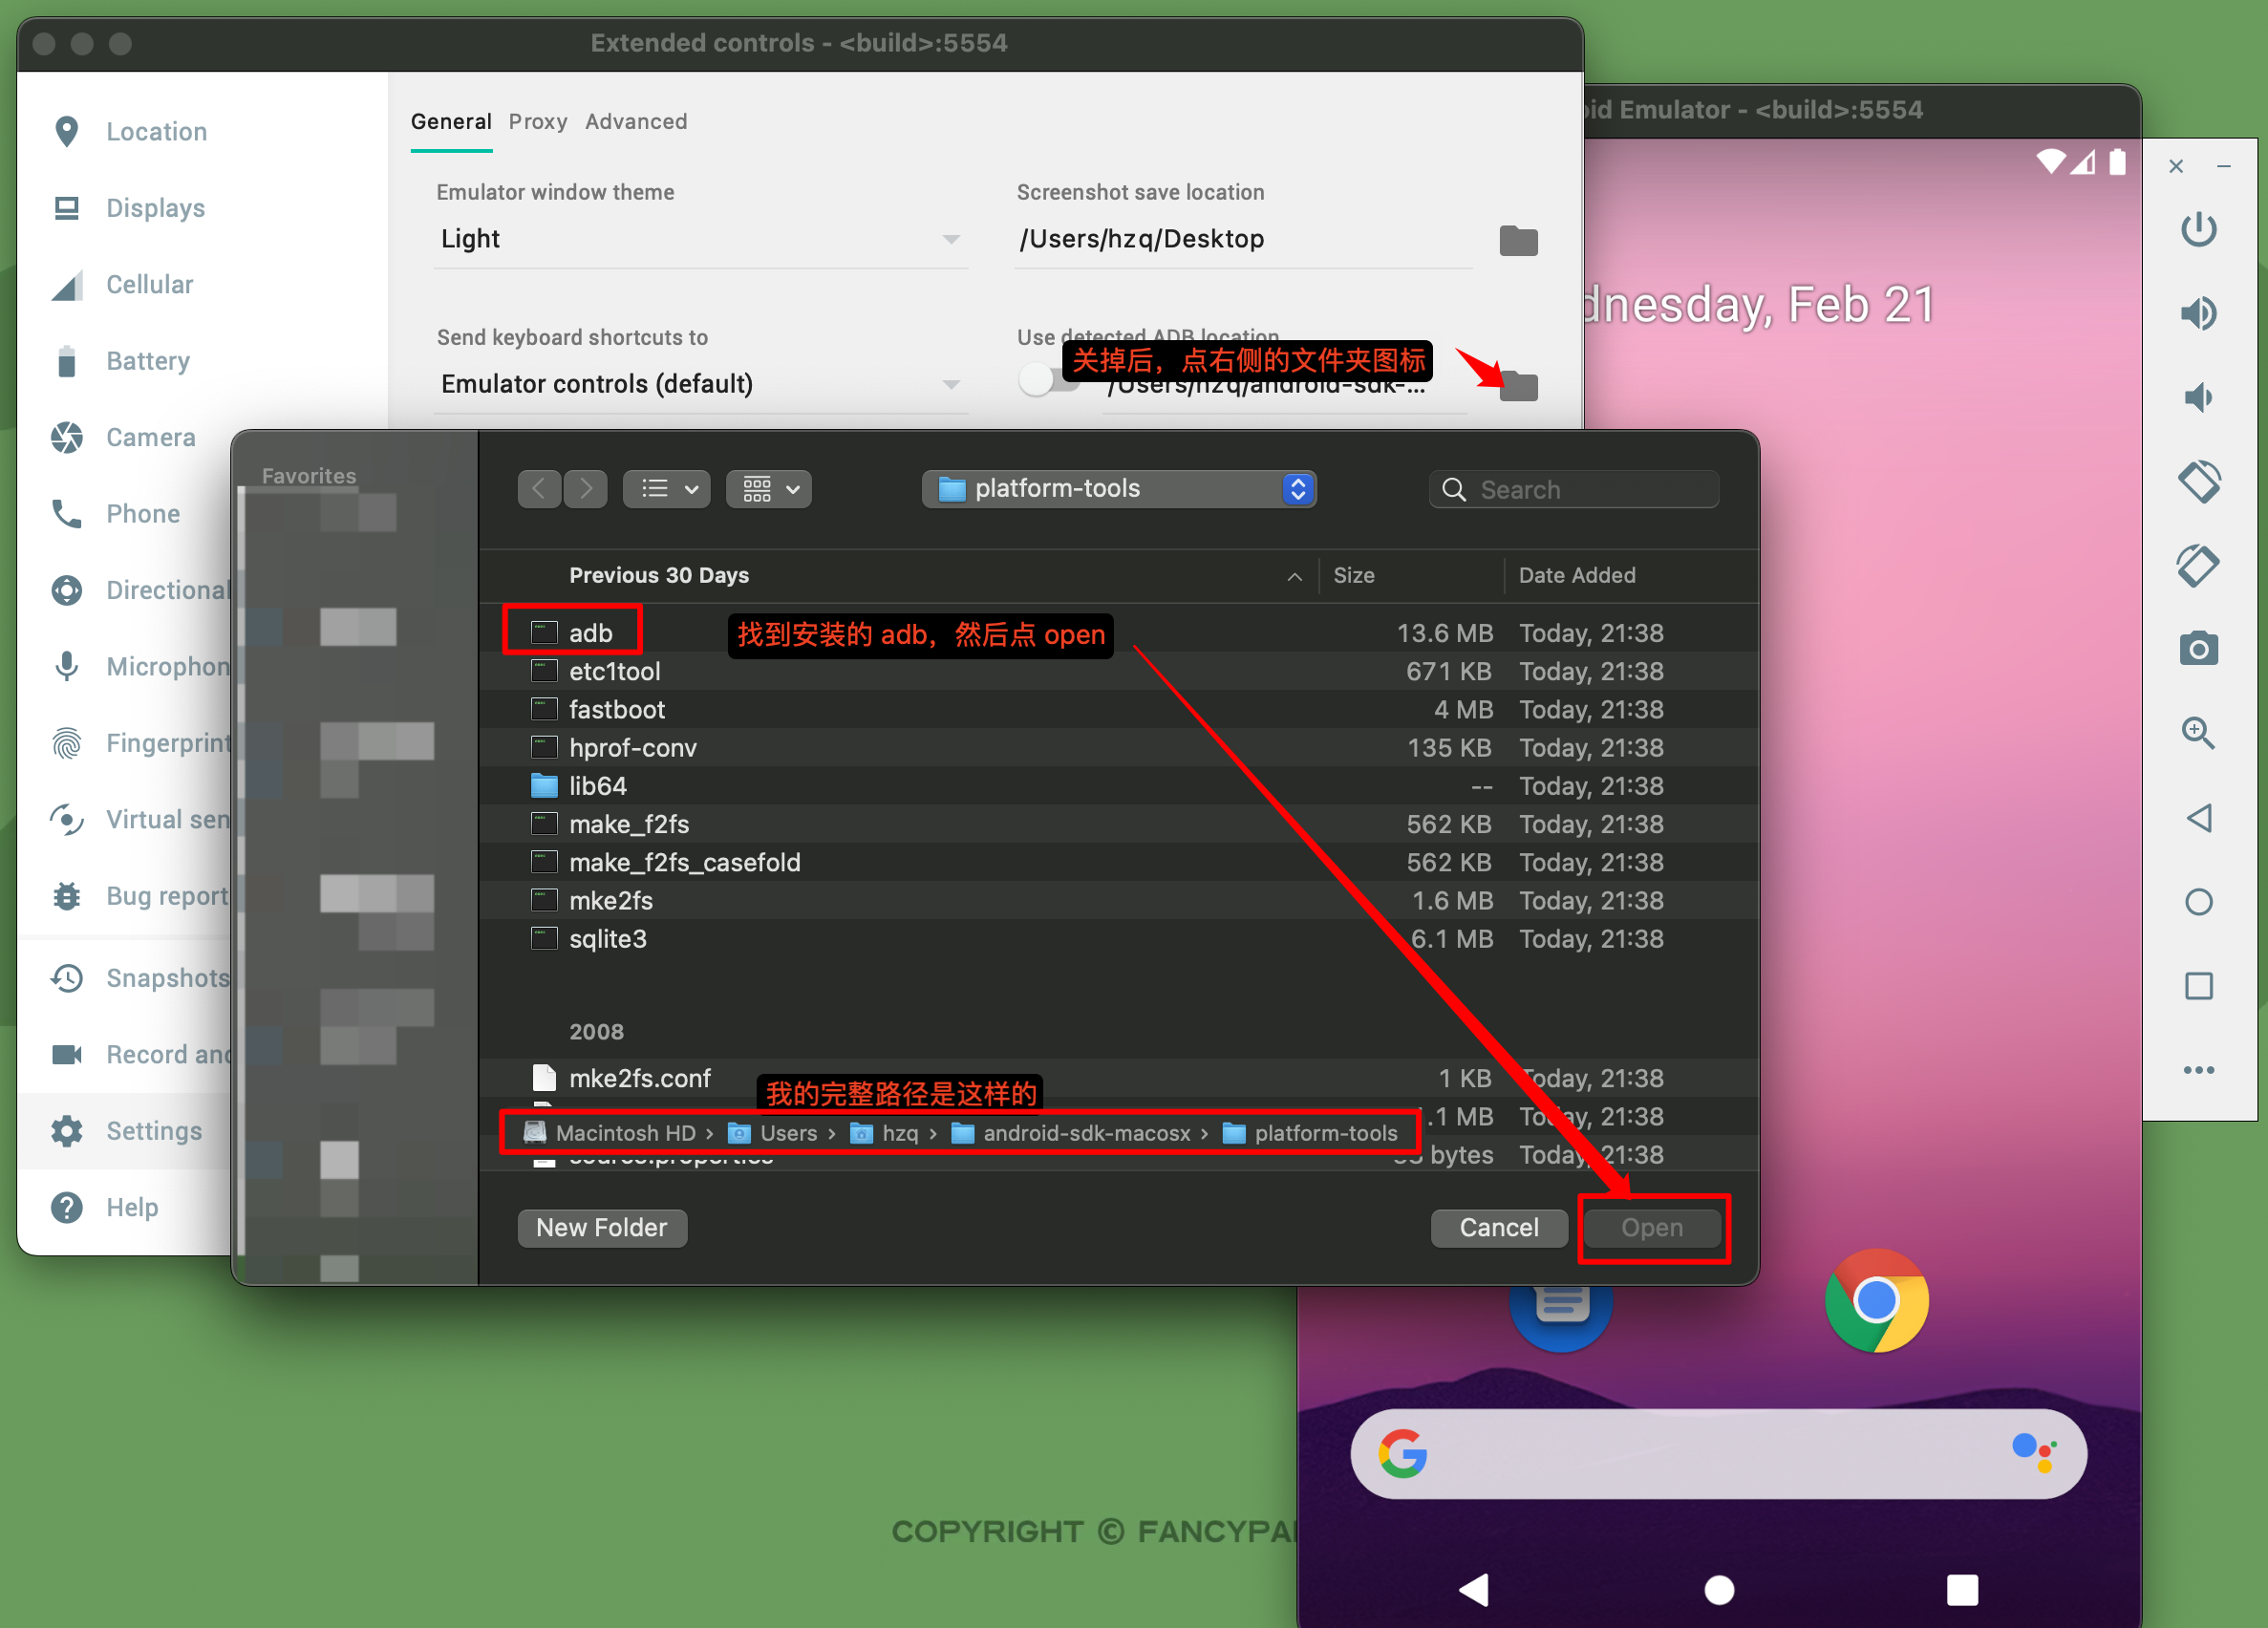
在 Android Emulator 内配置下
然后退出重启,就不会在报错了
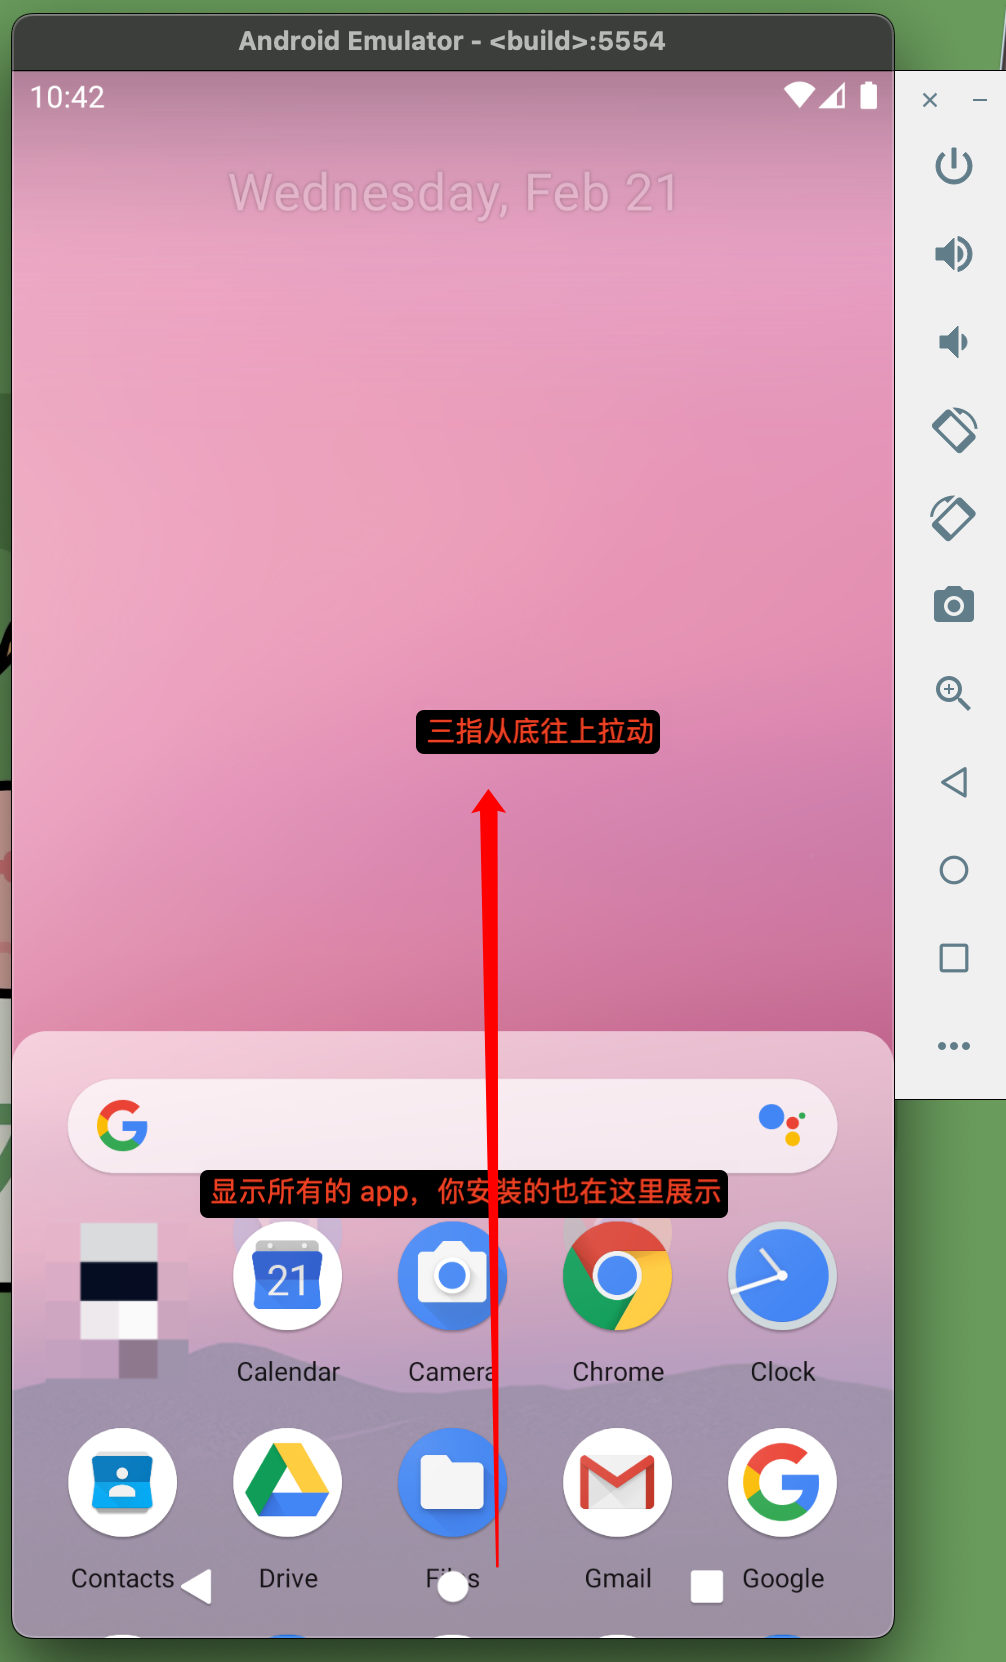
安装 apk
1 2 3 4 5 6 7 8 9 Users /xx/platform-tools/Users /xx/xx.apk Performing Streamed Install Success
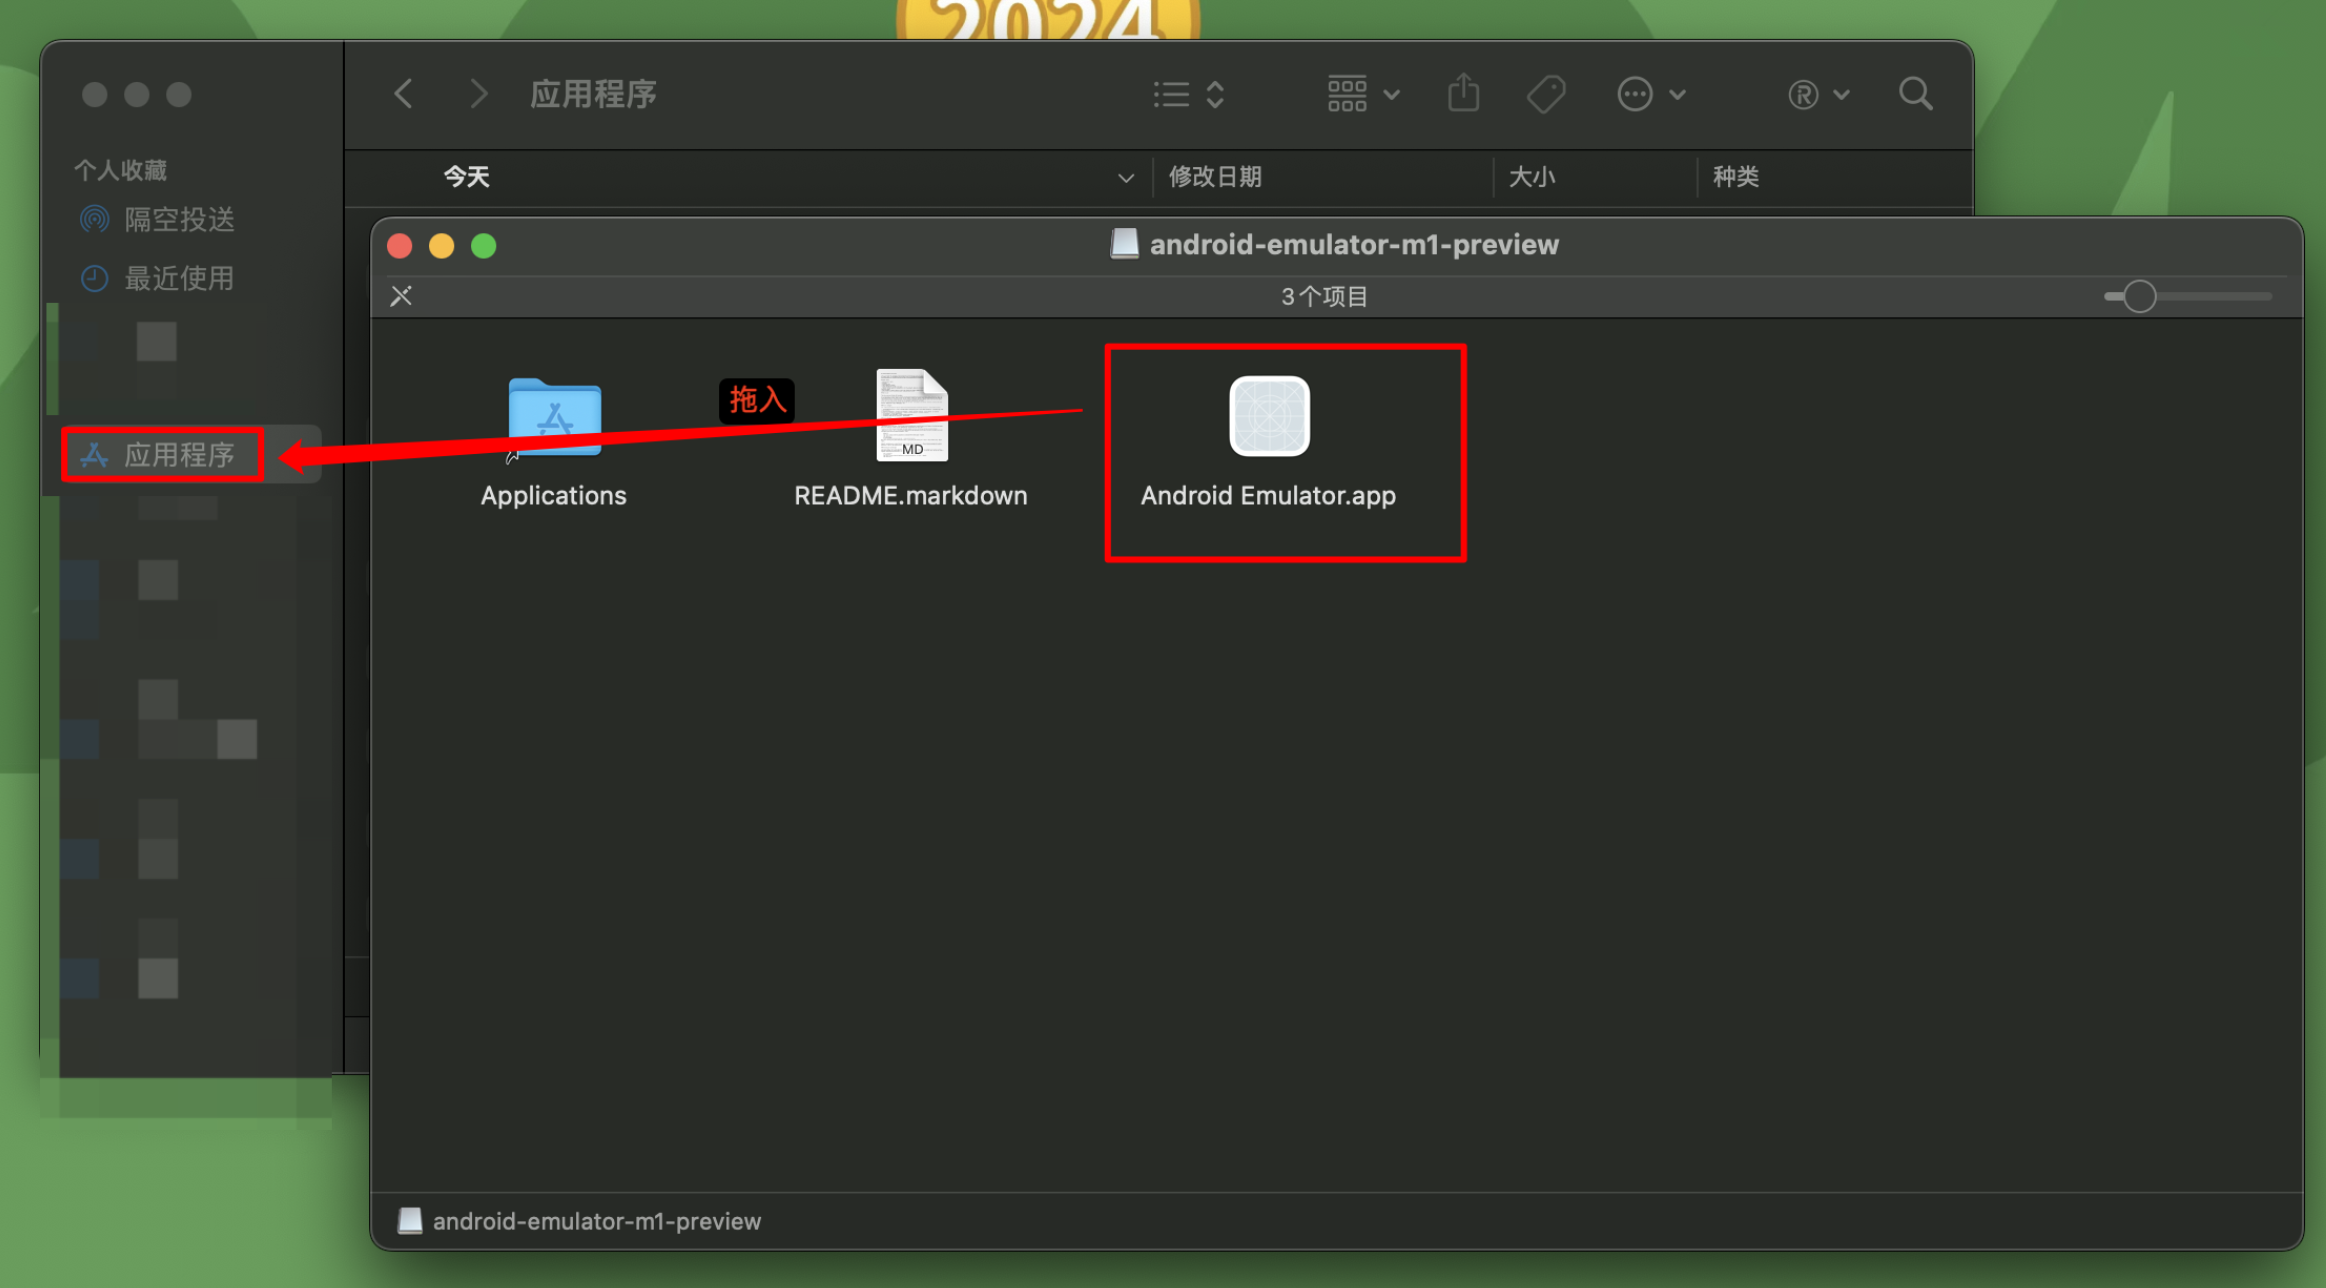
找到应用
手动安装 adb
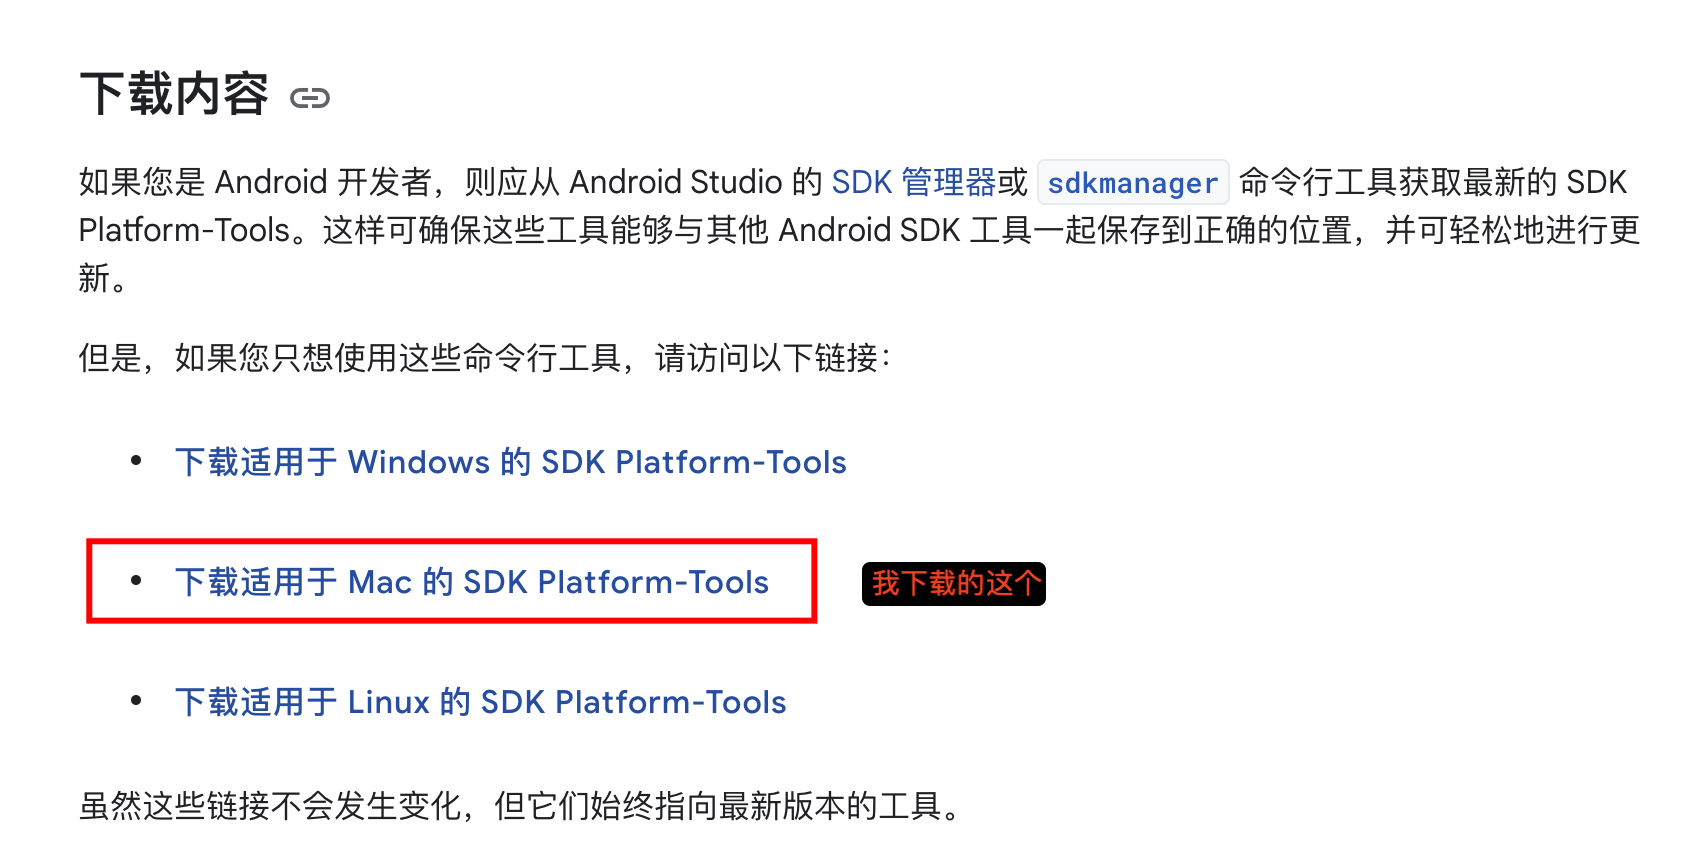
点这里 去下载对应平台的 Platform-Tools
下载后双击解压,生成platform-tools文件夹
打开命令行,运行下面的命令
1 2 3 4 5 /android-sdk-macosx/ platform-tools
添加 path 到环境变量中,命令行运行下面的命令
1 echo 'export PATH=$PATH:~/android-sdk-macosx/platform-tools/' >> ~/.bash_profile
重载 *_profile 文件,命令行运行下面的命令
测试 adb 命令,命令行运行下面的命令
打印如下结果,则安装成功
1
2
3
4
Android Debug Bridge version 1.0 .41 Version 35.0 .0 -11411520 Installed as /Users /hzq/android-sdk-macosx/platform-toolsRunning on Darwin 23.3 .0 (arm64)
像素 物理像素:设备屏幕的实际像素,不统一,跟设备本身有关
学习资料 30 天学 RN:https://github.com/fangwei716/30-days-of-react-native
一个比较大的 RN 实际项目:https://github.com/MarnoDev/react-native-eyepetizer
比较好的 RN 学习笔记:https://github.com/crazycodeboy/RNstudyNotes