本文最后更新于 2024-03-22T23:32:55+00:00
1、Mono 仓库搭建 Mono:单一;repo:repository 仓库为什么越来越多的项目选择 Monorepo? - 掘金
本次采用pnpm v7.30.3来搭建,node版本为v16.14.0
搭建步骤如下 所有带数字编号 的都是要操作的步骤哦
初始化工程
初始化并生成一个package.json文件
创建pnpm-workspace.yaml文件,并填入如下内容:
1 touch pnpm-workspace.yaml
1
2
packages: - "packages/**"
创建packages文件夹
创建apps、components、libs三个文件夹
1 mkdir packages/apps packages/components packages/libs
初始化apps下面的项目,react-master可任意取名
1 cd packages/apps && mkdir react-master && cd react-master && pnpm init && touch index.js
初始化libs下面的项目,react-test-utils可任意取名
1 cd ../../../ && cd packages/libs && mkdir react-test-utils && cd react-test-utils && pnpm init && touch index.js
在libs/react-test-utils/index.js内写如下代码:
1 export const getName = (console .log ('this is react-test-utils' )
npm 包的安装 项目全局安装 这样安装的包三个项目都可以使用,核心命令-w 或 --workspacepnpm add XXX -w,在项目根路径运行如下命令,将在当前文件创建node_modules
全局安装eslint
局部安装 将对应的包安装到对应的项目中去,核心命令--filter=packageNamepnpm add XXX --filter=packageName,在项目根路径运行如下命令,将在packageName创建node_modules
给apps/test-pro项目安装lodash(根目录运行)
1 pnpm add lodash --filter=react-master
PS:也可以 cd 到 test-pro 内,然后安装依赖 pnpm add lodash
内部安装 使用 Mono 形式后,支持互相作为 npm 包进行安装引用,语法跟局部安装一样pnpm add packageName1 --filter=packageName2,解释:将packageName1作为 npm 包安装到packageName2中
将libs/test-util安装到apps/test-pro内(根目录运行)
1 pnpm add react-test-utils --filter=react-master
以下是apps/react-test-pro/package.json,可以看到react-test-utils作为依赖成功被安装了
1 2 3 4 5 6 7 8 9 10 11 12 13 14 15 16 {"name" : "react-master" ,"version" : "1.0.0" ,"description" : "" ,"main" : "index.js" ,"scripts" : {"test" : "echo \"Error: no test specified\" && exit 1" "keywords" : [],"author" : "" ,"license" : "ISC" ,"dependencies" : {"lodash" : "^4.17.21" ,"react-test-utils" : "workspace:^1.0.0"
PS:若内部包名与外部(npm 上)包名重复,优先安装外部的,所以内部包名最好取的唯一一点
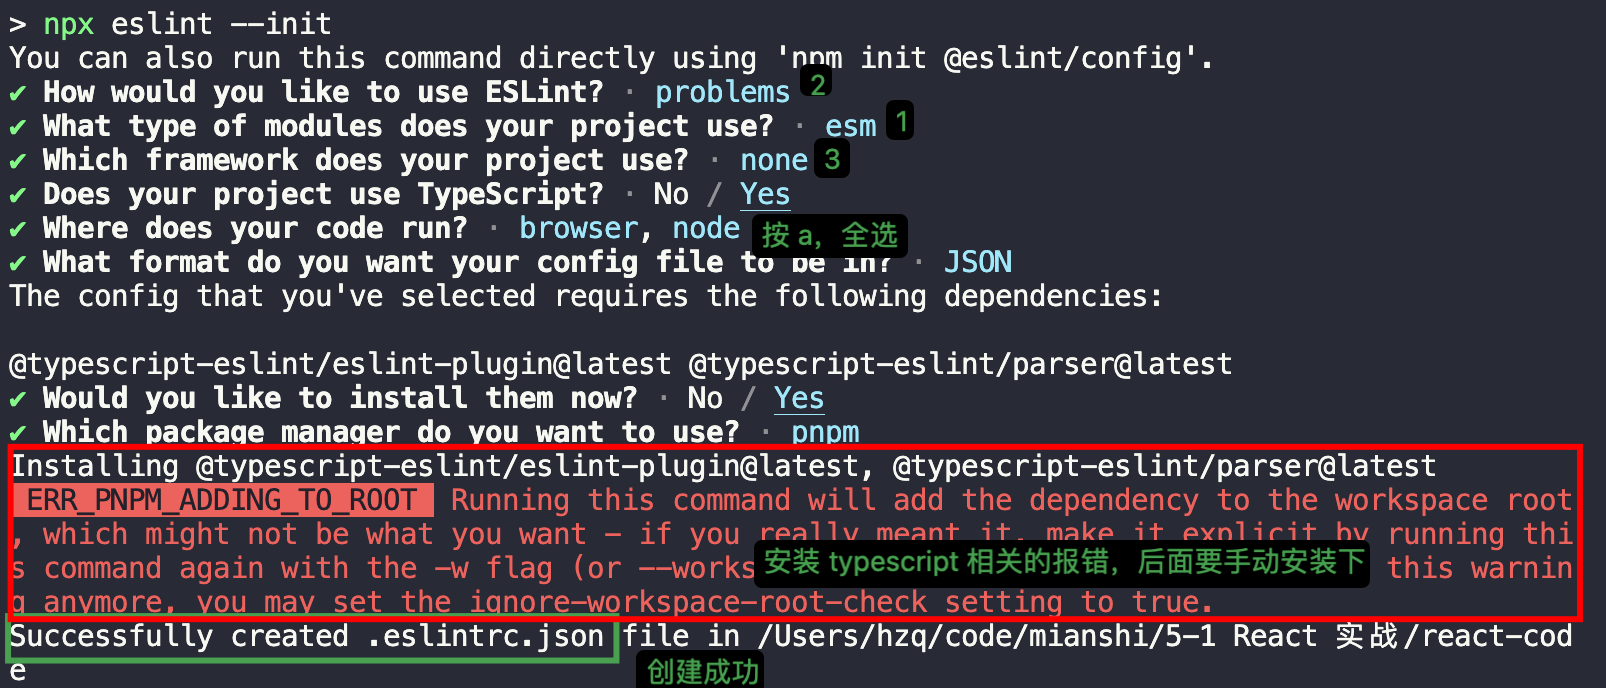
安装基础环境(根目录下) eslint 环境
eslint 检测代码错误的
根目录,运行:
根目录,手动安装(因为缺了 -w 所以上一步安装报警告)
1 pnpm add @typescript-eslint/eslint-plugin@latest @typescript-eslint/parser@latest -D -w
prettier 环境
prettier 处理代码风格的
根目录,运行:
根目录,新建.prettierrc.json文件
然后简单写如下配置,可以自行网上找更丰富的配置项
1 2 3 4 5 {"printWidth" : 80 ,"tabWidth" : 2 ,"useTabs" : true
安装对应的 vscode 插件,才能起作用哦
但prettier可能会和eslint其冲突,所以还要安装(根目录):
1 pnpm add eslint-plugin-prettier eslint-config-prettier -D -w
进入.eslintrc.json加上安装的插件
1 2 3 4 5 6 7 {"plugins" : ["@typescript-eslint" , "prettier" ],
安装 TypeScript
tsc、ts-loader、@babel/preset-typescript 的区别与使用
1、tsc:TypeScript 的官方编译器,将 TS 代码转为 JS 代码,并进行类型检查、支持 TS 泛型、枚举等转为 JS
使用:一般项目,不使用 tsc 生成代码,只让它做类型检查。
去进入项目packages/apps/react-master,命令行运行,创建 tsconfig.json 配置
会生成如下的配置:
1 2 3 4 5 6 7 8 9 10 11 12 13 14 15 16 17 18 19 20 21 22 23 24 25 26 27 28 29 30 31 32 33 34 35 36 37 38 39 40 41 42 43 44 45 46 47 48 49 50 51 52 53 54 55 56 57 58 59 60 61 62 63 64 65 66 67 68 69 70 71 72 73 74 75 76 77 78 79 80 81 82 83 84 85 86 87 88 89 90 91 92 93 94 95 96 97 98 99 100 101 102 103 104 105 106 107 108 109 {"compilerOptions" : {"target" : "es2016" ,"module" : "commonjs" ,"esModuleInterop" : true ,"forceConsistentCasingInFileNames" : true ,"strict" : true ,"skipLibCheck" : true
配置微调,调整完毕后如下:
1 2 3 4 5 6 7 8 9 10 11 12 13 14 15 16 17 18 19 20 21 22 23 24 25 26 27 28 29 30 31 32 33 34 35 36 37 38 39 40 41 42 43 44 45 46 47 48 49 50 51 52 53 54 55 56 57 58 59 60 61 62 63 64 65 66 67 68 69 70 71 72 73 74 75 76 77 78 79 80 81 82 83 84 85 86 87 88 89 90 91 92 93 94 95 96 97 98 99 100 101 102 103 104 105 106 107 108 109 110 111 112 113 114 115 {"compilerOptions" : {"target" : "es2016" ,"lib" : ["DOM" ,"DOM.Iterable" ,"ESNext" "jsx" : "react" ,"experimentalDecorators" : true ,"emitDecoratorMetadata" : true ,"module" : "ESNext" ,"moduleResolution" : "node" ,"resolveJsonModule" : true ,"allowJs" : true ,"noEmit" : true ,"isolatedModules" : true ,"allowSyntheticDefaultImports" : true ,"esModuleInterop" : true ,"forceConsistentCasingInFileNames" : true ,"strict" : true ,"skipLibCheck" : true "include" : ["./src/**/*" ],"exclude" : ["node_modules" , "dist" ]
react-master 项目配置 react-master 将作为 react 项目
删除/新建一些东西
react-master 目录下,删除 index.js
react-master 目录下,删除 package.json 下多余的 dependencies
1 pnpm remove lodash react-test-utils
react-master 目录下,创建src与index.tsx:
1 mkdir src && touch src/index.tsx
安装 Webpack、babel 等一系列环境
react-master 目录下,运行安装命令:
1 pnpm add webpack webpack-cli webpack-merge webpack-dev-server @babel/core @babel/preset-react @babel/preset-env @babel/preset-typescript babel-loader css-loader style-loader less less-loader postcss postcss-loader tailwindcss autoprefixer html-webpack-plugin css-minimizer-webpack-plugin terser-webpack-plugin mini-css-extract-plugin cross-env -D
安装的包归类:
1、webpack 类:webpack webpack-cli webpack-merge webpack-dev-server
通义千问的详细解释:
以下是这些 NPM 包的功能和用途的简要归类解释:
pnpm :
pnpm 是一个高效的 JavaScript 包管理器,采用了硬链接和内容寻址存储的方式来优化磁盘空间和缓存性能,特别适合在大型项目和 Monorepo 中使用。
webpack :
webpack 是一款流行的模块打包工具,负责将项目中的 JavaScript、CSS、图片等资源组织在一起,通过 loaders 和 plugins 处理和转换源文件,最终生成优化过的 bundle 文件。
webpack-cli :
webpack-cli 是 webpack 的命令行接口,提供了一系列命令用于与 webpack 交互,执行构建、配置、打包等任务。
webpack-merge :
webpack-merge 是一个用于合并 webpack 配置对象的工具,便于在不同环境(如开发、生产)间共享基础配置并叠加特定环境的配置。
webpack-dev-server :
webpack-dev-server 是一个小型的静态文件服务器,配合 webpack 使用,可以实现热模块替换(HMR)、自动刷新等功能,用于快速开发调试。
@babel/core :
Babel 核心包,用于转译 JavaScript 代码,支持 ES6+、JSX 等新的语言特性转换为旧版本 JavaScript。
@babel/preset-react :
Babel 预设,用于将 React 的 JSX 语法转换为标准的 JavaScript。
@babel/preset-env :
Babel 预设,根据目标环境自动应用兼容性 polyfill 和转换,使新版本 JavaScript 代码能在老版本浏览器运行。
@babel/preset-typescript :
Babel 预设,用于编译 TypeScript 代码为 JavaScript。
babel-loader :
webpack 加载器,用于配合 Babel 将源代码通过 Babel 转换后再传递给 webpack 进行打包。
css-loader :
webpack 加载器,用于处理 CSS 文件,支持导入和导出 CSS 语句。
style-loader :
webpack 加载器,将 CSS 代码插入到 JavaScript 中,通过动态样式标签注入到 DOM 中,实现 CSS 的实时加载。
less :
Less 是一种 CSS 预处理器,提供变量、嵌套、混合等高级功能。
less-loader :
webpack 加载器,用于将 Less 文件编译成 CSS。
postcss :
PostCSS 是一个 CSS 处理工具,支持一系列插件对 CSS 进行扩展和转换。
postcss-loader :
webpack 加载器,用于在 webpack 流程中运行 PostCSS。
tailwindcss :
一个实用的 CSS 框架,提供了一整套原子级实用类,用于快速构建自定义响应式界面。
autoprefixer :
PostCSS 的一个插件,自动为 CSS 添加 vendor 前缀,确保跨浏览器兼容性。
html-webpack-plugin :
生成 HTML 文件并自动引入打包后的 JavaScript 和 CSS 文件。
css-minimizer-webpack-plugin :
terser-webpack-plugin :
用于压缩 JavaScript 文件,是一个替代 UglifyJS 的 webpack 插件,提供了更好的 ES6+ 代码压缩能力。
mini-css-extract-plugin :
从 JavaScript 文件中提取 CSS 代码到单独的 CSS 文件中,有利于 CSS 文件的缓存和分离样式与脚本。
cross-env :
设置跨平台的环境变量,使得在 Windows、Unix 等不同操作系统上的环境变量设置变得简单。
安装 React 相关
react-master 目录下,运行安装命令:
1 pnpm add react react-dom react-router-dom @types/react @types/react-dom @types/react-router-dom
带来的思考:前端的方案 刚刚进行了react-master项目的配置,那从中可以思考下:前端的方案有哪些?
构建方案 构建关键词:bundle、chunk、module、channel
module: 构建的基本单元,从构建角度来说任何文件(.js/.css/.json 等)都是一个 Module,基于模块构建依赖关系chunk: 一般指中间产物,代表一组模块的集合,会根据模块的依赖关系生成 chunks。chunks 之后会被打进一个/多个 bundle 里面。比如通过代码分割(code splitting)功能来创建按需加载的代码块,会形成一个 chunksbundle: 一般指最终产物,比如:mian.xxx.js,它可能是把所有文件(js/css/图片等)合在一起形成的,浏览器可以直接加载它来运行应用程序channel: 一般跟 uri 挂钩,代表唯一的地址。
常用方案有:Bundled 与 BundlelessBundled :打包的最终产物为一个 js,典型工具:Webpack、RollupBundleless :几乎不打包,利用 ESM 进行加载使用,典型工具:Vite、Snowpack
工具/组件库还希望产物有目录结构,比如下面这种结构:
1
2
3
4
5
6
Button js css Card js css
实际使用:
CSS 方案
比如:css 如何隔离的?
css in js 方案 有个库:@emotion
1
2
3
4
5
6
7
8
9
10
11
12
13
14
15
import { css } from '@emotion' const color = 'white' render (<div className ={ css ` padding: 32px ; margin-left: 10px ; font-size: 12px ; ` }> hello world! </div >
styled-component 方案 本质还是 css in js
1
2
3
4
5
6
7
8
9
10
11
12
13
14
15
16
17
18
import styled from 'styled-components' ;const Button = styled.button ` background-color: ${props => props.primary ? 'blue' : 'grey' } ; color: white; font-size: 1em; padding: 0.5em 1em; border: none; border-radius: 3px; ` ;function MyComponent (return (<Button primary ={true} > Click me</Button >
css module 方案 通过 Webpack 的 css-loader 配置,在编译阶段转换 CSS 类名,将其变为唯一的、局部作用域的类名。
1 2 3 4 5 6 7 8 9 10 11 12 13 14 15 16 17 18 19 20 21 22 23 24 25 26 27 28 29 30 31 32 title {color : silver;description {composes : baseText from './base.module.css' ;size : 14px;export {baseText : base-text;base -text {color : black;family : Arial , sans-serif;import React from 'react' ;import styles from './styles.module.css' ;function MyComponent (return (<div > <h1 className ={styles.title} > Title</h1 > <p className ={styles.description} > Description text</p > </div >
bem 规范:block-element_modifier css 命名规范化
utility-css 方案 提供原子化类名,灵活、可复用、易于定制。(写多了就能记住了)
1
2
3
4
<div class ="flex flex-row items-center justify-between bg-gray-200 rounded-lg" ><h1 class ="text-xl font-bold" > Title</h1 > <button class ="btn btn-primary" > Button</button >
组件库方案
一般用第三方组件库
headless 组件库 vs styled 组件库
实际场景:公司设计与主流组件库差别大,可以选 headless ui + tailwindcss + css module
状态方案 Zustand、Solid、Redux、mobx
微前端方案 iframe、Web Components、Module Federation(模块联邦)微前端时代:打造高效、灵活的前端开发体系
安装 headless ui、图标库
安装 headless ui、图标库
1 pnpm add @headlessui/react @heroicons/react
手动配置 Webpack 我们会配置三个:
react-master 目录下,创建这三个文件
1 mkdir scripts && touch scripts/webpack.dev .js && touch scripts/webpack.prod .js && touch scripts/webpack.base .js
更改 package.json,加上 build、start 命令
1 2 3 4 5 6 7 8 9 10 11 12 13 {"name" : "react-master" ,"version" : "1.0.0" ,"description" : "" ,"main" : "index.js" ,"scripts" : {"test" : "echo \"Error: no test specified\" && exit 1" ,"build" : "webpack --config scripts/webpack.prod.js" , "start" : "webpack-dev-server --config scripts/webpack.dev.js"
手写webpack.base.js
1
2
3
4
5
6
7
8
9
10
11
12
13
14
15
16
17
18
19
20
21
22
23
24
25
26
27
28
29
30
31
32
33
34
35
36
37
38
39
40
41
42
43
44
45
46
47
48
49
50
51
52
53
54
55
56
57
58
59
60
61
62
63
64
65
66
67
68
69
70
71
72
73
74
75
76
77
78
79
80
81
82
83
84
85
86
87
88
89
90
91
92
93
94
95
96
97
98
99
100
101
102
103
104
105
106
107
108
109
110
111
112
113
114
115
116
117
118
119
120
121
122
123
124
125
126
127
128
129
130
131
132
133
134
135
136
137
138
const path = require ("path" );const MiniCssExtractPlugin = require ("mini-css-extract-plugin" );const HtmlWebpackPlugin = require ("html-webpack-plugin" );module .exports = function (isDev ) {return {entry : path.resolve (__dirname, "../src/index.tsx" ),output : {path : path.resolve (__dirname, "../dist" ),filename : "static/js/[name]/[hash:8].js" ,clean : true ,publicPath : "/" ,resolve : {extensions : [".tsx" , ".ts" , ".jsx" , ".js" ], module : {rules : [test : /\.(tsx|ts)$/ ,use : {loader : "babel-loader" , oneOf : [test : /\.css$/ , use : ["style-loader" : MiniCssExtractPlugin .loader ,"css-loader" , "postcss-loader" , test : /\.module\.(css|less)$/ ,include : [path.resolve (__dirname, "../src" )], use : ["style-loader" : MiniCssExtractPlugin .loader ,loader : "css-loader" ,options : {modules : {localIdentName : "[path][name]__[local]--[hash:base64:5]" ,"postcss-loader" ,"less-loader" ,test : /\.less$/ , use : ["style-loader" : MiniCssExtractPlugin .loader ,"css-loader" ,"postcss-loader" ,"less-loader" ,test : /\.(png|jpg|jpeg|gif|svg)$/ ,generator : {filename : "static/images/[name].[contenthash:8][ext]" ,test : /\.(woff2?|eot|ttf|otf)$/ ,generator : {filename : "static/fonts/[name].[contenthash:8][ext]" ,test : /\.(mp4|map3|flv|wav)$/ ,generator : {filename : "static/media/[name].[contenthash:8][ext]" ,plugins : [new HtmlWebpackPlugin ({template : path.resolve (__dirname, "../public/index.html" ),inject : true ,new MiniCssExtractPlugin ({filename : isDev"static/css/[name].css" "static/css/[name].[contenthash:4].css" ,
手动配置babel
1
2
3
4
5
6
7
8
9
touch .babelrc "presets" : ["@babel/preset-react" , "@babel/preset-typescript"
手动配置postcss
1
2
3
4
5
6
7
8
9
10
touch .postcssrc .js module .exports = {plugins : ["autoprefixer" , "tailwindcss" ,
手写public/index.html
1
2
3
4
5
6
7
8
9
10
11
12
13
14
15
mkdir public && touch public/index.html <html lang ="en" > <head > <meta charset ="UTF-8" /> <meta name ="viewport" content ="width=device-width, initial-scale=1.0" /> <title > React Master</title > </head > <body > <div id ="app" > </div > </body > </html >
手写webpack.prod.js
1
2
3
4
5
6
7
8
9
10
11
12
13
14
15
16
17
18
19
20
21
22
23
24
25
26
27
28
29
30
31
32
33
34
35
36
37
38
39
40
41
42
43
44
45
46
47
48
49
50
51
52
53
const { merge } = require ("webpack-merge" );const CssMinimizerPlugin = require ("css-minimizer-webpack-plugin" );const TerserPlugin = require ("terser-webpack-plugin" );const baseConfig = require ("./webpack.base" );module .exports = merge (baseConfig (), {mode : "production" ,optimization : {minimizer : [new CssMinimizerPlugin (),new TerserPlugin ({parallel : true ,terserOptions : {compress : {pure_funcs : ["console.log" , "console.warn" ], splitChunks : {cacheGroups : {vendors : {name : "vendors" ,test : /node_modules/ ,commoms : {name : "commons" ,
手撸入口页面,进入react-master/src/index.tsx,写如下代码
1
2
3
4
5
6
7
import ReactDom from 'react-dom' import React from 'react' import App from './app' ReactDom .createRoot (document .getElementById ('app' ) as Element ).render (<App />
创建app.tsx
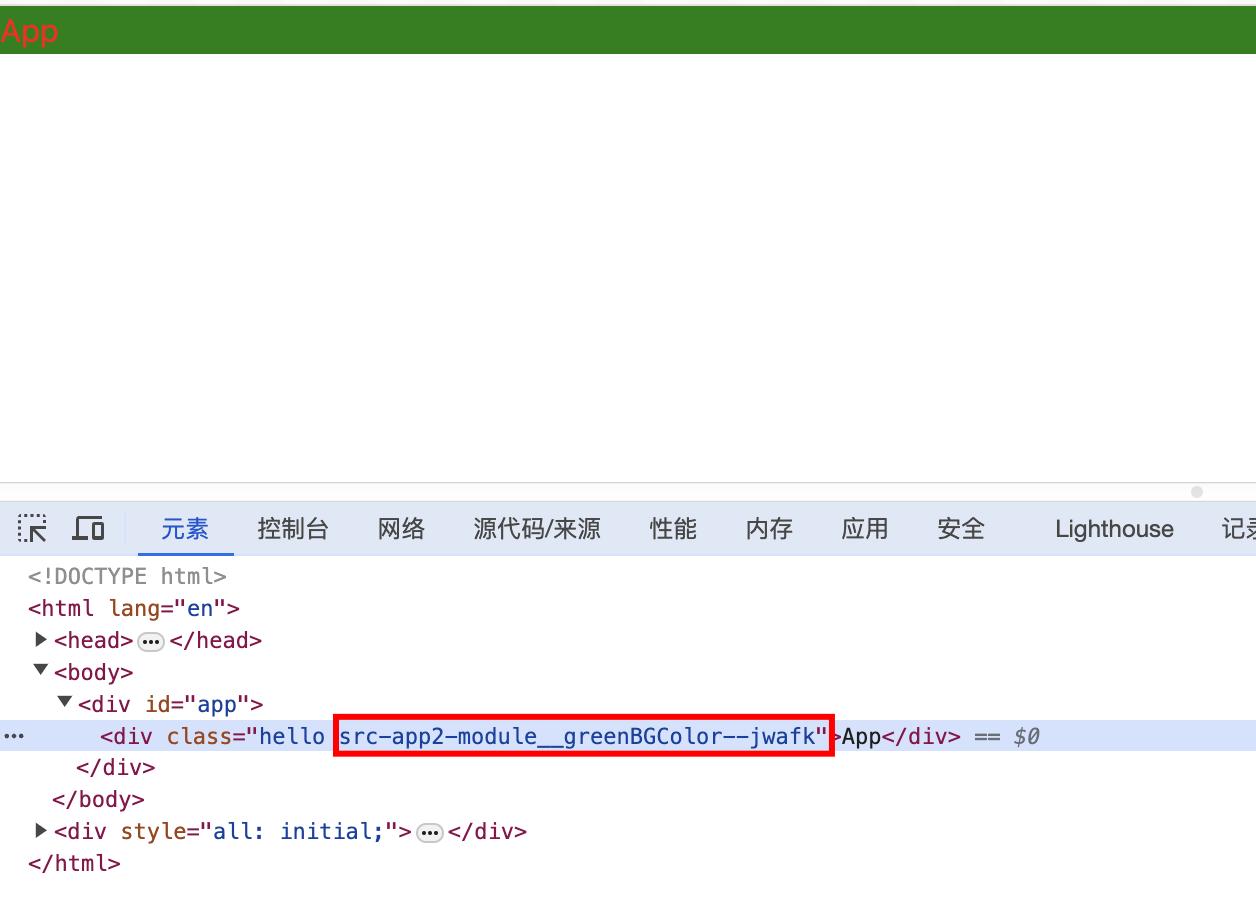
1
2
3
4
5
6
7
8
9
10
11
12
touch src/app.tsx import React from "react" ;import "./app.css" ;import styles from "./app2.module.less" ;Props = {};export default function App ({}: Props ) {return <div className ={ `hello ${styles.greenBGColor }`}> App</div >
创建app.css
1
2
3
4
5
6
touch src/app.css hello {color : red
创建app2.module.less
1
2
3
4
5
6
touch src/app2.module .less greenBGColor {color : green;
创建golbal.d.ts
1
2
3
4
5
touch src/golbal.d .ts module "*.module.less" ;module "*.module.css" ;
运行打包
打包成功后,可以看到对应的dist文件,然后在 dist/index.html 里面改下路径
1
2
3
4
5
6
<script defer="defer" src="/static/js/main/8aa22f5b.js" ></script><link href ="/static/css/main.2609.css" rel ="stylesheet" /> <script defer ="defer" src ="./static/js/main/8aa22f5b.js" > </script > <link href ="./static/css/main.2609.css" rel ="stylesheet" />
然后用浏览器打开dist/index.html,就能看到页面正常渲染了
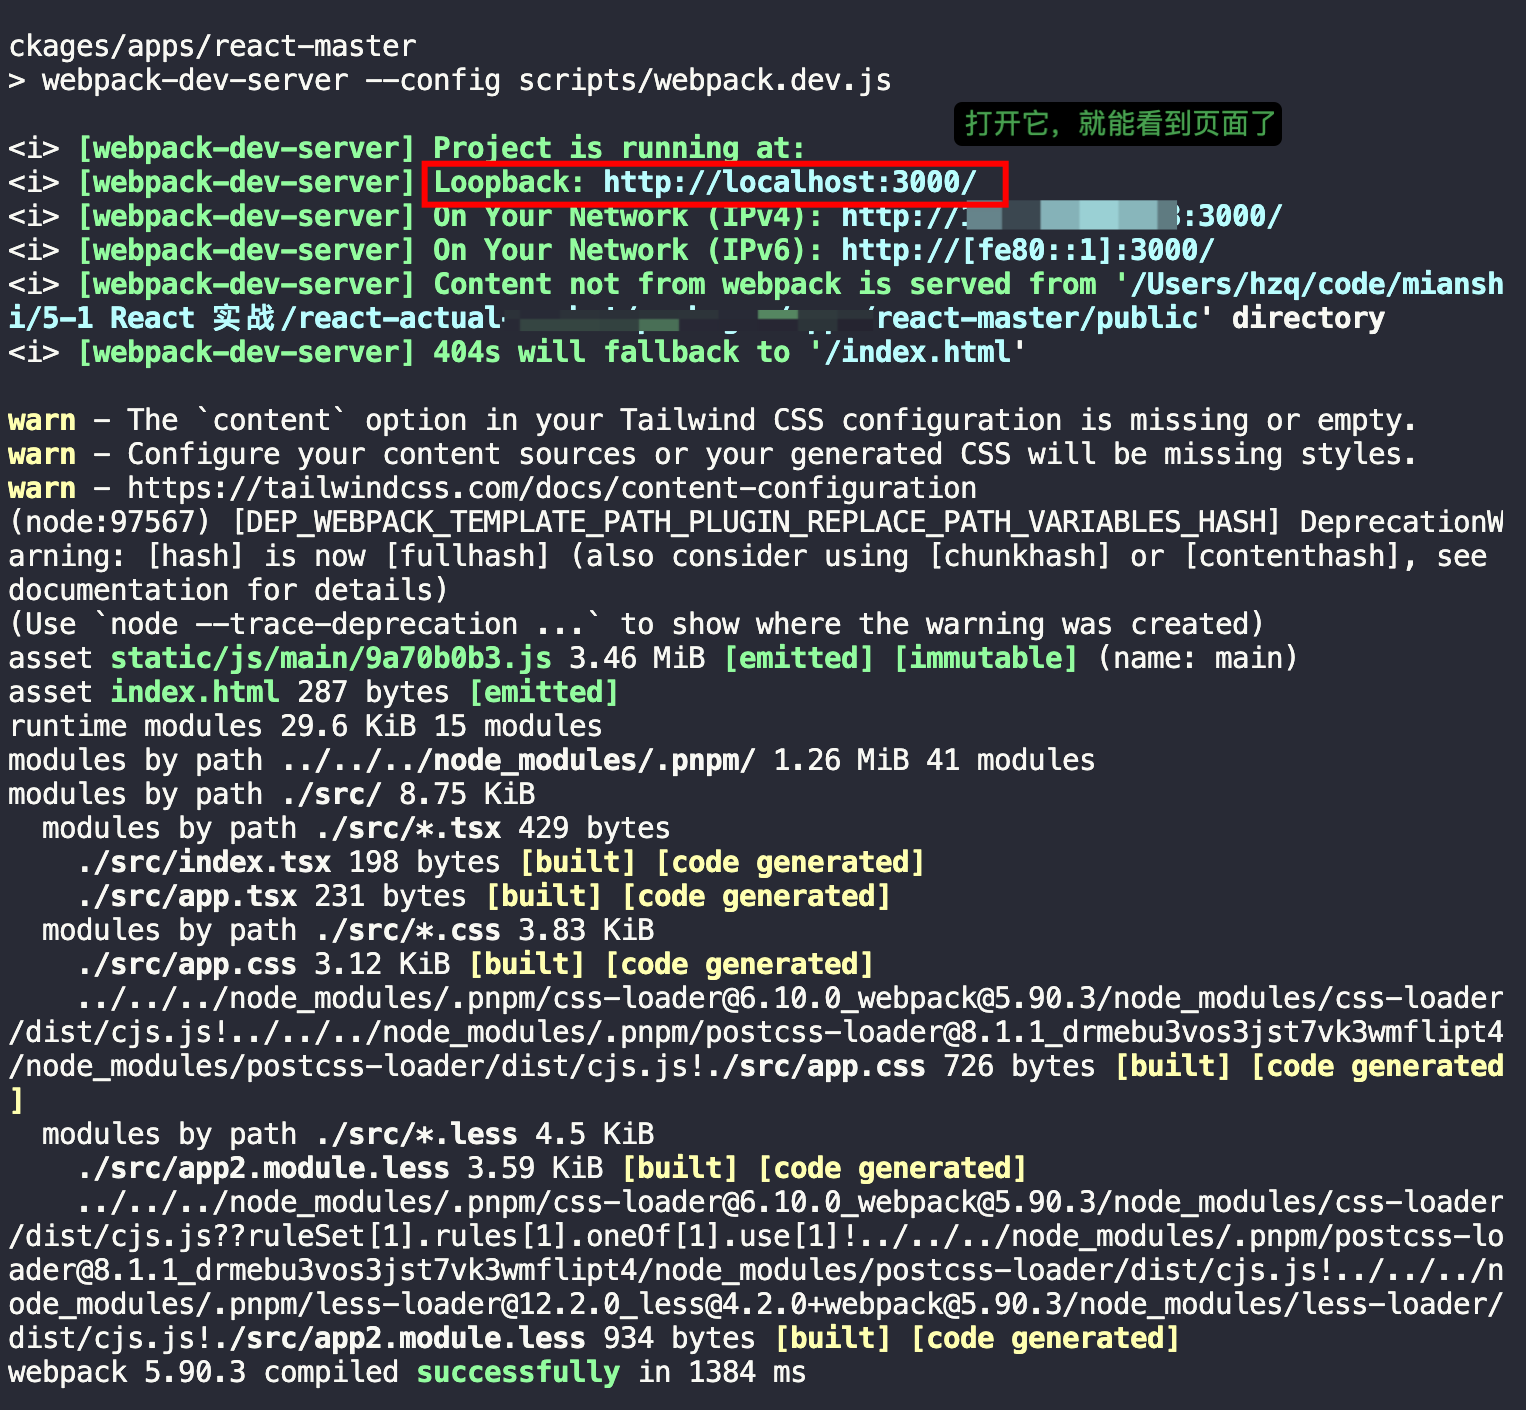
手写webpack.dev.js
1
2
3
4
5
6
7
8
9
10
11
12
13
14
15
16
17
18
19
20
21
22
23
24
25
26
27
const { merge } = require ("webpack-merge" );const path = require ("path" );const baseConfig = require ("./webpack.base" );module .exports = merge (baseConfig (true ), {mode : "development" ,devtool : "eval-cheap-module-source-map" ,devServer : {port : 3000 ,compress : false , hot : true , historyApiFallback : true , static : {directory : path.resolve (__dirname, "../public" ),
本地启动运行
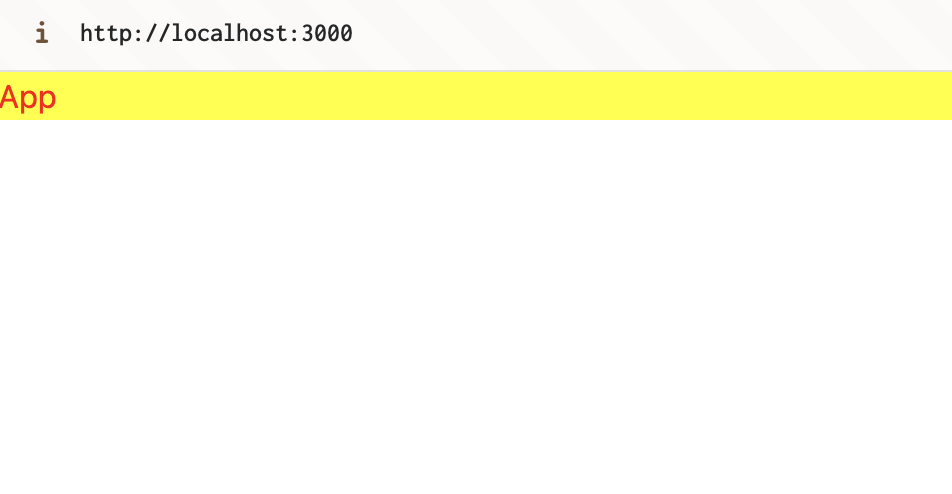
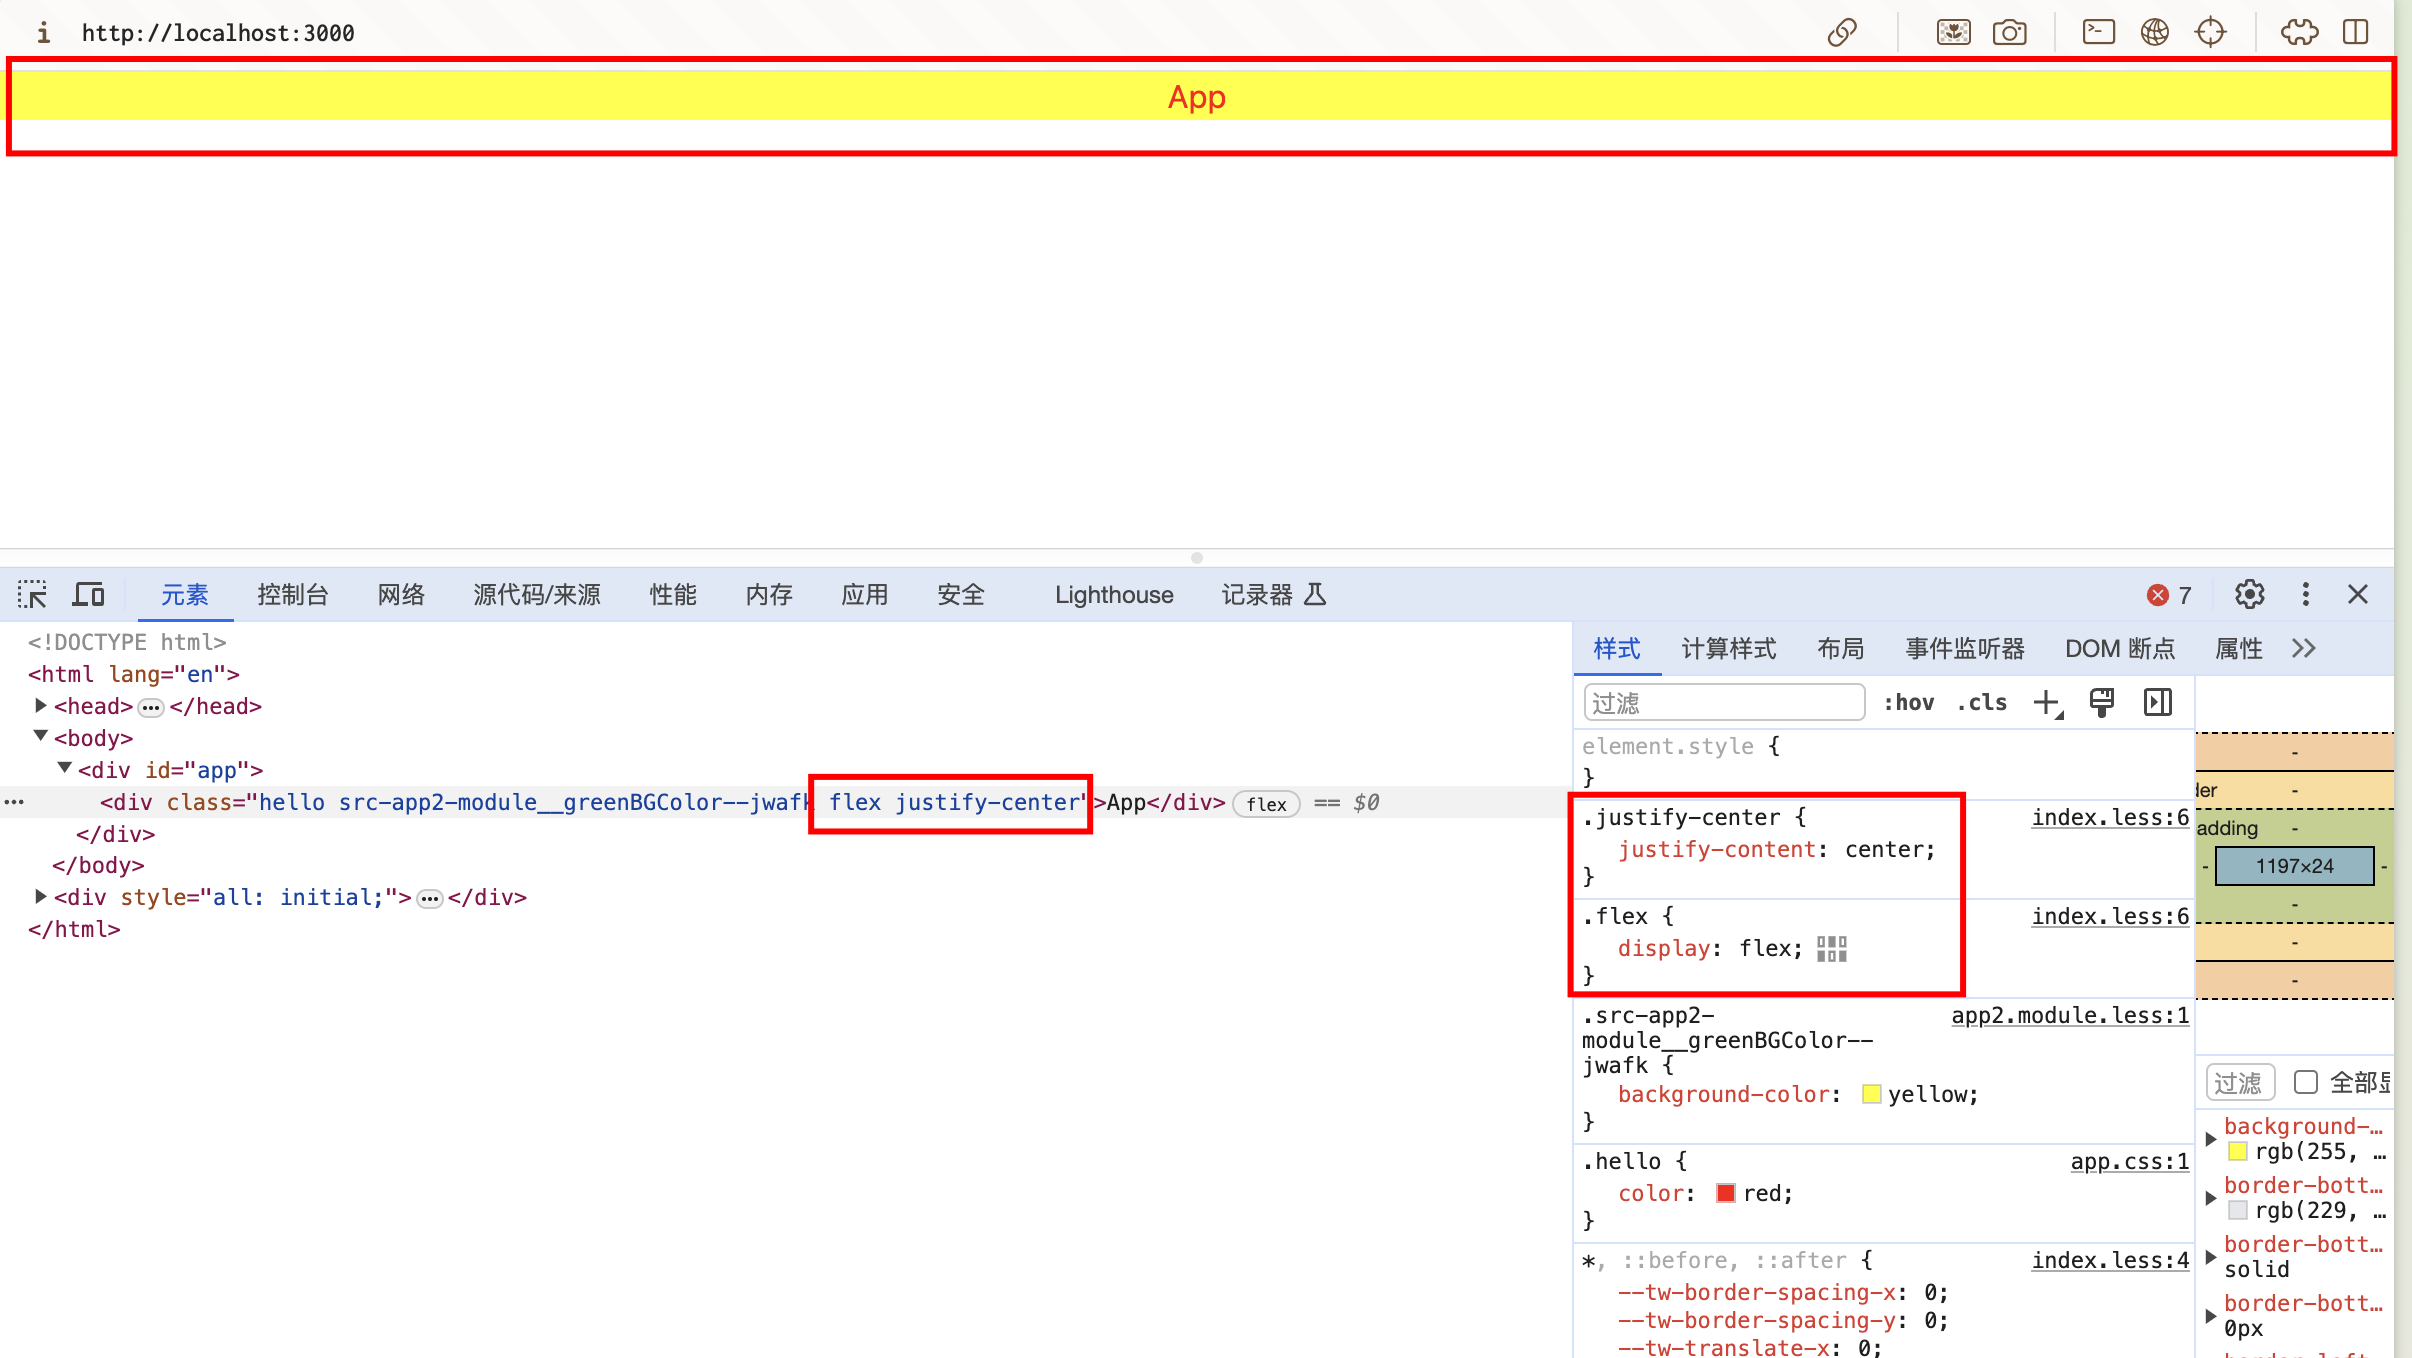
浏览器打开 http://localhost:3000/ ,然后更改代码(背景色改为黄色)保存下,页面也会热更新
tailwindcss 配置
安装 vscode 插件,便于代码提示
初始化,生成tailwind.config.js文件
更改完善tailwind.config.js文件,改为如下:
1 2 3 4 5 6 7 8 module .exports = {content : ["./src/**/*.{tsx,ts,jsx,js}" ],theme : {extend : {},plugins : [],
新增index.less,并完善
1
2
3
4
5
6
7
8
9
10
11
touch src/index.less
在index.tsx引入index.less
1
2
3
4
5
6
7
8
import ReactDOM from "react-dom/client" ;import React from "react" ;import App from "./app" ;import "./index.less" ; ReactDOM .createRoot (document .getElementById ("app" ) as Element ).render (<App />
在app.tsx使用一些原子 css
1
2
3
4
5
6
7
8
9
10
11
12
13
14
import React from "react" ;import "./app.css" ;import styles from "./app2.module.less" ;Props = {};export default function App ({}: Props ) {return (<div className ={ `hello ${styles.greenBGColor } flex justify-center `}> // +++++ App </div >
重新 start 下,效果如下:
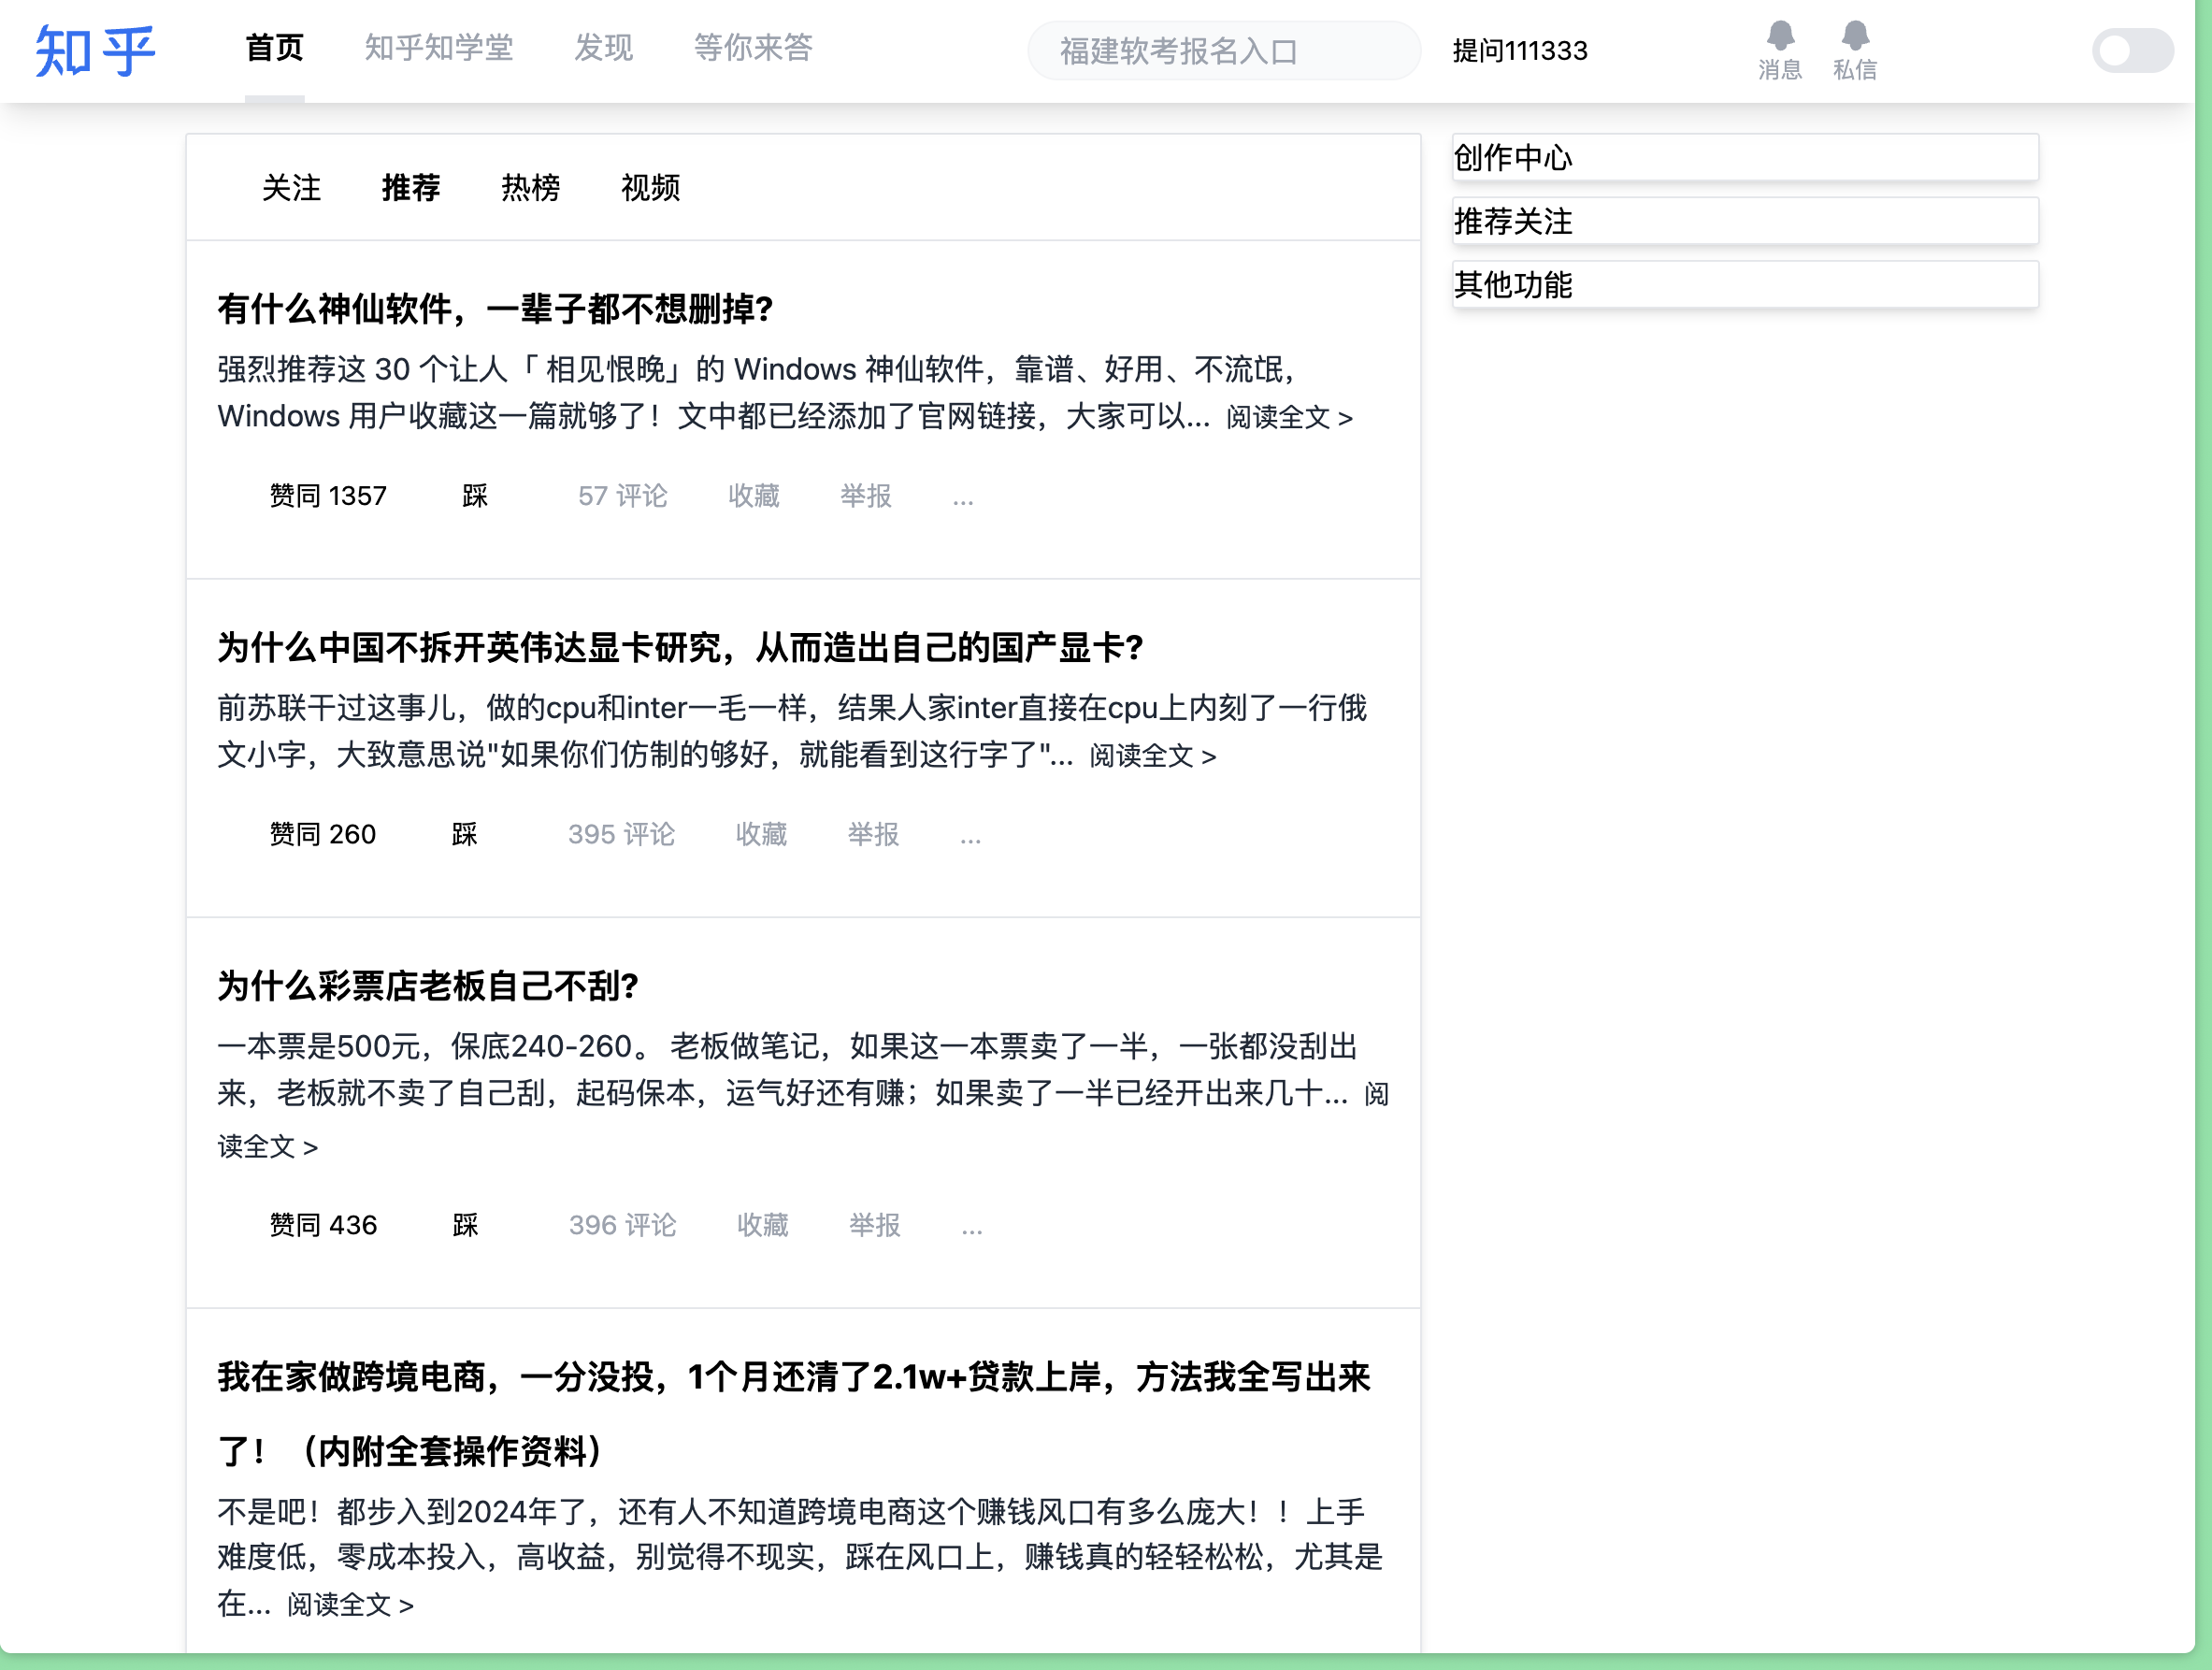
2、项目开发 当仓库搭建完毕后,并且react-master项目的基础配置搞完后,就要进行页面开发了知乎首页
开发之前 利其器之 VSCode 插件:React vscode 开发插件与代码补全提示 - 掘金
react-master内,新建文件夹
1 mkdir src/pages src/components src/router src/utils
路由配置 知乎路由结构:
新建router/index.tsx,并完善
1
2
3
4
5
6
7
8
9
10
11
12
13
14
15
16
17
18
19
20
21
22
23
24
25
26
27
28
29
30
31
32
33
34
35
36
37
38
39
40
41
42
43
44
45
46
47
48
49
50
51
52
53
54
55
56
57
58
59
60
61
62
63
64
65
66
67
68
69
70
71
72
73
74
75
76
77
78
79
80
81
82
83
84
85
86
87
88
89
90
91
92
93
94
95
96
97
touch router/index.tsx import React from "react" ;import { Outlet , RouteObject } from "react-router-dom" ;export interface extraBizObject {export const router : Array <RouteObject & extraBizObject> = [path : "/" ,element : (<div > <div className ="flex gap-4 text-blue-500 underline" > <a href ="" > 首页</a > <a href ="#education" > 知乎知学堂</a > <a href ="#explore" > 发现</a > <a href ="#question" > 等你来答</a > </div > <div > 首页自身内容 <div > <div className ="flex gap-4 text-blue-500 underline" > <a href ="#command" > command</a > <a href ="#follow" > follow</a > <a href ="#hot" > hot</a > <a href ="#zvideo" > zvideo</a > </div > 首页二级菜单内容 <Outlet /> </div > </div > </div > title : "首页" ,isShow : true ,children : [path : "/" ,element : <div > command</div > path : "follow" ,element : <div > follow</div > path : "hot" ,element : <div > hot</div > path : "zvideo" ,element : <div > zvideo</div > path : "/education" ,element : <div > education</div > title : "知乎知学堂" ,children : [path : "learning" ,element : <div > learning</div > path : "/explore" ,element : <div > explore</div > title : "发现" ,path : "/question" ,element : <div > question</div > title : "等你来答" ,children : [path : "waiting" ,element : <div > waiting</div >
改造app.tsx
1
2
3
4
5
6
7
8
9
10
11
12
13
14
15
16
17
18
import React from "react" ;import { HashRouter , useRoutes } from "react-router-dom" ;import { router } from "./router" ;Props = {const Routers = (useRoutes (router);export function App ({}: Props ) {return (<HashRouter > <Routers /> </HashRouter >
删除多余的app.css、app2.module.less
1 rm src/app.css src/app2.module .less
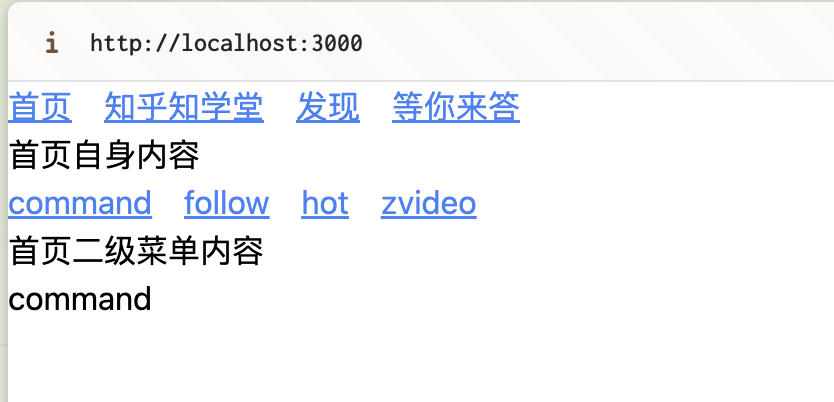
启动项目:pnpm start,效果如下,点击可以已经可以跳转到对应页面了
首页初始化
新建 首页 相关文件,并迁移路由文件里面的代码完成初始化
1
2
3
4
5
6
7
8
9
10
11
12
13
14
15
16
17
18
19
20
21
22
23
24
25
26
27
28
29
30
31
32
33
mkdir src/pages/home && touch src/pages/home/index.tsx import React from "react" ;import { Outlet } from "react-router-dom" ;Props = {};export default function Home ({}: Props ) {return (<div > <div className ="flex gap-4 text-blue-500 underline" > <a href ="" > 首页</a > <a href ="#education" > 知乎知学堂</a > <a href ="#explore" > 发现</a > <a href ="#question" > 等你来答</a > </div > <div > 首页 page 自身内容 <div > <div className ="flex gap-4 text-blue-500 underline" > <a href ="#command" > command</a > <a href ="#follow" > follow</a > <a href ="#hot" > hot</a > <a href ="#zvideo" > zvideo</a > </div > 首页二级菜单内容 <Outlet /> </div > </div > </div >
更改路由文件,将首页的 element 改一下(不贴代码了,看变动吧)
看浏览器,确保页面还是正常的
公共部分之导航栏开发
新建导航对应文件,并写代码
1
2
3
4
5
6
7
8
9
10
11
12
13
14
15
16
17
18
19
20
21
22
23
24
25
26
27
28
29
30
31
32
33
34
35
36
37
38
39
40
41
42
43
44
45
46
47
48
49
50
51
52
53
54
55
56
57
58
59
60
61
62
63
64
65
66
67
68
69
70
71
72
73
74
75
76
77
78
79
80
81
82
83
84
85
86
87
88
89
90
mkdir src/components/navigation && touch src/components/navigation/index.tsx import React , { FC } from "react" ;import { ZHRouter , router } from "../../router" ;import { BellIcon } from "@heroicons/react/24/outline" ;import { NavLink } from "react-router-dom" ;import Search from "../search" ;Props = {};const Logo = (return (<div className =" px-2" > <svg viewBox ="0 0 64 30" fill ="#1772F6" width ="64" height ="30" className ="css-1hlrcxk" > <path d ="M29.05 4.582H16.733V25.94h3.018l.403 2.572 4.081-2.572h4.815V4.582zm-5.207 18.69l-2.396 1.509-.235-1.508h-1.724V7.233h6.78v16.04h-2.425zM14.46 14.191H9.982c0-.471.033-.954.039-1.458v-5.5h5.106V5.935a1.352 1.352 0 0 0-.404-.957 1.378 1.378 0 0 0-.968-.396H5.783c.028-.088.056-.177.084-.255.274-.82 1.153-3.326 1.153-3.326a4.262 4.262 0 0 0-2.413.698c-.57.4-.912.682-1.371 1.946-.532 1.453-.997 2.856-1.31 3.693C1.444 8.674.28 11.025.28 11.025a5.85 5.85 0 0 0 2.52-.61c1.119-.593 1.679-1.502 2.054-2.883l.09-.3h2.334v5.5c0 .5-.045.982-.073 1.46h-4.12c-.71 0-1.39.278-1.893.775a2.638 2.638 0 0 0-.783 1.874h6.527a17.717 17.717 0 0 1-.778 3.649 16.796 16.796 0 0 1-3.012 5.273A33.104 33.104 0 0 1 0 28.74s3.13 1.175 5.425-.954c1.388-1.292 2.631-3.814 3.23-5.727a28.09 28.09 0 0 0 1.12-5.229h5.967v-1.37a1.254 1.254 0 0 0-.373-.899 1.279 1.279 0 0 0-.909-.37z" > </path > <path d ="M11.27 19.675l-2.312 1.491 5.038 7.458a6.905 6.905 0 0 0 .672-2.218 3.15 3.15 0 0 0-.28-2.168l-3.118-4.563zM51.449 15.195V5.842c4.181-.205 7.988-.405 9.438-.483l.851-.05c.387-.399.885-2.395.689-3.021-.073-.25-.213-.666-.638-.555a33.279 33.279 0 0 1-4.277.727c-2.766.321-3.97.404-7.804.682-6.718.487-12.709.72-12.709.72a2.518 2.518 0 0 0 .788 1.834 2.567 2.567 0 0 0 1.883.706c2.278-.095 5.598-.25 8.996-.41v9.203h-12.78c0 .703.281 1.377.783 1.874a2.69 2.69 0 0 0 1.892.777h10.105v7.075c0 .887-.464 1.192-1.231 1.214h-3.92a4.15 4.15 0 0 0 .837 1.544 4.2 4.2 0 0 0 1.403 1.067 6.215 6.215 0 0 0 2.71.277c1.36-.066 2.967-.826 2.967-3.57v-7.607h11.28c.342 0 .67-.135.91-.374.242-.239.378-.563.378-.902v-1.375H51.449z" > </path > <path d ="M42.614 8.873a2.304 2.304 0 0 0-1.508-.926 2.334 2.334 0 0 0-1.727.405l-.376.272 4.255 5.85 2.24-1.62-2.884-3.98zM57.35 8.68l-3.125 4.097 2.24 1.663 4.517-5.927-.375-.277a2.32 2.32 0 0 0-1.722-.452 2.327 2.327 0 0 0-1.536.896z" > </path > </svg > </div > NavProps {navs : ZHRouter ;NavLinkRenderProps = {const NavTab : FC <NavProps > = ({ navs } ) => {const getStyles = ({ isActive }: NavLinkRenderProps ) =>"hover:text-black mx-4 h-full py-3.5 transition-all " +"font-extrabold text-black border-b-4 border-blue-600" "text-gray-400" );return (<div className =" flex mx-6 box-border" > {navs.map((item) => ( <NavLink key ={item.path + "__ "} to ={item.path || "/"} className ={getStyles} > {item.title} </NavLink > ))} </div > const MenuAlarm = (<div className ="flex mr-10 gap-4" > <div className =" flex flex-col justify-center items-center" > <BellIcon className =" h-5 w-5 text-gray-400 fill-gray-400" /> <span className =" text-gray-400 text-xs" > 消息</span > </div > <div className =" flex flex-col justify-center items-center" > <BellIcon className =" h-5 w-5 text-gray-400 fill-gray-400" /> <span className =" text-gray-400 text-xs" > 私信</span > </div > </div > export default function Navigation ({}: Props ) {return (<div className =" bg-white w-screen shadow-lg" > <div className =" max-w-6xl mx-auto my-0 flex justify-center w-full" > <div className =" h-14 flex justify-between items-center min-w-max w-full" > <div className =" flex items-center" > <Logo /> <NavTab navs ={router} /> </div > <Search /> <MenuAlarm /> </div > </div > </div >
更改react-master/src/pages/home/index.tsx
1
2
3
4
5
6
7
8
9
10
11
12
13
14
import React from "react" ;import { Outlet } from "react-router-dom" ;import Navigation from "../../components/navigation" ;Props = {};export default function Home ({}: Props ) {return (<div > <Navigation /> <Outlet /> </div >
更改react-master/src/pages/router/index.tsx
新建搜索栏对应文件,并写代码
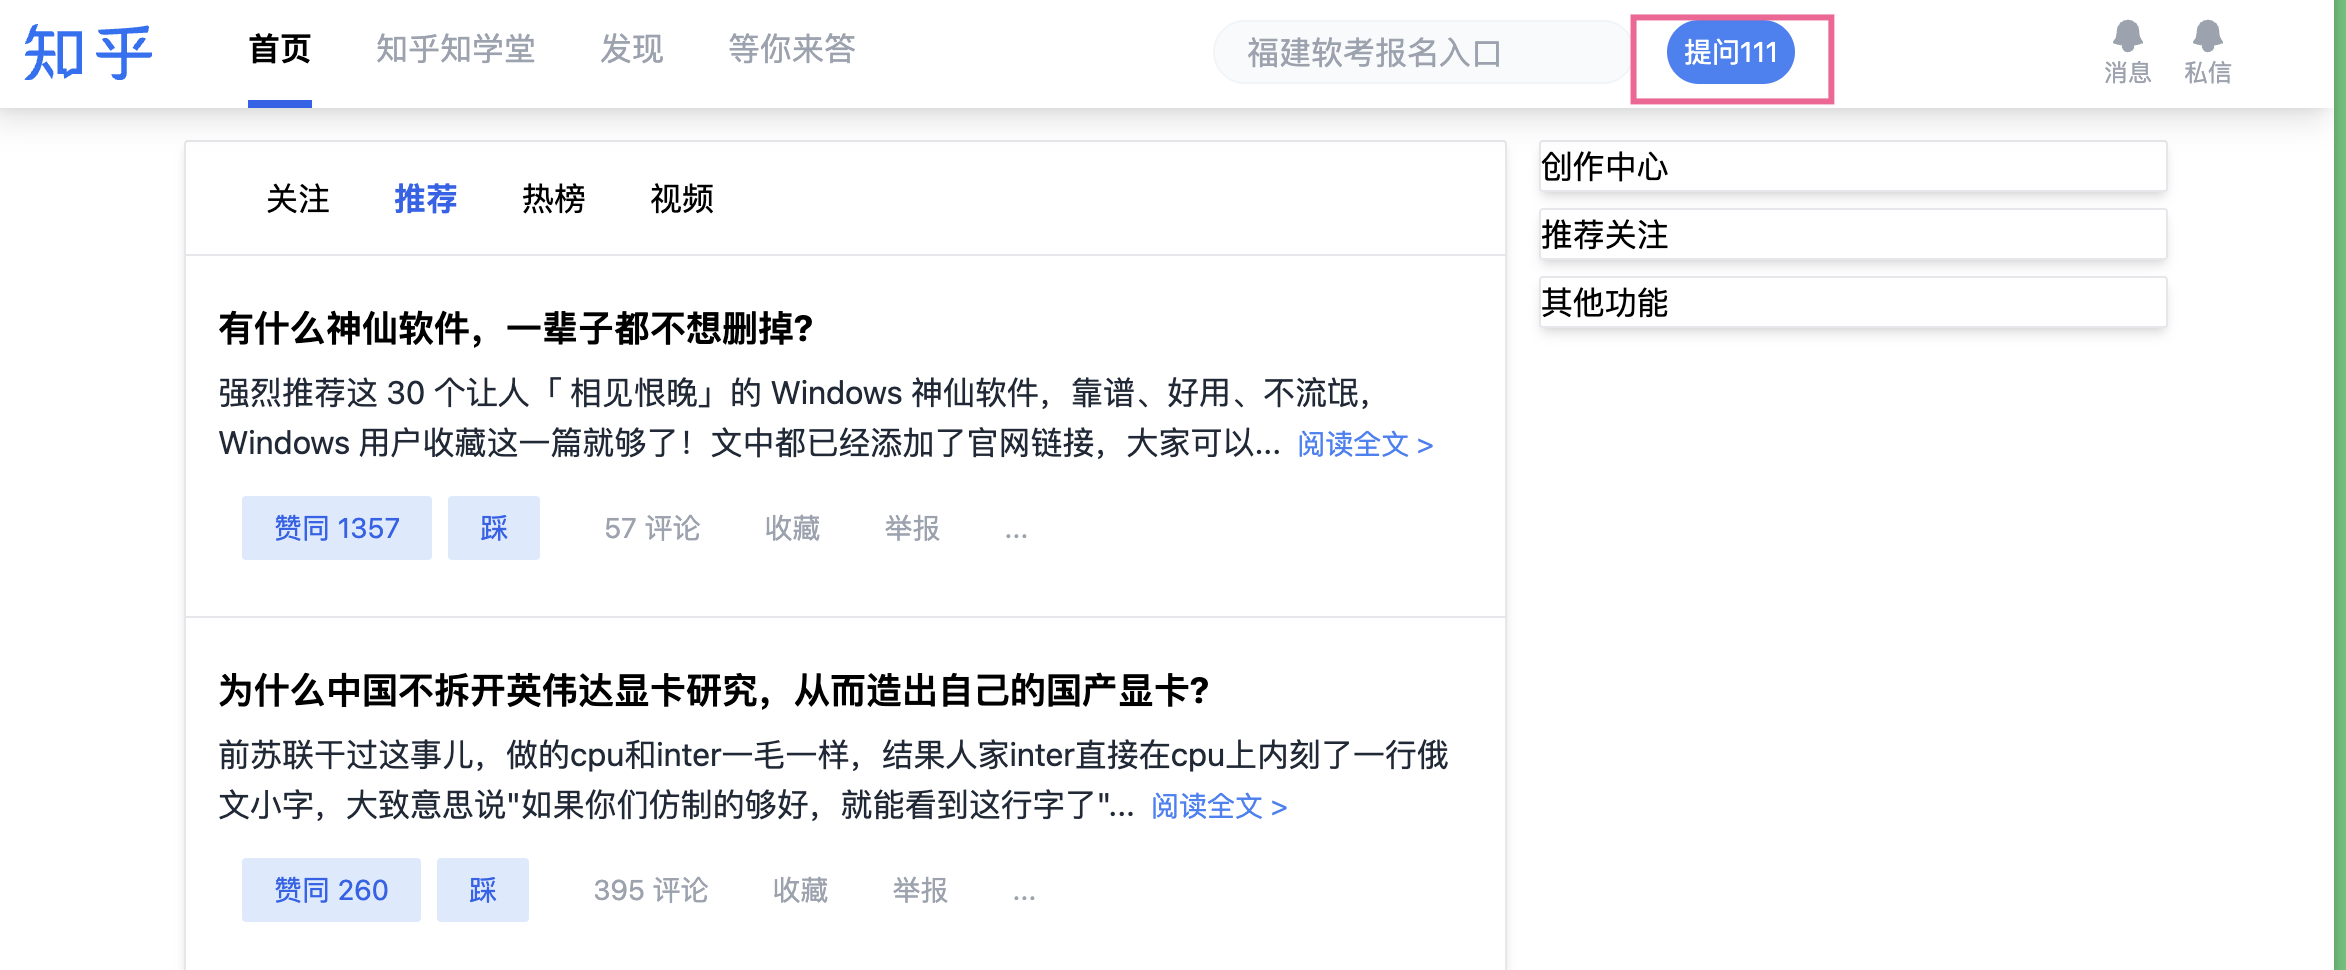
1
2
3
4
5
6
7
8
9
10
11
12
13
14
15
16
17
18
19
20
21
mkdir src/components/search && touch src/components/search/index.tsx import React from "react" ;Props = {};export default function Search ({}: Props ) {return (<div className =" flex items-center" > <input type ="text" className =" w-98 h-8 border border-gray-100 px-4 rounded-full bg-gray-50" placeholder ="福建软考报名入口" /> <button className =" w-16 h-8 mx-4 text-sm bg-blue-500 text-white flex justify-center items-center rounded-full hover:bg-blue-800 transition-all" > 提问 </button > </div >
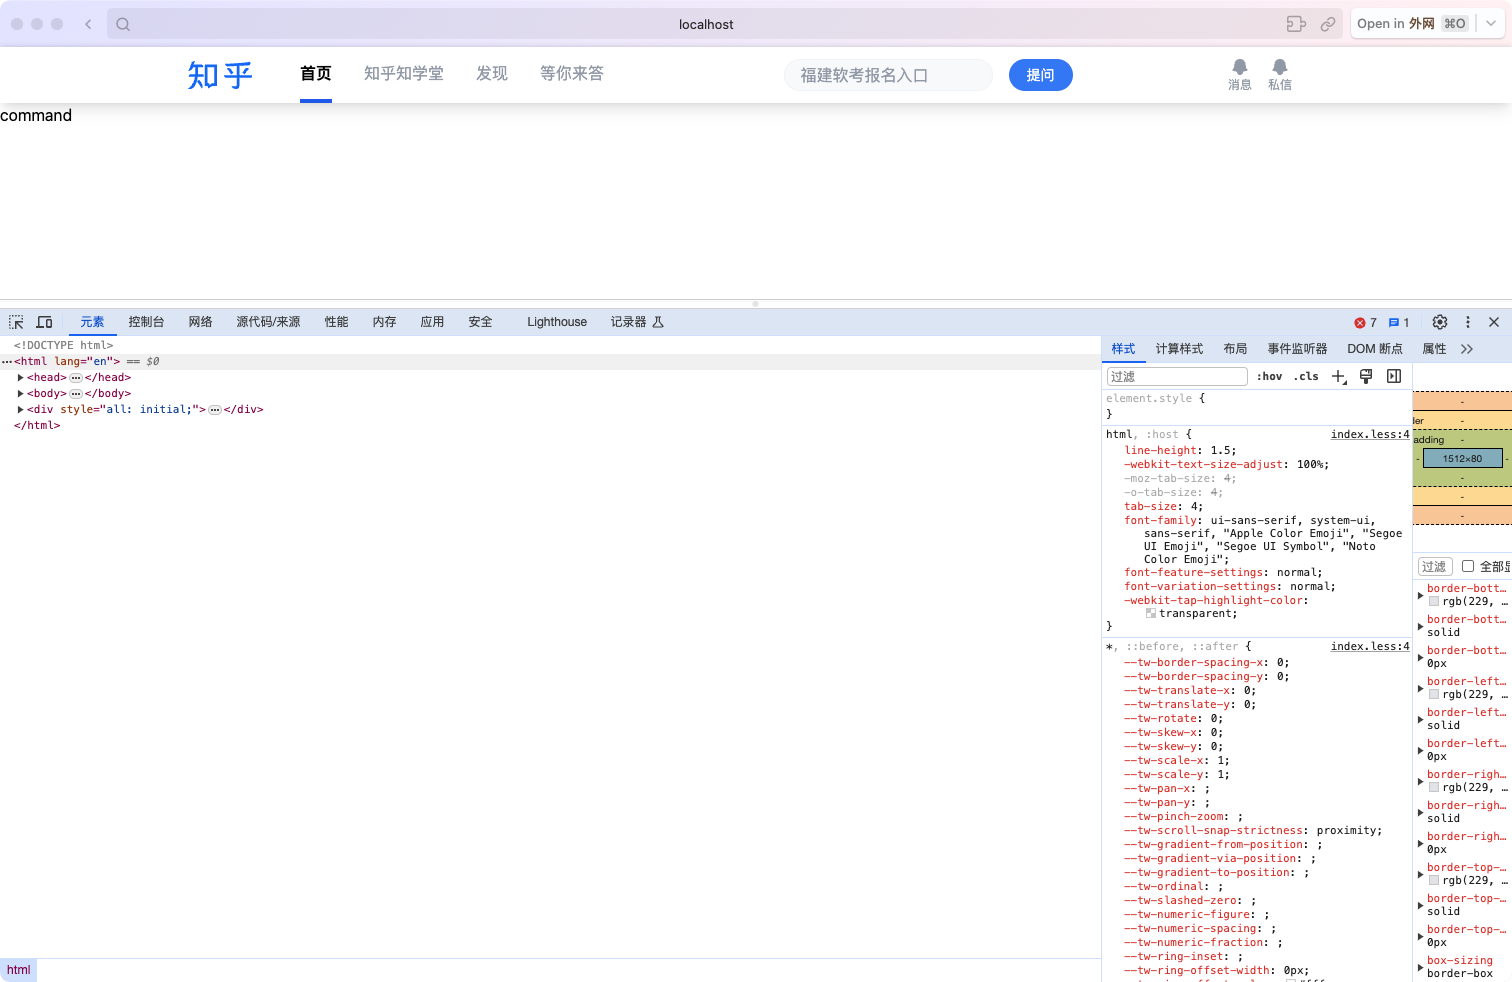
此时的页面效果如下
完善首页
完善首页代码,react-master/src/pages/home/index.tsx
1
2
3
4
5
6
7
8
9
10
11
12
13
14
15
16
17
18
19
20
21
22
23
24
import React from "react" ;import Navigation from "../../components/navigation" ;import Card from "../../components/card" ;import Tabs from "./tabs" ;Props = {};export default function Home ({}: Props ) {return (<div > <Navigation /> <div className =" mx-auto max-w-6xl flex my-2 px-20" > <Card className =" w-2/3" > <Tabs /> </Card > <div className =" flex-1 w-1/3" > <Card className =" w-full" > 创作中心</Card > <Card className =" w-full" > 推荐关注</Card > <Card className =" w-full" > 其他功能</Card > </div > </div > </div >
新建Card组件,并写代码
1
2
3
4
5
6
7
8
9
10
11
12
13
14
15
16
17
18
19
mkdir src/components/card && touch src/components/card/index.tsx import React , { ReactNode } from "react" ;Props = {ReactNode ;export default function Card ({ className, children }: Props ) {return (<div className ={ ` bg-white border border-gray-200 m-2 rounded-sm shadow-md ${className }`} > {children} </div >
新建tabs.tsx,作为二级菜单
1
2
3
4
5
6
7
8
9
10
11
12
13
14
15
16
17
18
19
20
21
22
23
24
25
26
27
28
29
30
31
32
33
34
35
36
37
38
39
40
41
42
43
44
45
46
47
48
49
50
51
52
53
touch src/pages/home/tabs.tsx import React from "react" ;import { NavLink , Outlet } from "react-router-dom" ;Props = {const tabs = [name : "关注" ,to : "/follow" ,name : "推荐" ,to : "/" ,name : "热榜" ,to : "/hot" ,name : "视频" ,to : "/zvideo" ,export default function Tabs ({}: Props ) {return (<div className =" w-full" > <div className =" flex mx-6 box-border" > {tabs.map((item) => ( <NavLink key ={item.to} to ={item.to} className ={({ isActive }) => " whitespace-nowrap py-4 px-4 text-base transition-all " + (isActive ? "text-blue-600 font-bold" : "text-black hover:text-blue-700") } > {item.name} </NavLink > ))} </div > <Outlet /> </div >
目前页面效果如下
完善推荐列表
处理 mock 数据
1
2
3
4
5
mkdir src/pages/home/commandList && touch src/pages/home/commandList/mock.js https :
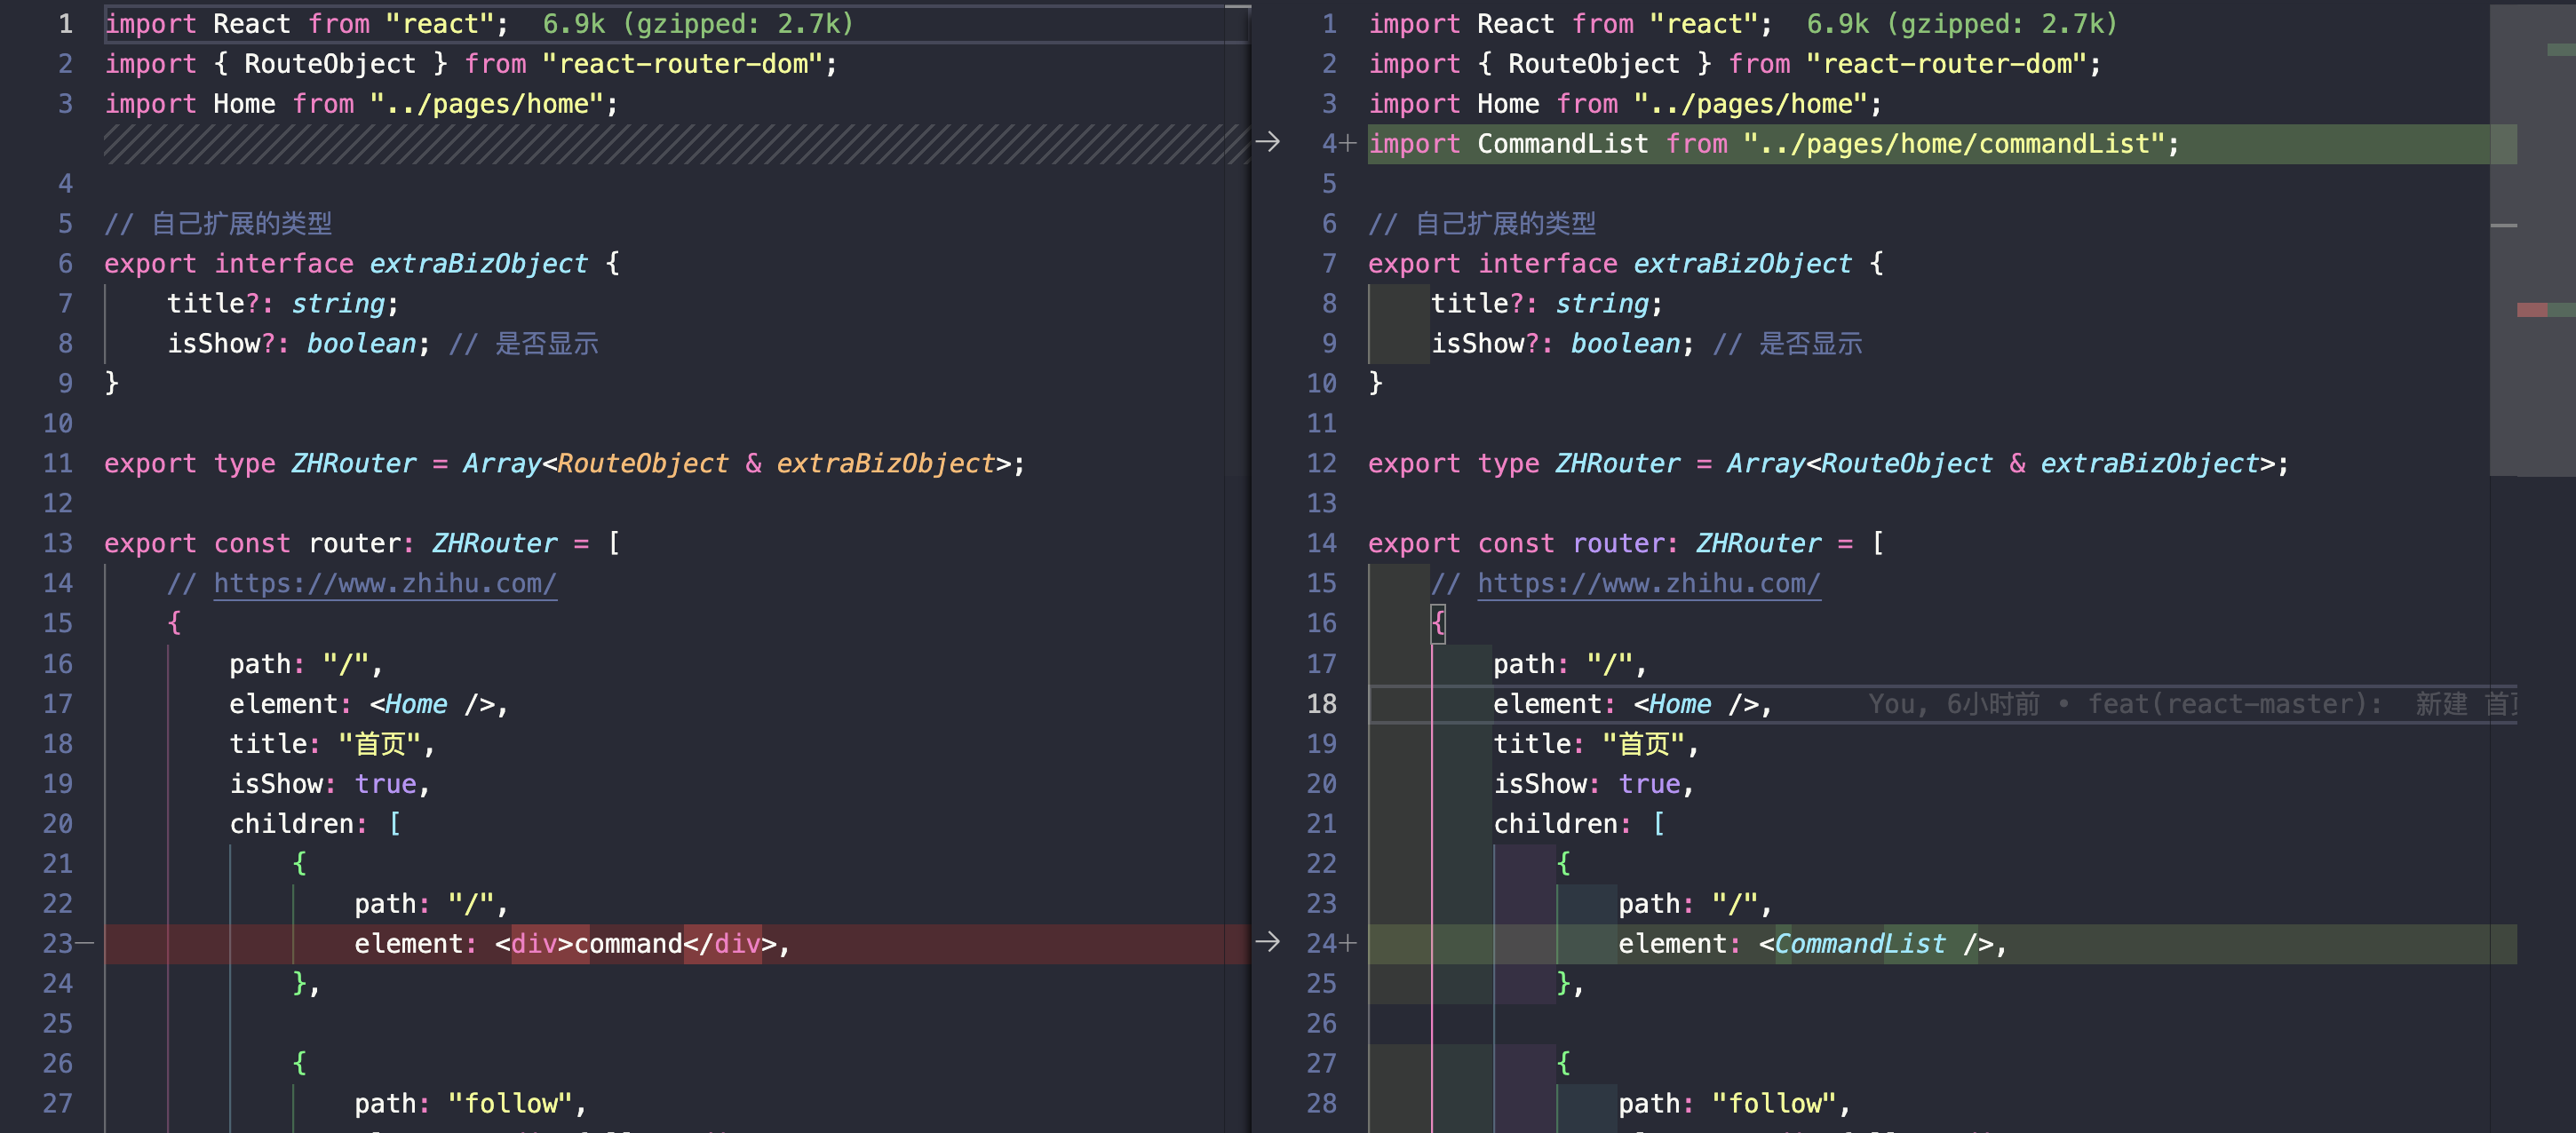
新建推荐列表页面 && 路由更改
1 touch src/pages/home/commandList/index.tsx
推荐列表页面代码
1
2
3
4
5
6
7
8
9
10
11
12
13
14
15
16
17
18
19
20
21
22
23
24
25
26
27
28
29
30
31
32
33
34
35
36
37
38
39
40
41
42
43
44
45
46
47
48
49
50
51
52
53
54
55
56
57
58
59
60
61
62
63
64
65
66
67
68
69
70
71
72
73
74
75
76
77
78
79
80
81
82
83
84
85
86
87
import React , { FC , MouseEventHandler , useState } from "react" ;import { mockList } from "./mock" ;Props = {};ICommandItem {key : string;item : any;const CommandData : FC <ICommandItem > = ({ item } ) => {const [selected, setSelected] = useState (false );const handleClick : MouseEventHandler <Element > = (event ) => {preventDefault ();setSelected (!selected);return (<div className =" flex flex-col items-start p-4 border-b" > {/* 标题部分 */} <div className =" flex h-auto" > <a className =" font-bold text-lg leading-10" > {item?.target?.question?.title || item?.target?.title} </a > </div > {/* 文章卡片 */} {selected ? ( <div dangerouslySetInnerHTML ={{ __html: item ?.target ?.content }} /> ) : ( <a href ="/" onClick ={handleClick} className =" cursor-pointer hover:text-gray-600 text-gray-800" > {item?.target?.excerpt?.substring(0, 80) + "..."} <span className =" text-sm leading-7 text-blue-500 ml-2" > 阅读全文 > </span > </a > )} {/* 底部 bar */} <div className ={ `flex justify-between items-center p-3 bg-white w-full ${selected ? " bottom-0 left-0 shadow-sm border-t sticky " : ""}`} > <div className =" flex items-center flex-1" > <div className =" flex justify-center items-center h-8 px-4 bg-blue-100 text-sm text-blue-600 rounded-sm cursor-pointer hover:bg-blue-200 transition-all" > 赞同 {item?.target?.thanks_count || 0} </div > <div className =" flex justify-center items-center h-8 px-4 bg-blue-100 text-sm text-blue-600 rounded-sm cursor-pointer hover:bg-blue-200 transition-all ml-2" > 踩 </div > <div className =" flex items-center flex-1 gap-8 text-gray-400 text-sm ml-8" > <div > {item?.target?.comment_count} 评论</div > <div > 收藏</div > <div > 举报</div > <div > ...</div > </div > </div > {selected && ( <div > <span className =" text-gray-500 text-sm cursor-pointer" onClick ={handleClick} > 收起 </span > </div > )} </div > </div > export default function CommandList ({}: Props ) {return (<div className =" flex flex-col border-t" > {mockList.map((item, idx) => ( <CommandData key ={item.id + idx } item ={item} /> ))} </div >
当前页面效果
3、继续页面开发 第二大节【2、项目开发】中已经基本成型了,这次会补充、完善一些细节
顶部导航吸顶,要求:滚动一点距离后才吸顶
改动页面:react-master/src/components/navigation/index.tsx
1
2
3
4
5
6
7
8
9
10
11
12
13
14
15
16
17
18
19
20
21
22
23
24
25
26
27
28
29
30
31
32
33
34
35
36
37
38
39
40
41
42
43
44
45
46
47
48
49
50
51
52
53
54
55
56
57
58
59
60
61
62
63
64
65
66
67
68
69
70
71
72
73
74
75
76
77
78
79
80
81
82
83
84
85
86
87
88
89
90
91
92
93
94
95
96
97
98
99
100
101
102
103
104
105
106
107
import React , { FC } from "react" ;import { ZHRouter , router } from "../../router" ;import { BellIcon } from "@heroicons/react/24/outline" ;import { NavLink } from "react-router-dom" ;import Search from "../search" ;import { Tab } from "../../pages/home/tabs" ;const Logo = (return (<div className =" px-2" > <svg viewBox ="0 0 64 30" fill ="#1772F6" width ="64" height ="30" className ="css-1hlrcxk" > <path d ="M29.05 4.582H16.733V25.94h3.018l.403 2.572 4.081-2.572h4.815V4.582zm-5.207 18.69l-2.396 1.509-.235-1.508h-1.724V7.233h6.78v16.04h-2.425zM14.46 14.191H9.982c0-.471.033-.954.039-1.458v-5.5h5.106V5.935a1.352 1.352 0 0 0-.404-.957 1.378 1.378 0 0 0-.968-.396H5.783c.028-.088.056-.177.084-.255.274-.82 1.153-3.326 1.153-3.326a4.262 4.262 0 0 0-2.413.698c-.57.4-.912.682-1.371 1.946-.532 1.453-.997 2.856-1.31 3.693C1.444 8.674.28 11.025.28 11.025a5.85 5.85 0 0 0 2.52-.61c1.119-.593 1.679-1.502 2.054-2.883l.09-.3h2.334v5.5c0 .5-.045.982-.073 1.46h-4.12c-.71 0-1.39.278-1.893.775a2.638 2.638 0 0 0-.783 1.874h6.527a17.717 17.717 0 0 1-.778 3.649 16.796 16.796 0 0 1-3.012 5.273A33.104 33.104 0 0 1 0 28.74s3.13 1.175 5.425-.954c1.388-1.292 2.631-3.814 3.23-5.727a28.09 28.09 0 0 0 1.12-5.229h5.967v-1.37a1.254 1.254 0 0 0-.373-.899 1.279 1.279 0 0 0-.909-.37z" > </path > <path d ="M11.27 19.675l-2.312 1.491 5.038 7.458a6.905 6.905 0 0 0 .672-2.218 3.15 3.15 0 0 0-.28-2.168l-3.118-4.563zM51.449 15.195V5.842c4.181-.205 7.988-.405 9.438-.483l.851-.05c.387-.399.885-2.395.689-3.021-.073-.25-.213-.666-.638-.555a33.279 33.279 0 0 1-4.277.727c-2.766.321-3.97.404-7.804.682-6.718.487-12.709.72-12.709.72a2.518 2.518 0 0 0 .788 1.834 2.567 2.567 0 0 0 1.883.706c2.278-.095 5.598-.25 8.996-.41v9.203h-12.78c0 .703.281 1.377.783 1.874a2.69 2.69 0 0 0 1.892.777h10.105v7.075c0 .887-.464 1.192-1.231 1.214h-3.92a4.15 4.15 0 0 0 .837 1.544 4.2 4.2 0 0 0 1.403 1.067 6.215 6.215 0 0 0 2.71.277c1.36-.066 2.967-.826 2.967-3.57v-7.607h11.28c.342 0 .67-.135.91-.374.242-.239.378-.563.378-.902v-1.375H51.449z" > </path > <path d ="M42.614 8.873a2.304 2.304 0 0 0-1.508-.926 2.334 2.334 0 0 0-1.727.405l-.376.272 4.255 5.85 2.24-1.62-2.884-3.98zM57.35 8.68l-3.125 4.097 2.24 1.663 4.517-5.927-.375-.277a2.32 2.32 0 0 0-1.722-.452 2.327 2.327 0 0 0-1.536.896z" > </path > </svg > </div > NavProps {navs : ZHRouter ;NavLinkRenderProps = {const NavTab : FC <NavProps > = ({ navs } ) => {const getStyles = ({ isActive }: NavLinkRenderProps ) =>"hover:text-black mx-4 h-full py-3.5 transition-all " +"font-extrabold text-black border-b-4 border-blue-600" "text-gray-400" );return (<div className =" flex mx-6 box-border" > {navs.map((item) => ( <NavLink key ={item.path + "__ "} to ={item.path || "/"} className ={getStyles} > {item.title} </NavLink > ))} </div > const MenuAlarm = (<div className ="flex mr-10 gap-4" > <div className =" flex flex-col justify-center items-center" > <BellIcon className =" h-5 w-5 text-gray-400 fill-gray-400" /> <span className =" text-gray-400 text-xs" > 消息</span > </div > <div className =" flex flex-col justify-center items-center" > <BellIcon className =" h-5 w-5 text-gray-400 fill-gray-400" /> <span className =" text-gray-400 text-xs" > 私信</span > </div > </div > Props = {className : string;hide : boolean;export default function Navigation ({ className, hide }: Props ) {return (<div className ={ ` bg-white w-screen shadow-lg overflow-hidden ${className }`} > <div className =" max-w-6xl mx-auto my-0 flex justify-center w-full" > <div className ={ ` relative h-14 flex flex-col justify-between items-center min-w-max w-full transition-all duration-300 ${hide ? "top-0 " : "-top-14 "}`} > {/* 未吸顶时展示这个 */} <div className =" w-full h-14 flex justify-between items-center min-w-max" > <div className =" flex items-center" > <Logo /> <NavTab navs ={router} /> </div > <Search /> <MenuAlarm /> </div > {/* 吸顶时展示这个 */} <div className =" w-full h-14 flex justify-between items-center min-w-max" > <div className =" flex items-center" > <Logo /> <Tab activeStyle ="border-b-4 border-blue-600" /> </div > <Search /> </div > </div > </div > </div >
改动页面:react-master/src/pages/home/index.tsx
1
2
3
4
5
6
7
8
9
10
11
12
13
14
15
16
17
18
19
20
21
22
23
24
25
26
27
28
29
import React , { useState } from "react" ;import Navigation from "../../components/navigation" ;import Card from "../../components/card" ;import Tabs from "./tabs" ;Props = {};export default function Home ({}: Props ) {const [hide, setHide] = useState (true );const handleChange = (flag: boolean ) => {setHide (flag);return (<div > <Navigation className =" sticky top-0" hide ={hide} /> <div className =" mx-auto max-w-6xl flex my-2 px-20" > <Card className =" w-2/3" > <Tabs onChange ={handleChange} /> </Card > <div className =" flex-1 w-1/3" > <Card className =" w-full" > 创作中心</Card > <Card className =" w-full" > 推荐关注</Card > <Card className =" w-full" > 其他功能</Card > </div > </div > </div >
改动页面:react-master/src/pages/home/tabs.tsx
1
2
3
4
5
6
7
8
9
10
11
12
13
14
15
16
17
18
19
20
21
22
23
24
25
26
27
28
29
30
31
32
33
34
35
36
37
38
39
40
41
42
43
44
45
46
47
48
49
50
51
52
53
54
55
56
57
58
59
60
61
62
63
64
65
66
67
68
69
70
71
72
73
74
75
76
77
78
79
80
81
82
83
84
import React , { FC , useEffect, useRef } from "react" ;import { NavLink , Outlet } from "react-router-dom" ;export const tabs = [title : "关注" ,path : "/follow" ,title : "推荐" ,path : "/" ,title : "热榜" ,path : "/hot" ,title : "视频" ,path : "/zvideo" ,TabProps = {export const Tab : FC <TabProps > = ({ activeStyle } ) => (<div className =" flex mx-6 box-border" > {tabs.map((item) => ( <NavLink key ={item.path} to ={item.path} className ={({ isActive }) => " whitespace-nowrap py-4 mx-4 text-base transition-all " + (isActive ? "text-blue-600 font-bold " + activeStyle : "text-black hover:text-blue-700") } > {item.title} </NavLink > ))} </div > Props = {(bool: boolean ) => void ;export default function Tabs ({ onChange }: Props ) {const scrollRef = useRef<HTMLDivElement >(null );useEffect (() => {let intersectionObserver : IntersectionObserver | undefined =new IntersectionObserver ((entries ) => {0 ]?.isIntersecting );current && intersectionObserver.observe (scrollRef.current );return () => {current && intersectionObserver!.unobserve (scrollRef.current );undefined ;return (<div className =" w-full" > <div ref ={scrollRef} > </div > <Tab /> <Outlet /> </div >
无限滚动
改动页面:react-master/src/pages/home/commandList.tsx
1
2
3
4
5
6
7
8
9
10
11
12
13
14
15
16
17
18
19
20
21
22
23
24
25
26
27
28
29
30
31
32
33
34
35
36
37
38
39
40
41
42
43
44
45
46
47
48
49
50
51
52
53
54
55
56
57
58
59
60
61
62
63
64
65
66
67
68
69
70
71
72
73
74
75
76
77
78
79
80
81
82
83
84
85
86
87
88
89
90
91
92
93
94
95
96
97
98
99
100
101
102
103
104
105
106
107
108
109
110
111
112
113
114
115
116
117
118
119
120
121
122
123
124
125
126
127
128
129
import React , {FC ,MouseEventHandler ,from "react" ;import { mockList } from "./mock" ;Props = {};ICommandItem {key : string;item : any;const CommandData : FC <ICommandItem > = ({ item } ) => {const [selected, setSelected] = useState (false );const handleClick : MouseEventHandler <Element > = (event ) => {preventDefault ();setSelected (!selected);return (<div className =" flex flex-col items-start p-4 border-b" > {/* 标题部分 */} <div className =" flex h-auto" > <a className =" font-bold text-lg leading-10" > {item?.target?.question?.title || item?.target?.title} </a > </div > {/* 文章卡片 */} {selected ? ( <div dangerouslySetInnerHTML ={{ __html: item ?.target ?.content }} /> ) : ( <a href ="/" onClick ={handleClick} className =" cursor-pointer hover:text-gray-600 text-gray-800" > {item?.target?.excerpt?.substring(0, 80) + "..."} <span className =" text-sm leading-7 text-blue-500 ml-2" > 阅读全文 > </span > </a > )} {/* 底部 bar */} <div className ={ `flex justify-between items-center p-3 bg-white w-full ${selected ? " bottom-0 left-0 shadow-sm border-t sticky " : ""}`} > <div className =" flex items-center flex-1" > <div className =" flex justify-center items-center h-8 px-4 bg-blue-100 text-sm text-blue-600 rounded-sm cursor-pointer hover:bg-blue-200 transition-all" > 赞同 {item?.target?.thanks_count || 0} </div > <div className =" flex justify-center items-center h-8 px-4 bg-blue-100 text-sm text-blue-600 rounded-sm cursor-pointer hover:bg-blue-200 transition-all ml-2" > 踩 </div > <div className =" flex items-center flex-1 gap-8 text-gray-400 text-sm ml-8" > <div > {item?.target?.comment_count} 评论</div > <div > 收藏</div > <div > 举报</div > <div > ...</div > </div > </div > {selected && ( <div > <span className =" text-gray-500 text-sm cursor-pointer" onClick ={handleClick} > 收起 </span > </div > )} </div > </div > const fetchList = (new Promise <Array <any>>((resolve ) => {setTimeout (() => {resolve (mockList.slice (5 , 10 ));500 );export default function CommandList ({}: Props ) {const [list, setList] = useState (mockList.slice (0 , 5 ));const scrollRef = useRef<HTMLDivElement >(null );useEffect (() => {let intersectionObserver : IntersectionObserver | undefined =new IntersectionObserver ((entries ) => {const isIntersecting = entries[0 ]?.isIntersecting ;if (isIntersecting) {fetchList ().then ((res: Array <any> ) => {setList ((list ) => [...list, ...res]);current && intersectionObserver.observe (scrollRef.current );return () => {current && intersectionObserver!.unobserve (scrollRef.current );void 0 ;return (<div className =" flex flex-col border-t" > {list.map((item, idx) => ( <CommandData key ={item.id + idx } item ={item} /> ))} <div ref ={scrollRef} > loading......</div > </div >
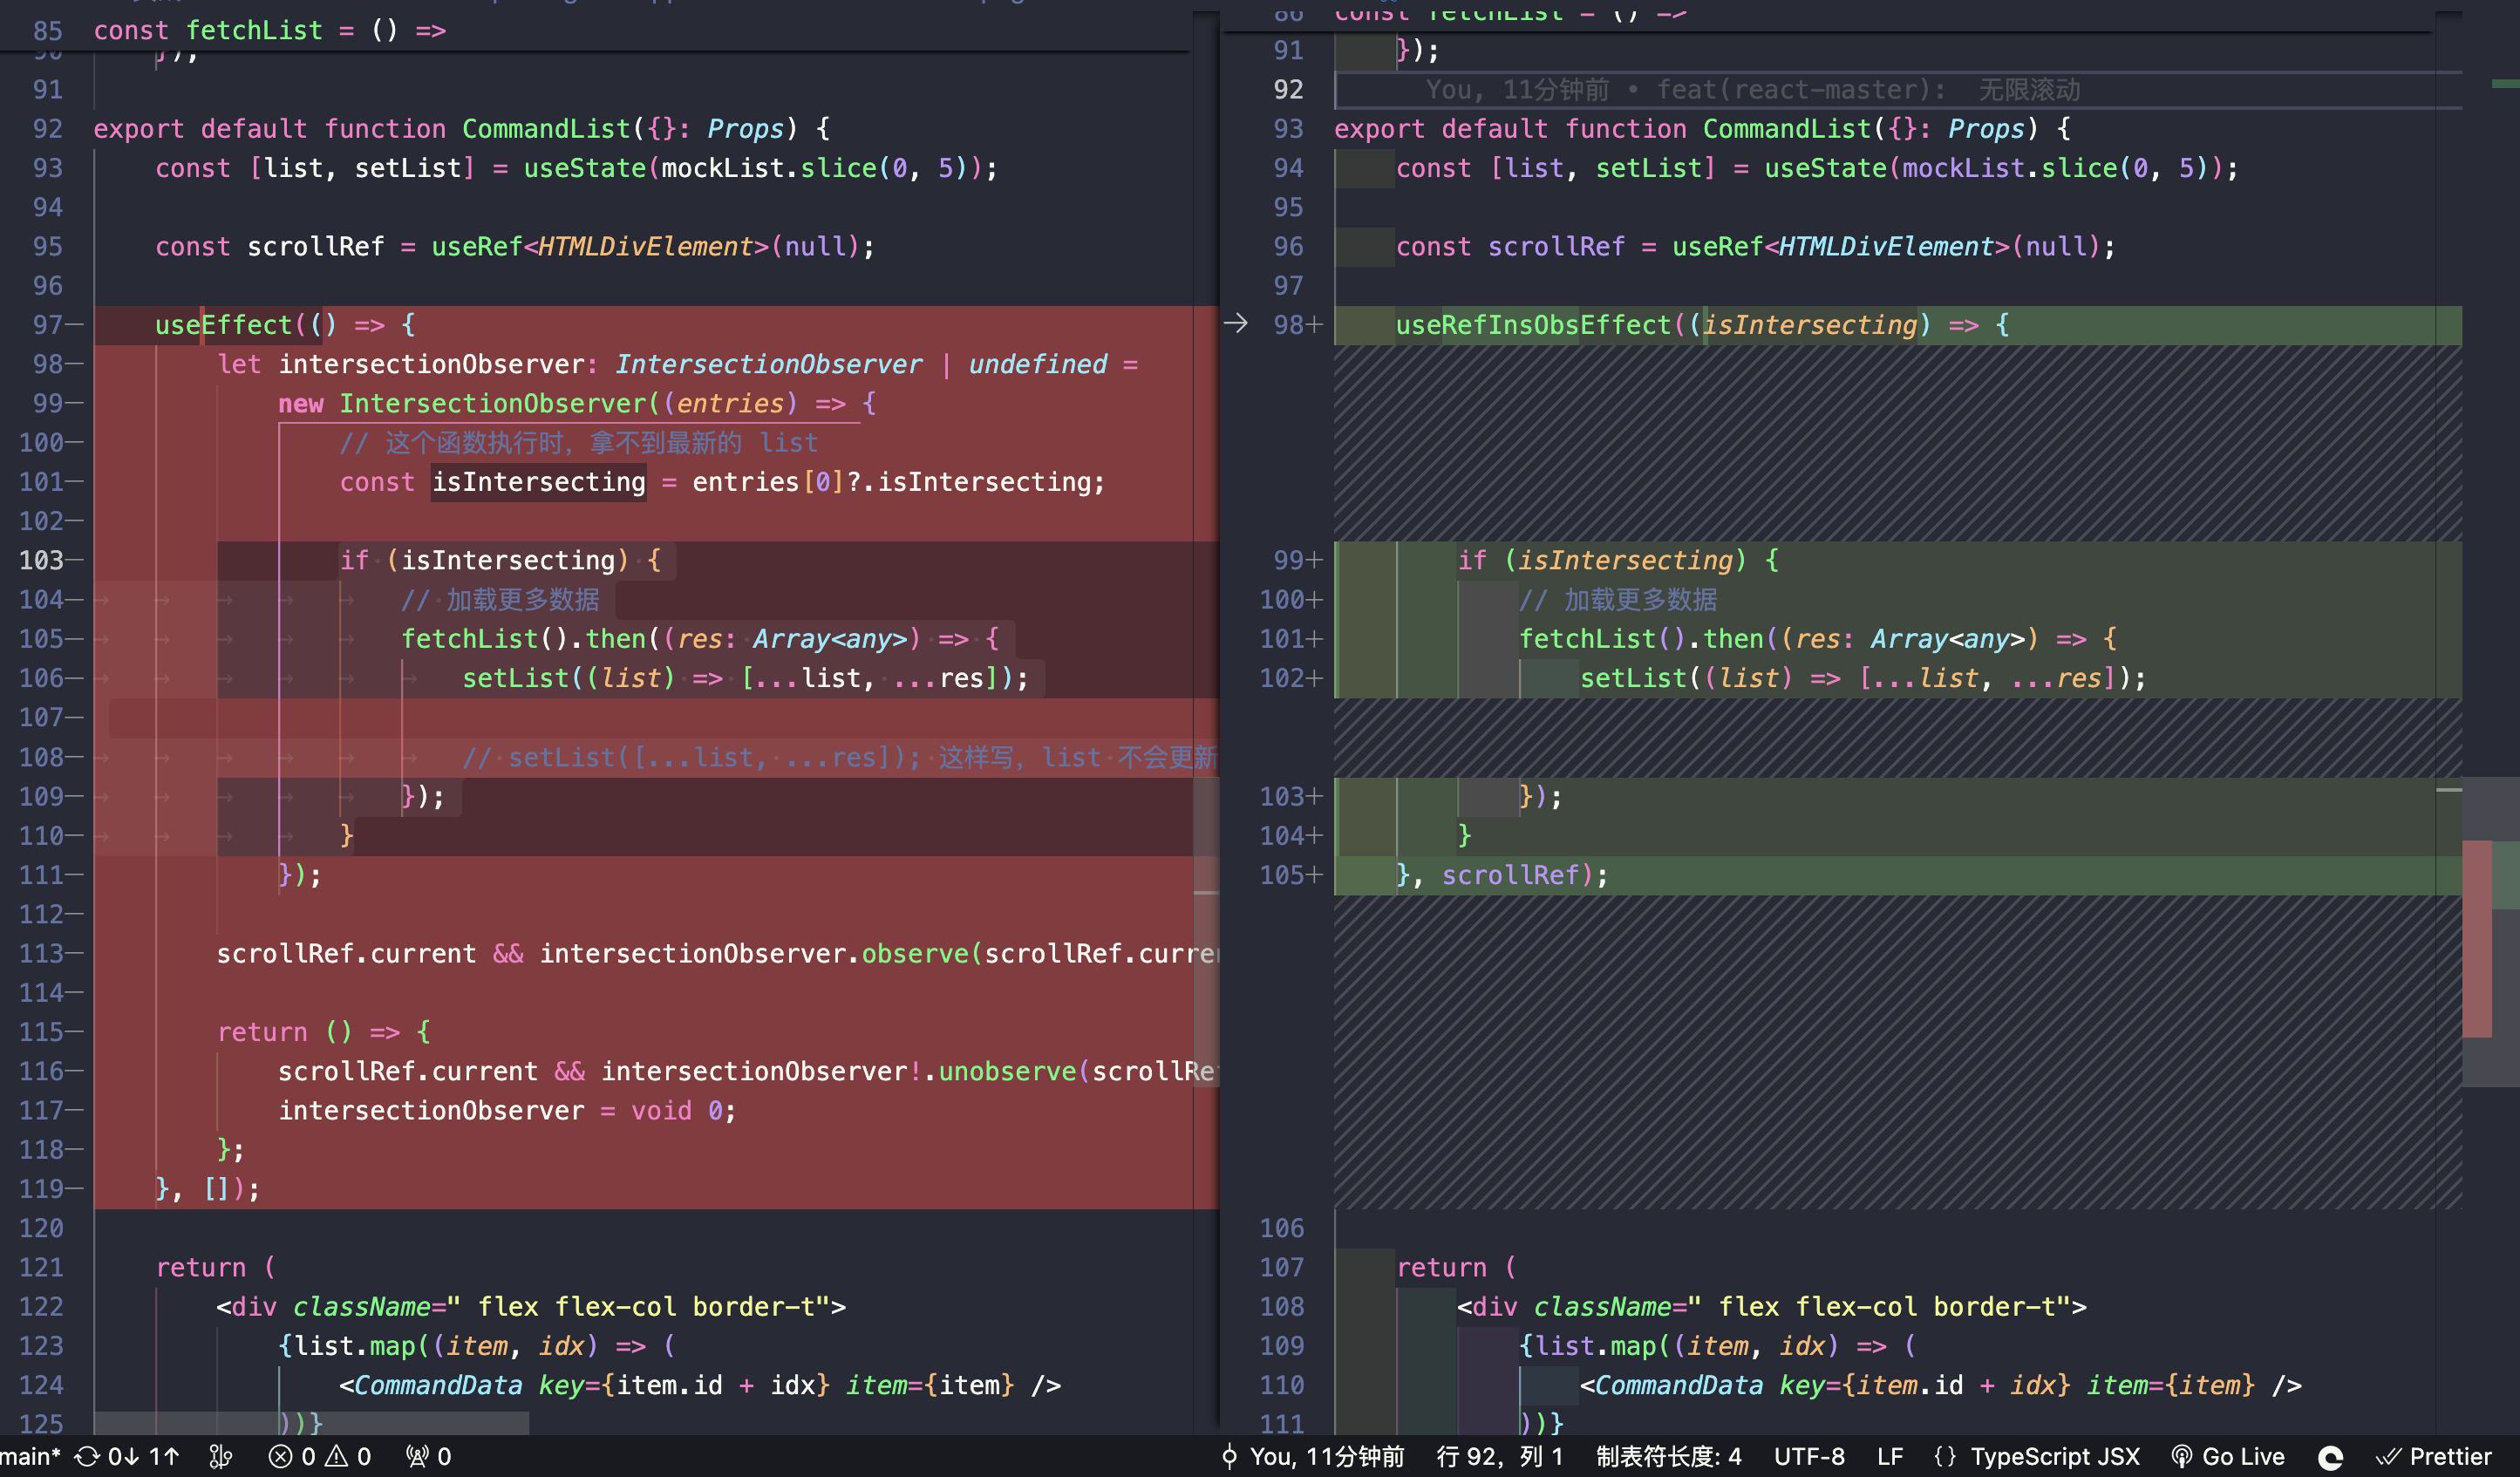
use* API 封装 React 的 useApi 有 useState 这种有返回值的,也有 useEffect 这种“生命周期”类的
useRefInsObsEffect 类似于 useEffect 的
新增useRefInsObsEffect.ts
1
2
3
4
5
6
7
8
9
10
11
12
13
14
15
16
17
18
19
20
21
22
23
touch src/pages/home/commandList/useRefInsObsEffect.ts import { RefObject , useEffect } from "react" ;export function useRefInsObsEffect ( fn: (b: boolean) => void , scrollRef: RefObject<HTMLDivElement>, useEffect (() => {let intersectionObserver : IntersectionObserver | undefined =new IntersectionObserver ((entries ) => {fn (entries[0 ]?.isIntersecting );current && intersectionObserver.observe (scrollRef.current );return () => {current && intersectionObserver!.unobserve (scrollRef.current );void 0 ;
更改react-master/src/pages/home/commandList/index.tsx(看变更吧)
useRefInsObsState 类似于 useState 的
新增useRefInsObsState.ts
1
2
3
4
5
6
7
8
9
10
11
12
13
14
15
16
17
18
19
20
21
22
23
24
25
26
import { RefObject , useState } from "react" ;import { useRefInsObsEffect } from "./useRefInsObsEffect" ;import { mockList } from "./mock" ;const fetchList = (new Promise <Array <any>>((resolve ) => {setTimeout (() => {resolve (mockList.slice (5 , 10 ));1000 );export function useRefInsObsState (scrollRef: RefObject<HTMLDivElement> ) {const [list, setList] = useState (mockList.slice (0 , 5 ));useRefInsObsEffect ((isIntersecting ) => {if (isIntersecting) {fetchList ().then ((res: Array <any> ) => {setList ((list ) => [...list, ...res]);return list;
更改react-master/src/pages/home/commandList/index.tsx
1
2
3
4
5
6
7
8
9
10
11
12
13
14
15
16
17
18
19
20
21
22
23
24
25
26
27
28
29
30
31
32
33
34
35
36
37
38
39
40
41
42
43
44
45
46
47
48
49
50
51
52
53
54
55
56
57
58
59
60
61
62
63
64
65
66
67
68
69
70
71
72
73
74
75
76
77
78
79
80
81
82
83
84
85
86
87
88
89
90
91
92
93
94
95
96
97
98
99
100
101
102
103
104
105
import React , { FC , MouseEventHandler , useRef, useState } from "react" ;import { useRefInsObsState } from "./useRefInsObsState" ;Props = {};ICommandItem {key : string;item : any;const CommandData : FC <ICommandItem > = ({ item } ) => {const [selected, setSelected] = useState (false );const handleClick : MouseEventHandler <Element > = (event ) => {preventDefault ();setSelected (!selected);return (<div className =" flex flex-col items-start p-4 border-b" > {/* 标题部分 */} <div className =" flex h-auto" > <a className =" font-bold text-lg leading-10" > {item?.target?.question?.title || item?.target?.title} </a > </div > {/* 文章卡片 */} {selected ? ( <div dangerouslySetInnerHTML ={{ __html: item ?.target ?.content }} /> ) : ( <a href ="/" onClick ={handleClick} className =" cursor-pointer hover:text-gray-600 text-gray-800" > {item?.target?.excerpt?.substring(0, 80) + "..."} <span className =" text-sm leading-7 text-blue-500 ml-2" > 阅读全文 > </span > </a > )} {/* 底部 bar */} <div className ={ `flex justify-between items-center p-3 bg-white w-full ${selected ? " bottom-0 left-0 shadow-sm border-t sticky " : ""}`} > <div className =" flex items-center flex-1" > <div className =" flex justify-center items-center h-8 px-4 bg-blue-100 text-sm text-blue-600 rounded-sm cursor-pointer hover:bg-blue-200 transition-all" > 赞同 {item?.target?.thanks_count || 0} </div > <div className =" flex justify-center items-center h-8 px-4 bg-blue-100 text-sm text-blue-600 rounded-sm cursor-pointer hover:bg-blue-200 transition-all ml-2" > 踩 </div > <div className =" flex items-center flex-1 gap-8 text-gray-400 text-sm ml-8" > <div > {item?.target?.comment_count} 评论</div > <div > 收藏</div > <div > 举报</div > <div > ...</div > </div > </div > {selected && ( <div > <span className =" text-gray-500 text-sm cursor-pointer" onClick ={handleClick} > 收起 </span > </div > )} </div > </div > export default function CommandList ({}: Props ) {const scrollRef = useRef<HTMLDivElement >(null );const list = useRefInsObsState (scrollRef);return (<div className =" flex flex-col border-t" > {list.map((item, idx) => ( <CommandData key ={item.id + idx } item ={item} /> ))} <div ref ={scrollRef} className =" h-auto" > <svg width ="656" height ="108" viewBox ="0 0 656 108" className ="w-full text-gray-100" > <path d ="M0 0h656v108H0V0zm0 0h350v12H0V0zm20 32h238v12H20V32zM0 32h12v12H0V32zm0 32h540v12H0V64zm0 32h470v12H0V96z" fill ="currentColor" fill-rule ="evenodd" > </path > </svg > </div > </div >
搜索历史记录功能 知乎原功能
极致的本地存储库封装
新建文件
1 mkdir src/utils/store && touch src/utils/store/index.js
写入如下代码
1 2 3 4 5 6 7 8 9 10 11 12 13 14 15 16 17 18 19 20 21 22 23 24 25 26 27 28 29 30 31 32 33 34 35 36 37 38 39 40 41 42 43 44 45 46 47 48 49 50 51 52 53 54 55 56 57 58 59 60 61 62 63 64 65 66 67 68 69 70 71 72 73 74 75 76 77 78 79 80 81 82 83 84 85 86 87 88 89 90 91 92 93 94 95 96 97 98 99 100 101 102 103 104 105 106 107 108 109 110 111 112 113 114 115 116 117 118 119 120 121 122 123 124 125 126 127 128 const CreateStore = function ( unLocal = false , maxLength = 30 , expireTime = NaN , this .unLocal = unLocal;this .maxLength = maxLength;this .expireTime = expireTime;this .observe ();CreateStore .prototype observe = function (const context = this ;this .__mock__storage = new Proxy (get (target, propKey, receiver ) {let result = Reflect .get (target, propKey, receiver);if (!this .unLocal ) {getItem && context.getItem (propKey)) || void 0 ;return result;set (target, propKey, value, receiver ) {let _value = value;if (value instanceof Array && value.length > context.maxLength ) {slice (0 , context.maxLength ); if (!this .unLocal ) {setItem && context.setItem (propKey, _value);return Reflect .set (target, propKey, value, receiver);CreateStore .prototype getItem = function (type ) {if (!window ) throw new Error ("请在浏览器环境下运行" );const data = window [this .storageMethod ].getItem (type);let dataJson;try {JSON .parse (data);catch (error) {throw new Error (error);return dataJson;CreateStore .prototype setItem = function (type, data ) {if (!window ) throw new Error ("请在浏览器环境下运行" );const dataJson = JSON .stringify (data);window [this .storageMethod ].setItem (type, dataJson);CreateStore .prototype set = function (type, data ) {this .__mock__storage [`${this .key} __${type} ` ] = data;CreateStore .prototype get = function (type ) {return this .__mock__storage [`${this .key} __${type} ` ];"pop" , "push" , "shift" , "unshift" , "reverse" , "splice" ].forEach ((method ) => {CreateStore .prototype function (type, ...rest ) {if (!this .get (type)) this .set (type, []);if ((!this .get (type)) instanceof Array ) throw new Error ("必须为数组类型" );const dataList = this .get (type);Array .prototype apply (dataList, rest);this .set (type, dataList);const CreateLocalStorage = function (key, ...rest ) {CreateStore .apply (this , rest);this .storageMethod = "localStorage" ;this .key = key;CreateLocalStorage .prototype Object .create (CreateStore .prototype CreateLocalStorage .prototype constructor = CreateLocalStorage ;const CreateSessionlStorage = function (key, ...rest ) {CreateStore .apply (this , rest);this .storageMethod = "sessionlStorage" ;this .key = key;CreateSessionlStorage .prototype Object .create (CreateStore .prototype CreateSessionlStorage .prototype constructor = CreateSessionlStorage ;export const localStore = new CreateLocalStorage ("local" );
思考:函数与 SDK 的区别 SDK 一般采用类来写,它的扩展性更强。并且可以自行分层,逻辑隔离更清晰
更改react-master/src/components/search/index.tsx 搜索框支持历史记录、上下箭头选择历史记录
1
2
3
4
5
6
7
8
9
10
11
12
13
14
15
16
17
18
19
20
21
22
23
24
25
26
27
28
29
30
31
32
33
34
35
36
37
38
39
40
41
42
43
44
45
46
47
48
49
50
51
52
53
54
55
56
57
58
59
60
61
62
63
64
65
66
67
68
69
70
71
72
73
74
75
76
77
78
79
80
81
82
83
84
85
86
87
88
89
90
91
92
93
94
95
96
97
98
99
100
101
102
103
104
105
106
107
108
109
110
111
112
113
114
115
116
117
118
119
120
121
122
123
124
125
126
127
128
129
130
131
132
133
134
135
136
137
138
139
140
141
142
143
144
145
146
147
148
149
150
151
152
153
154
155
156
157
158
159
160
import React , {ChangeEventHandler ,FocusEventHandler ,Fragment ,KeyboardEventHandler ,from "react" ;import { localStore } from "../../utils/store/index.js" ;Props = {};export default function Search ({}: Props ) {const inputRef = useRef<HTMLInputElement >(null );const [relatedList, setRelatedList] = useState<string[]>([]);const [isShow, setIsShow] = useState<boolean>(false );const [inputValue, setInputValue] = useState<string>("" );const [selectedIdx, setSelectedIdx] = useState<number>(-1 );const handleFocus : FocusEventHandler <HTMLInputElement > = (e ) => {setRelatedList (get ("searchHistoryList" ) || [])reduce ((setArr: string[], item: string ) => {return setArr.includes (item) ? setArr : [...setArr, item];filter ((item: string ) => Boolean (item))filter ((item: string ) => target .value ||target .value && item.includes (e.target .value )),slice (0 , 5 ),setIsShow (true );const handleBlur = (setIsShow (false );const handleChangge : ChangeEventHandler <HTMLInputElement > = (e ) => {setInputValue (e.target .value );setSelectedIdx (-1 );handleFocus (e as any);const handleKeyDown : KeyboardEventHandler <HTMLInputElement > = (e ) => {console .log ("[ handleKeyDown ] >" );switch (e.key ) {case "Enter" : {const currentValue =1 ? relatedList[selectedIdx] : inputValue;setInputValue (currentValue);unshift ("searchHistoryList" , currentValue);setIsShow (false );break ;case "ArrowUp" : {if (relatedList.length ) {if (selectedIdx < 1 ) {setSelectedIdx (relatedList.length - 1 );else {setSelectedIdx ((idx: number ) => idx - 1 );break ;case "ArrowDown" : {if (relatedList.length ) {if (selectedIdx === relatedList.length - 1 ) {setSelectedIdx (0 );else {setSelectedIdx ((idx: number ) => idx + 1 );break ;default :break ;const handleSearchBtnClick = (const currentValue = inputValue || inputRef.current ?.placeholder ;setInputValue (currentValue!);unshift ("searchHistoryList" , currentValue);setIsShow (false );return (<Fragment > <div className =" flex items-center" > <input onFocus ={handleFocus} onBlur ={handleBlur} onChange ={handleChangge} onKeyDown ={handleKeyDown} ref ={inputRef} value ={inputValue} type ="text" className =" w-98 h-8 border border-gray-100 px-4 rounded-full bg-gray-50" placeholder ="福建软考报名入口" /> <button className =" w-16 h-8 mx-4 text-sm bg-blue-500 text-white flex justify-center items-center rounded-full hover:bg-blue-800 transition-all" onClick ={handleSearchBtnClick} > 提问 </button > </div > {relatedList?.length && isShow ? ( <div className ="fixed top-16 w-96 z-10 bg-white border h-auto" style ={{ left: inputRef.current ?.getBoundingClientRect ()?.x }} > {relatedList.map((item, idx) => { return ( <div key ={idx} className ={ `mb-2 last:mb-0 py-2 px-4 hover:bg-gray-100 cursor-pointer flex justify-between hover: *:flex ${idx === selectedIdx ? "bg-gray-100 text-blue-400 " : ""}`} > <span > {item}</span > <span className ="text-gray-500 text-sm hidden" > X</span > </div > ); })} </div > ) : ( <> </> Fragment >
4、组件库开发
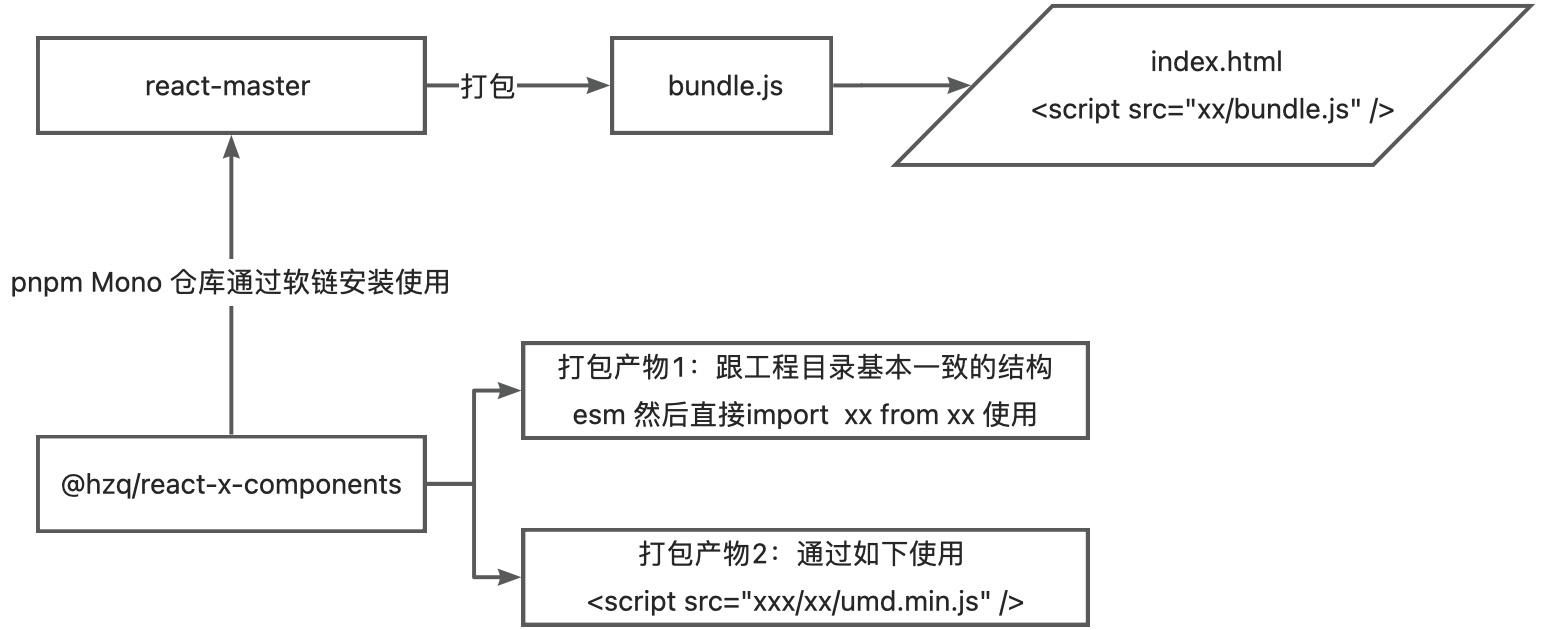
采用 Rollup 打包,产物为 umd、esm 两种
新建组件库文件夹(进入packages/components内)
1 mkdir react-x-components
初始化该项目(进入packages/component/react-x-components内)
1 cd react-x-components && pnpm init
创建两个组件文件
1 mkdir src && mkdir src/button && touch src/button/index.tsx && mkdir src/card && touch src/card/index.tsx
src/button/index.tsx写入代码
1
2
3
4
5
6
7
8
9
10
11
12
13
14
15
16
17
import React from "react" ;Props = {children : React .ReactNode ;() => void ;export default function Button ({ children, onClick }: Props ) {return (<button onClick ={onClick} className =" w-16 h-8 mx-4 text-sm bg-blue-500 text-white flex justify-center items-center rounded-full hover:bg-blue-800 transition-all" > {children} </button >
src/card/index.tsx写入代码
1
2
3
4
5
6
7
8
9
10
11
12
13
14
15
16
import React from "react" ;Props = {React .ReactNode ;export default function Card ({ className, children }: Props ) {return (<div className ={ ` bg-white border border-gray-200 m-2 rounded-sm shadow-md ${className }`} > {children} </div >
手写 Rollup 配置
安装对应依赖(packages/components/react-x-components下)
1 pnpm add rollup rollup-plugin-clear rollup-plugin-auto-add rollup-plugin-typescript2 @rollup/plugin-node-resolve @rollup/plugin-commonjs @rollup/plugin-alias rollup-plugin-peer-deps-external rollup-plugin-filesize rollup-plugin-postcss rollup-plugin-terser rollup-plugin-multi-input postcss typescript react @types/react -D
创建对应文件
1 mkdir scripts && touch scripts/rollup.config .js && touch tsconfig.json && touch scripts/tsconfig.esm .json && touch scripts/tsconfig.umd .json
tsconfig.json写如下代码
1 2 3 4 5 6 7 8 9 10 11 12 13 14 15 16 17 18 19 20 21 22 23 24 25 26 27 28 29 30 31 32 {"compilerOptions" : {"target" : "ESNext" ,"useDefineForClassFields" : true ,"lib" : ["DOM" , "DOM.Iterable" , "ESNext" ],"outDir" : "./lib" ,"allowJs" : false ,"skipLibCheck" : false ,"esModuleInterop" : false ,"allowSyntheticDefaultImports" : true ,"strict" : true ,"forceConsistentCasingInFileNames" : true ,"module" : "ESNext" ,"moduleResolution" : "Node" ,"resolveJsonModule" : true ,"isolatedModules" : true ,"noEmit" : false ,"jsx" : "react" , "baseUrl" : "./" ,"paths" : {"@/*" : ["src/*" ]"noImplicitAny" : false "include" : ["./src/**/*" ],"exclude" : ["node_modules" , "**/dist" , "**/esm" ],"ts-node" : {"compilerOptions" : {"module" : "CommonJS"
scripts/tsconfig.esm.json写如下代码
1 2 3 4 5 6 7 8 9 10 11 12 13 14 15 16 17 18 19 20 21 {"extends" : "../tsconfig.json" ,"ts-node" : {"transplieOnly" : true ,"require" : ["typescript-transform-paths/register" ]"compilerOptions" : {"plugins" : ["transform" : "typescript-transform-paths" },"transform" : "typescript-transform-paths" ,"afterDeclarations" : true "declaration" : true ,"jsx" : "react" ,"jsxFactory" : "React.createElement" ,"jsxFragmentFactory" : "React.Fragment" "include" : ["../src" ]
scripts/tsconfig.umd.json写如下代码
1 2 3 4 5 6 7 8 {"extends" : "../tsconfig.json" ,"compilerOptions" : {"jsx" : "react" ,"jsxFactory" : "React.createElement" ,"jsxFragmentFactory" : "React.Fragment"
改造package.json加上peerDependencies告知当前组件库所依赖的包(组件库可不提供)
1 2 3 4 5 6 7 8 9 10 11 12 13 14 15 16 17 18 19 20 21 22 23 24 25 26 27 28 29 30 31 32 33 34 {"name" : "react-x-components" ,"version" : "1.0.0" ,"description" : "" ,"main" : "index.js" ,"scripts" : {"test" : "echo \"Error: no test specified\" && exit 1" "keywords" : [],"author" : "" ,"license" : "ISC" ,"devDependencies" : {"@rollup/plugin-alias" : "^5.1.0" ,"@rollup/plugin-commonjs" : "^25.0.7" ,"@rollup/plugin-node-resolve" : "^15.2.3" ,"@types/react" : "^18.2.64" ,"postcss" : "^8.4.35" ,"react" : "^18.2.0" ,"rollup" : "^4.12.1" ,"rollup-plugin-auto-add" : "^0.0.6" ,"rollup-plugin-clear" : "^2.0.7" ,"rollup-plugin-filesize" : "^10.0.0" ,"rollup-plugin-multi-input" : "^1.4.1" ,"rollup-plugin-peer-deps-external" : "^2.2.4" ,"rollup-plugin-postcss" : "^4.0.2" ,"rollup-plugin-terser" : "^7.0.2" ,"rollup-plugin-typescript2" : "^0.36.0" ,"typescript" : "^5.4.2" "peerDependencies" : { "react" : "^18.2.0" , "react-dom" : "^18.2.0"
手写配置代码scripts/rollup.config.js
1
2
3
4
5
6
7
8
9
10
11
12
13
14
15
16
17
18
19
20
21
22
23
24
25
26
27
28
29
30
31
32
33
34
35
36
37
38
39
40
41
42
43
44
45
46
47
48
49
50
51
52
53
54
55
56
57
58
59
60
61
62
63
64
65
66
67
68
69
70
71
72
73
74
75
76
77
78
79
80
81
82
83
84
85
86
87
88
89
90
91
92
93
94
95
96
97
98
99
100
101
102
103
104
105
106
107
108
109
110
111
112
113
114
115
116
117
const clear = require ("rollup-plugin-clear" );const autoAdd = require ("rollup-plugin-auto-add" ).default ;const multiInput = require ("rollup-plugin-multi-input" ).default ;const typescript = require ("rollup-plugin-typescript2" );const path = require ("path" );const peerDepExternal = require ("rollup-plugin-peer-deps-external" );const resolve = require ("@rollup/plugin-node-resolve" );const commonjs = require ("@rollup/plugin-commonjs" );const alias = require ("@rollup/plugin-alias" );const postcss = require ("rollup-plugin-postcss" );const { terser } = require ("rollup-plugin-terser" );const filesize = require ("rollup-plugin-filesize" );const pkg = require ("../package.json" );module .exports = [input : "src/**/*" ,output : [dir : "esm" ,format : "esm" ,sourceMap : false ,enternal : Object .keys (pkg.peerDenpendencies || {}),plugins : [clear ({ target : "esm" }),autoAdd ({include : [/src\/(((?!\/).)+?)\/index\.tsx/gi ],multiInput (),typescript ({path : path.resolve (__dirname, "./tsconfig.esm.json" ),peerDepExternal (),resolve (), commonjs (), filesize (), postcss ({minimize : true ,sourceMap : true ,extensions : [".less" , ".css" ],use : ["less" ],alias ({entries : {"@" : path.resolve (__dirname, "../src" ),input : "src/index.tsx" ,output : [dir : "dist" ,format : "umd" ,exports : "named" ,name : pkg.name ,sourceMap : true ,enternal : Object .keys (pkg.peerDenpendencies || {}),plugins : [clear ({ target : "dist" }),autoAdd ({include : [/src\/(((?!\/).)+?)\/index\.tsx/gi ],multiInput (),typescript ({path : path.resolve (__dirname, "./tsconfig.dist.json" ),peerDepExternal (),resolve (), commonjs (), filesize (), postcss ({minimize : true ,sourceMap : true ,extensions : [".less" , ".css" ],use : ["less" ],alias ({entries : {"@" : path.resolve (__dirname, "../src" ),
改造package.json加上打包命令
1 2 3 4 5 6 7 8 {scripts : {"test" : "echo \"Error: no test specified\" && exit 1" ,"build" : "rollup --config ./scripts/rollup.config.js"
新建index.tsx
1
2
3
4
5
6
7
touch src/index.tsx import Button from "./button" ;import Card from "./card" ;export { Button , Card };
运行pnpm build,进行打包
改造一些,给内部项目使用
改造package.json,看变更
内部项目安装它,进入apps/react-master内,运行安装命令
1 pnpm add @hzq/react-x-components
在项目中引入并使用
1
2
3
4
5
import { Button } from "@hzq/react-x-components" ;<Button > 提问111</Button >
效果如下:
组件使用流程讲解 package.json,然后运行pnpm dev这样就是边开发边打包,能达到“实时”
1 2 3 4 5 6 7 8 9 10 11 12 13 {"main" : "src/index.tsx" , "scripts" : {"test" : "echo \"Error: no test specified\" && exit 1" ,"build" : "rollup --config ./scripts/rollup.config.js" ,"dev" : "rollup --config ./scripts/rollup.config.js -w"
2、改造组件项目的package.json,这样直接使用组件源码,也能达到“实时”
1 2 3 4 5 6 7 {"main" : "src/index.tsx" ,
5、插件封装 微内核架构
抽象不依赖实现
提供一个内核(core/engine),内核本身具有很强的扩展性,但内核不会因为有了一个扩展,就去修改内核自身
核心伪代码:
1
2
3
4
5
6
7
8
9
10
11
12
13
14
15
16
17
18
19
20
21
22
23
24
25
26
27
28
29
30
31
32
33
34
35
36
37
38
39
40
41
42
43
44
45
46
47
48
49
50
51
52
53
54
55
56
57
58
59
60
61
62
63
64
65
66
67
68
69
70
71
72
73
74
75
76
77
78
79
80
81
82
83
84
85
86
87
88
89
90
91
92
93
94
95
96
97
98
const events = {};const typeEnum = ["create" , "mount" , "distory" ];class Core {beforeCreate (console .log ("beforeCreate" );created (console .log ("created" );beforeMount (console .log ("beforeMount" );mounted (console .log ("mounted" );beforeDistory (console .log ("beforeDistory" );distoryed (console .log ("distoryed" );constructor (opts ) {this .opts = { ...this .defaultOpts , ...opts };addPlugin ({ type, run } ) {push (run);pluginsRun (type ) {forEach ((fn ) => fn (this .context ));start (this .opts .beforeCreate (); this .pluginsRun ("create" );this .opts .created (); this .opts .beforeMount (); this .pluginsRun ("mount" );this .opts .mounted (); end (this .opts .beforeDistory (); this .pluginsRun ("distory" );this .opts .distoryd (); export default Core ;const core = new Core ({beforeCreate (console .log ("[ this is my beforeCreate] >" );mounted (console .log ("[ this is my mounted] >" );addPlugin ({type : "create" ,run (context ) {console .log ("[ create run 1 ] >" );xxxx = "xxxx" ;addPlugin ({type : "create" ,run (context ) {console .log ("[ create run 2 ] >" );console .log ("[ create run 2 context ] >" , context);yyyy = "yyyy" ;addPlugin ({type : "mount" ,run (context ) {console .log ("[ mount context ] >" , context);start ();
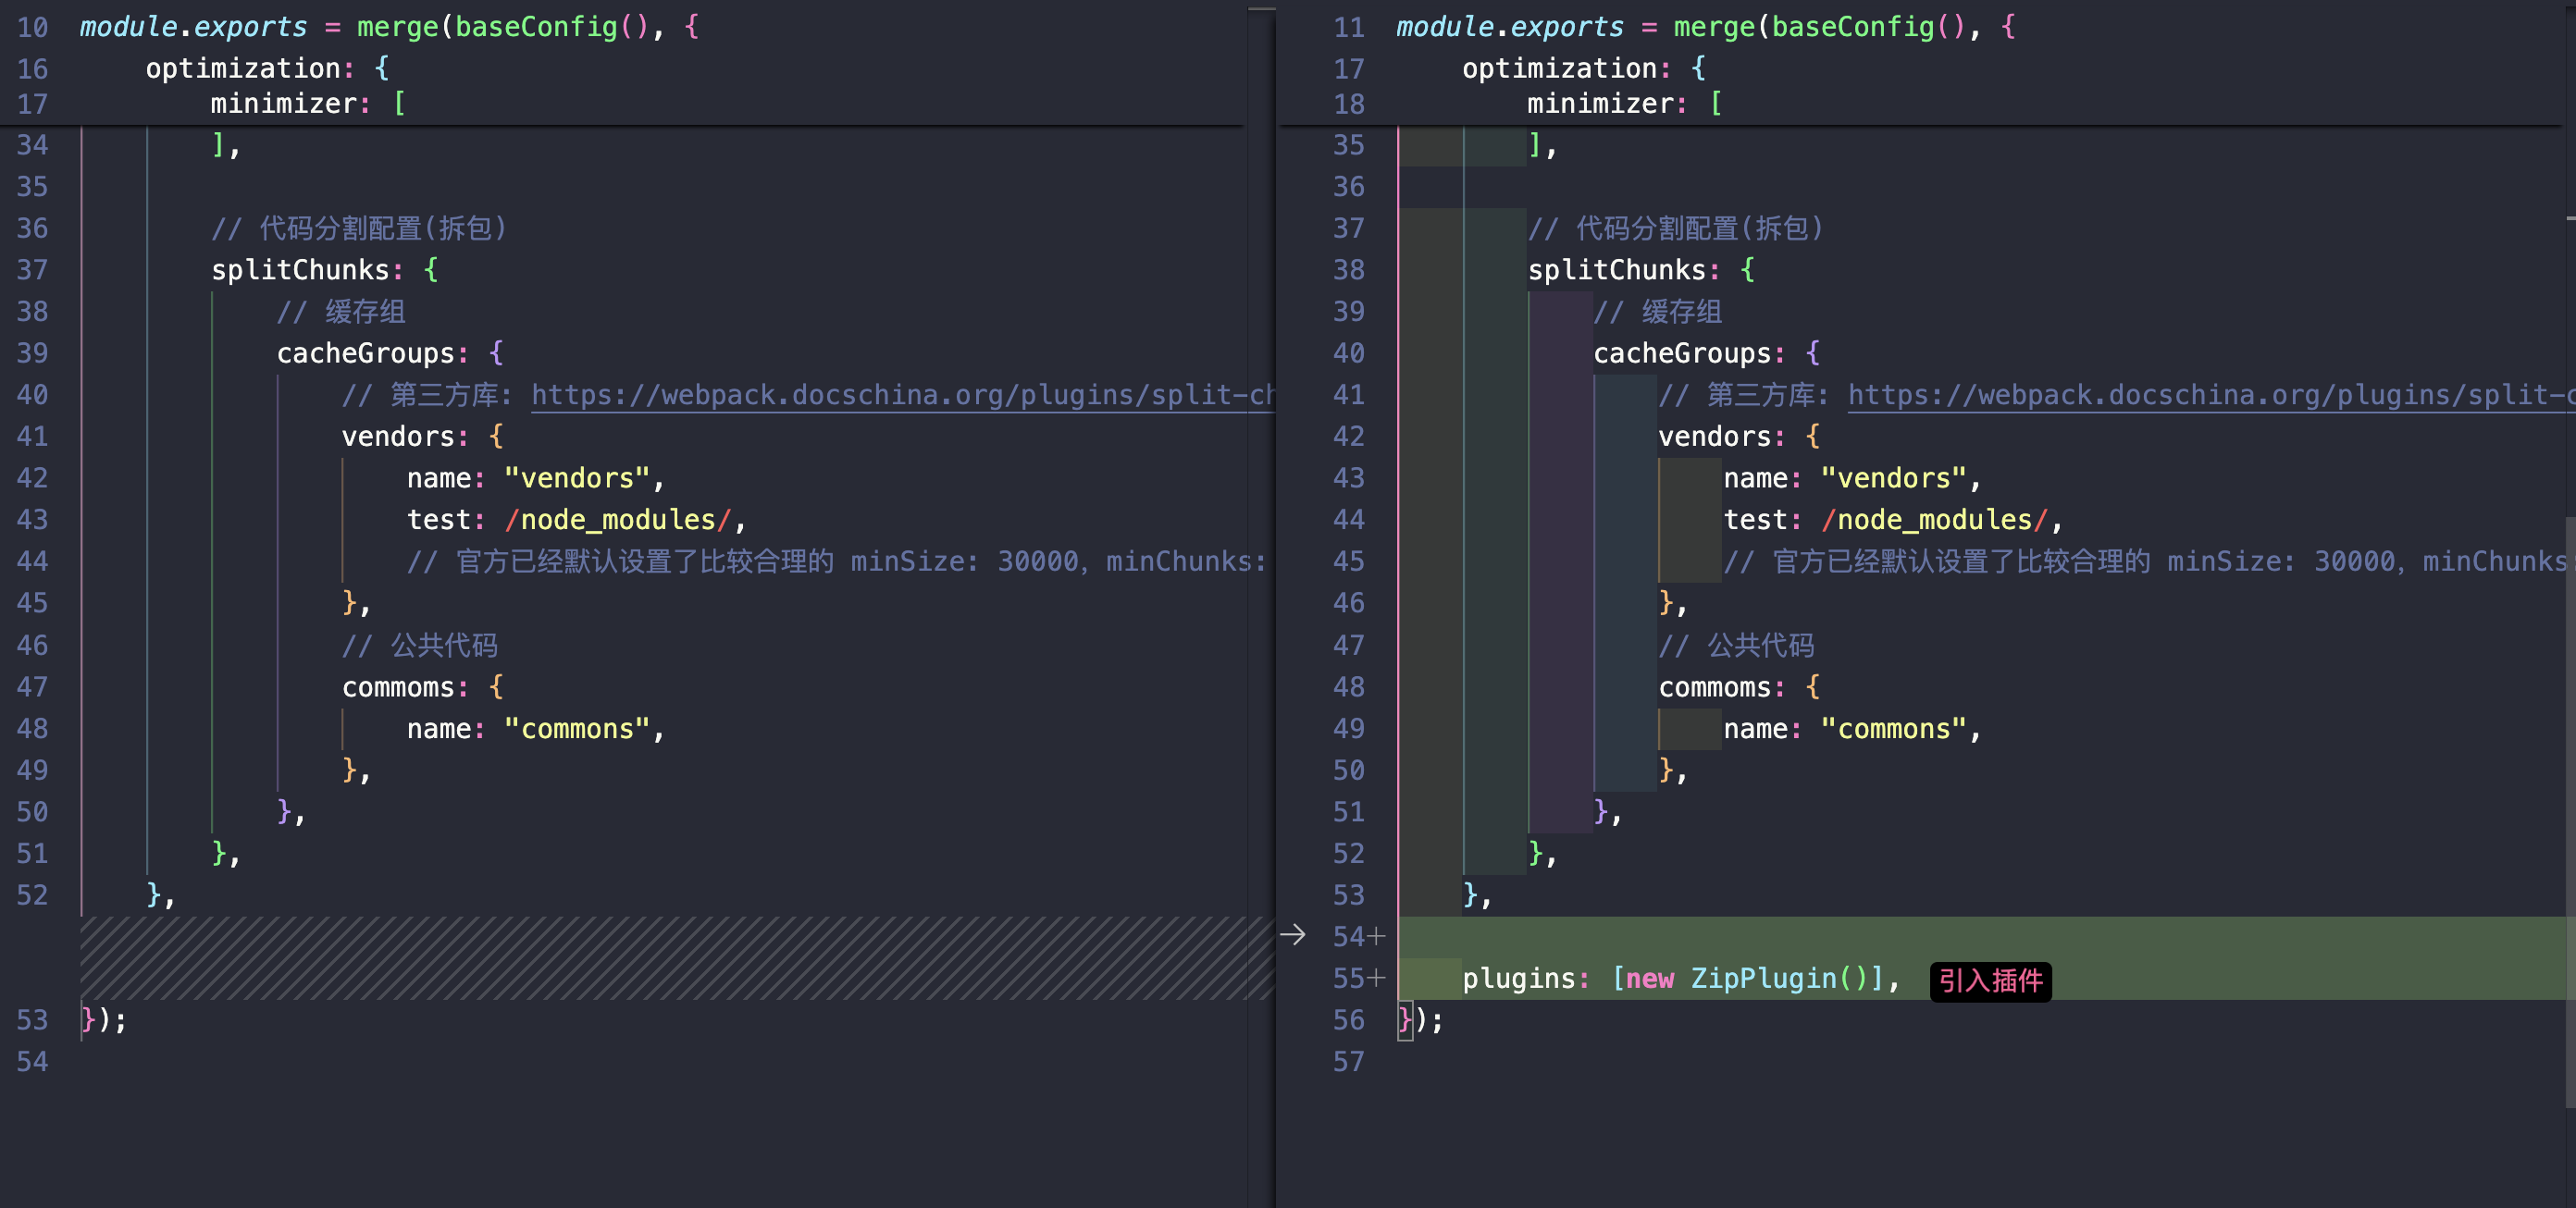
Webpack:zipPlugin 插件封装(apps/react-master 下)
功能描述:将打包的东西压缩成一个包
安装前置依赖
1 pnpm add jszip webpack-sources -D
新建对应文件
编写代码
1
2
3
4
5
6
7
8
9
10
11
12
13
14
15
16
17
18
19
20
21
22
23
24
25
26
27
28
29
30
31
32
33
34
35
36
37
38
39
40
const JSzip = require ("jszip" ); const { RawSource } = require ("webpack-sources" );class ZipPlugin {static defaultOptions = {outputFile : "dist.zip" ,constructor (options ) {this .options = { ...ZipPlugin .defaultOptions , ...options };apply (compiler ) {const pluginName = ZipPlugin .name ;hooks .emit .tapAsync (pluginName, (compilation, callback ) => {const zip = new JSzip ();Object .keys (compilation.assets ).forEach ((filename ) => {const source = compilation.assets [filename].source ();file (filename, source); generateAsync ({ type : "nodebuffer" }).then ((content ) => {emitAsset (this .options .outputFile , new RawSource (content));callback (); module .exports = { ZipPlugin };
更改react-master/scripts/webpack.prod.js(看变更)
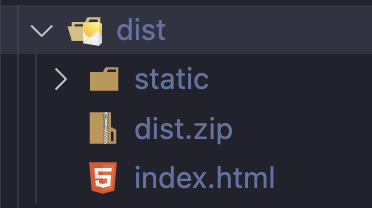
运行pnpm build,生成的dist里面就会有个dist.zip,解压后就是整个dist
Babel:consolePlugin 插件封装(apps/react-master 下)
功能描述:在调试模式下,将 console.log() 丰富,支持打印具体位置:行数、列数
安装前置依赖
1 pnpm add @babel/generator -D
新建对应文件
编写代码
1
2
3
4
5
6
7
8
9
10
11
12
13
14
15
16
17
18
19
20
21
22
const generator = require ("@babel/generator" ).default ;function consolePlugin ({ types } ) {return {visitor : {CallExpression (path) {const name = generator (path.node .callee ).code ;if (["console.log" , "console.info" , "console.error" ].includes (name)) {const { line, column } = path.node .loc .start ;node .arguments .unshift (stringLiteral (`fliepath: ${line} :${column} ` ),module .exports = consolePlugin;
使用插件
1 2 3 4 5 6 7 8 {"presets" : ["@babel/preset-react" , "@babel/preset-typescript" "plugins" : ["./consolePlugin.js" ]
重新启动项目pnpm start,写一个console.log(xx)并打印出来,可以看有行数、列数了
Postcss 插件:themePlugin(apps/react-master 下)
主要功能:实现网站主题色切换
基本功能 先展示基于tailwindcss实现的最朴实的颜色切换
更改tailwind.config.js
1 2 3 4 5 6 7 8 9 10 11 12 13 14 15 16 17 18 19 20 21 22 23 24 25 26 module .exports = {content : ["./src/**/*.{tsx,ts,jsx,js}" ],theme : {extend : {},colors : { white : "var(--color-white)" ,black : "var(--color-black)" ,gray : {50 : "var(--color-gray-50)" ,100 : "var(--color-gray-100)" ,200 : "var(--color-gray-200)" ,300 : "var(--color-gray-300)" ,400 : "var(--color-gray-400)" ,500 : "var(--color-gray-500)" ,600 : "var(--color-gray-600)" ,700 : "var(--color-gray-700)" ,800 : "var(--color-gray-800)" ,900 : "var(--color-gray-900)" ,950 : "var(--color-gray-950)" ,plugins : [],
更改index.less
1 2 3 4 5 6 7 8 9 10 11 12 13 14 15 16 17 18 19 20 21 22 23 24 25 26 27 28 29 30 31 32 33 34 35 36 37 38 39 40 white : #fff;black : #000 ;50 : #f9fafb;100 : #f3f4f6;200 : #e5e7eb;300 : #d1d5db;400 : #9ca3af;500 : #6b7280;600 : #4b5563;700 : #374151 ;800 : #1f2937;900 : #111827 ;950 : #030712 ;"dark" ] {white : #000 ;black : #fff;950 : #f9fafb;900 : #f3f4f6;800 : #e5e7eb;700 : #d1d5db;600 : #9ca3af;500 : #6b7280;400 : #4b5563;300 : #374151 ;200 : #1f2937;100 : #111827 ;50 : #030712 ;
更改react-master/src/components/navigation/index.tsx,增加一个主题切换操作,看 mr
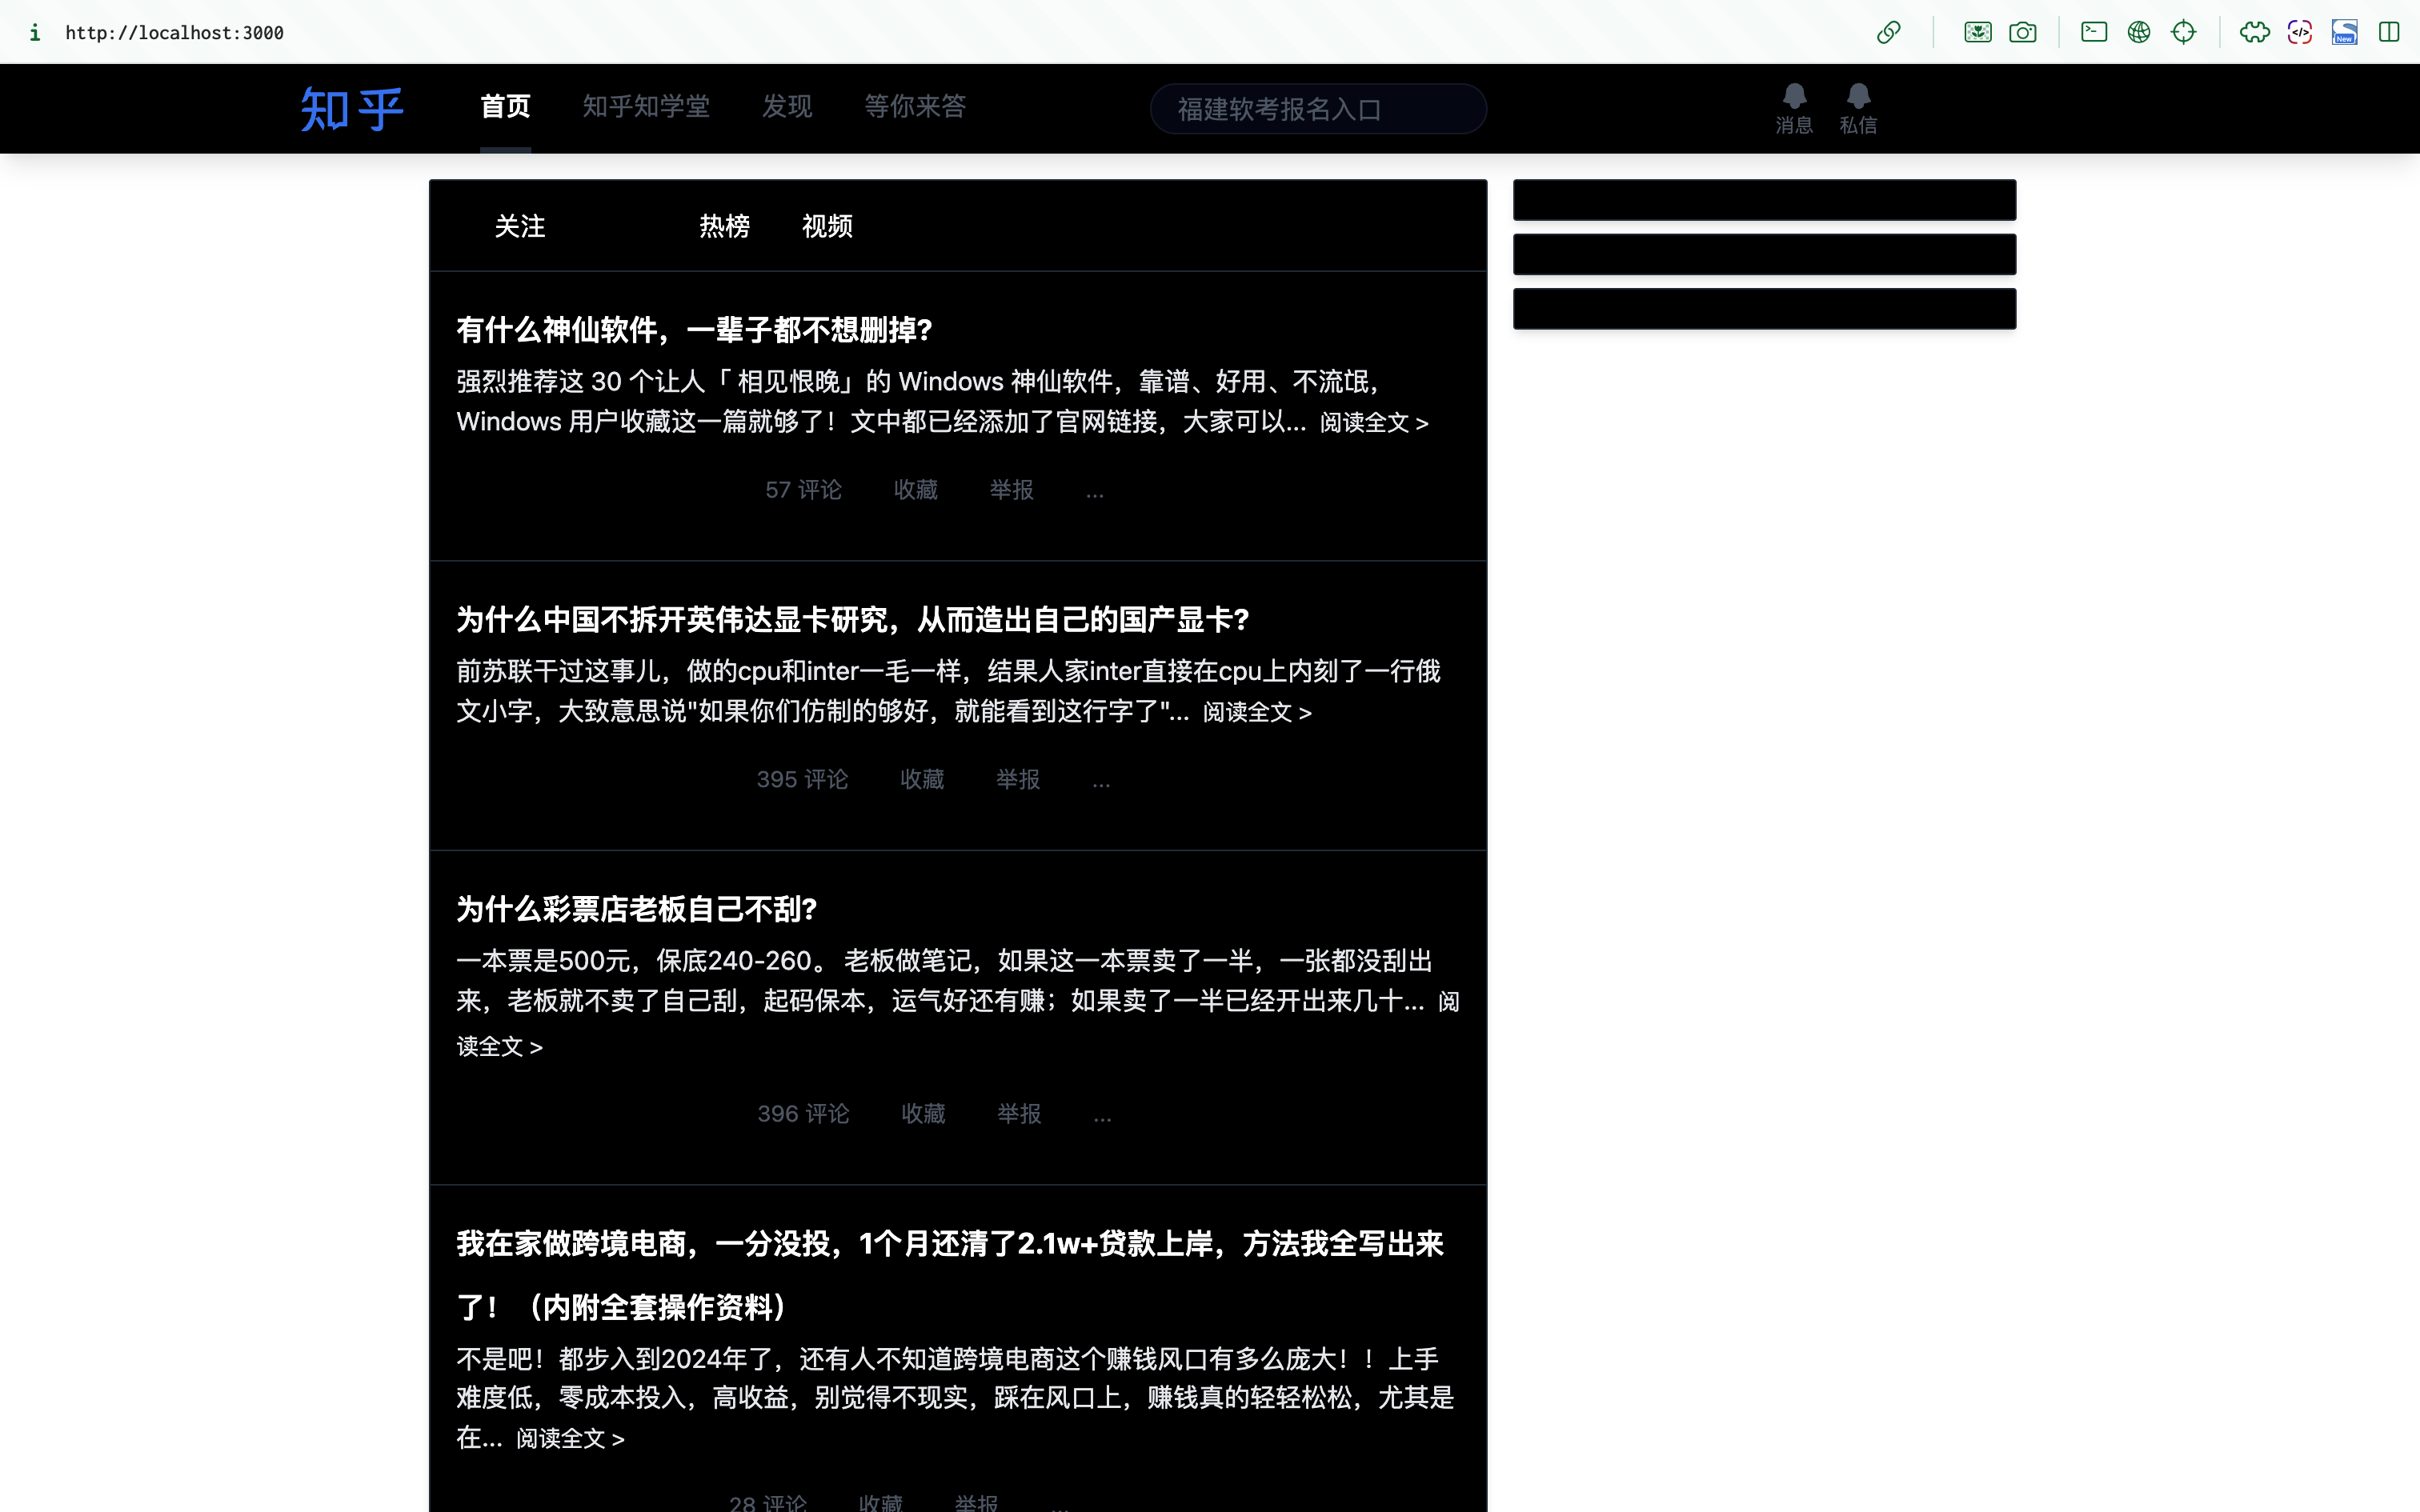
切换之前
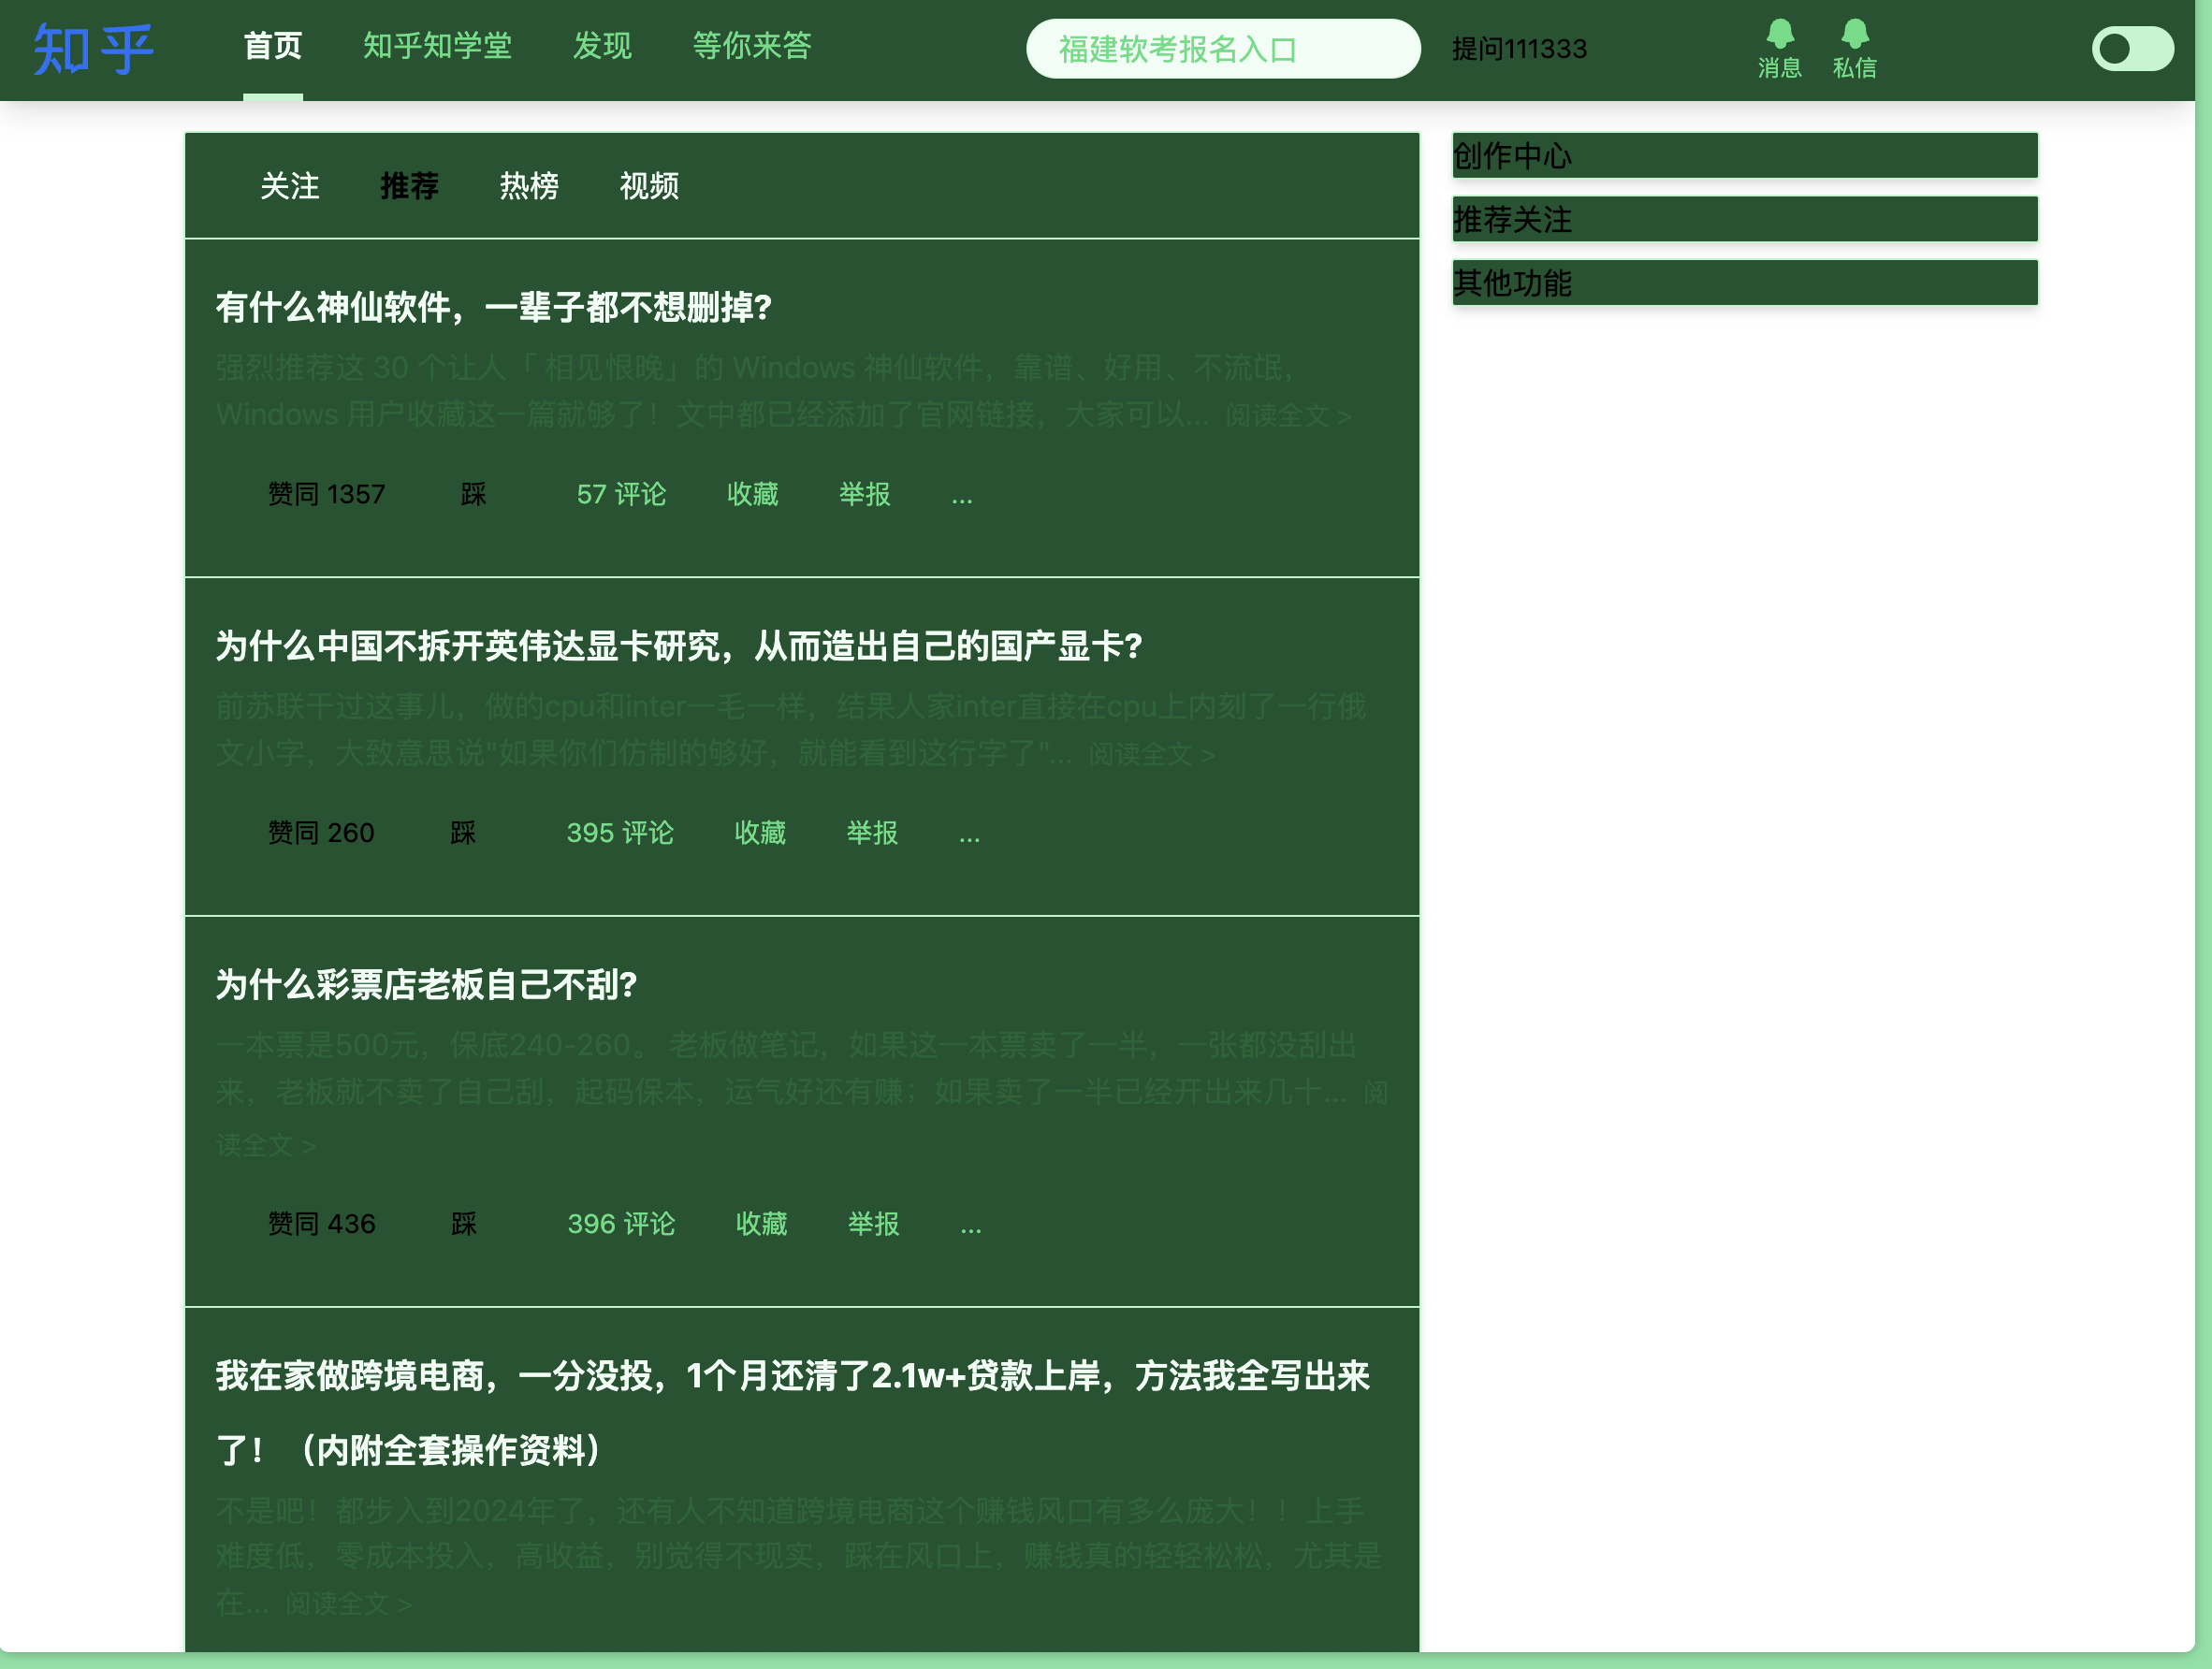
切换之后
基于插件 基本功能完成后,会发现我们的主题变量需要手动去维护,当主题多了就麻烦了,现在就可以写插件来处理
色卡:主题需要设计时提供一系列对应的颜色值,明亮、暗黑、xx 一套
在前端可以这样去维护:
新建色卡文件,就是之前index.less里面写 css 代码,改成 js 代码而已
1
2
3
4
5
6
7
8
9
10
11
12
13
14
15
16
17
18
19
20
21
22
23
24
25
26
27
28
29
30
31
32
33
34
35
36
37
38
39
40
41
42
43
44
45
46
47
48
49
50
51
52
touch themeGroup.js const themeGroup = {light : {"--color-white" : "#fff" ,"--color-black" : "#000" ,"--color-gray-50" : "#f9fafb" ,"--color-gray-100" : "#f3f4f6" ,"--color-gray-200" : "#e5e7eb" ,"--color-gray-300" : "#d1d5db" ,"--color-gray-400" : "#9ca3af" ,"--color-gray-500" : "#6b7280" ,"--color-gray-600" : "#4b5563" ,"--color-gray-700" : "#374151" ,"--color-gray-800" : "#1f2937" ,"--color-gray-900" : "#111827" ,"--color-gray-950" : "#030712" ,dark : {"--color-white" : "#000" ,"--color-black" : "#fff" ,"--color-gray-950" : "#f9fafb" ,"--color-gray-900" : "#f3f4f6" ,"--color-gray-800" : "#e5e7eb" ,"--color-gray-700" : "#d1d5db" ,"--color-gray-600" : "#9ca3af" ,"--color-gray-500" : "#6b7280" ,"--color-gray-400" : "#4b5563" ,"--color-gray-300" : "#374151" ,"--color-gray-200" : "#1f2937" ,"--color-gray-100" : "#111827" ,"--color-gray-50" : "#030712" ,green : {"--color-white" : "#14532d" ,"--color-black" : "#f0fdf4" ,"--color-gray-50" : "#f0fdf4" ,"--color-gray-100" : "#dcfce7" ,"--color-gray-200" : "#bbf7d0" ,"--color-gray-300" : "#86efac" ,"--color-gray-400" : "#4ade80" ,"--color-gray-500" : "#22c55e" ,"--color-gray-600" : "#16a34a" ,"--color-gray-700" : "#15803d" ,"--color-gray-800" : "#166534" ,"--color-gray-900" : "#14532d" ,"--color-gray-950" : "#052e16" ,module .exports = { themeGroup, defaultTheme : "green" };
删除index.less里面的颜色配置
更改tailwind.config.js,将var改为hzqTheme,最后实现效果是将color:hzqTheme(--color-white)通过插件变为color:#fff,这样就完成了插件的功能
1 2 3 4 5 6 7 8 9 10 11 12 13 14 15 16 17 18 19 20 21 22 23 24 25 26 module .exports = {content : ["./src/**/*.{tsx,ts,jsx,js}" ],theme : {extend : {},colors : {white : "hzqTheme(--color-white)" ,black : "hzqTheme(--color-black)" ,gray : {50 : "hzqTheme(--color-gray-50)" ,100 : "hzqTheme(--color-gray-100)" ,200 : "hzqTheme(--color-gray-200)" ,300 : "hzqTheme(--color-gray-300)" ,400 : "hzqTheme(--color-gray-400)" ,500 : "hzqTheme(--color-gray-500)" ,600 : "hzqTheme(--color-gray-600)" ,700 : "hzqTheme(--color-gray-700)" ,800 : "hzqTheme(--color-gray-800)" ,900 : "hzqTheme(--color-gray-900)" ,950 : "hzqTheme(--color-gray-950)" ,plugins : [],
安装前置依赖:用于修改 css 代码的库
1 pnpm add postcss-nested@^6.0 .1 postcss-nesting@^10.2 .0
新建插件文件themePlugin.js
1
2
3
4
5
6
7
8
9
10
11
12
13
14
15
16
17
18
19
20
21
22
23
24
25
26
27
28
29
30
31
32
33
34
35
36
37
38
39
40
41
42
43
44
45
46
47
48
49
50
51
52
53
54
55
56
57
58
59
60
61
62
63
64
65
66
67
68
69
70
71
72
73
74
75
76
77
78
79
80
81
82
83
84
85
86
87
88
89
90
91
92
93
94
95
96
97
touch themePlugin.js const postcss = require ("postcss" );module .exports = postcss.plugin ("postcss-theme" , (options ) => {const defalutOpts = {functionName : "hzqTheme" ,themeGroup : {},defaultTheme : "light" ,themeSelector : 'html[data-theme="$_$"]' ,nestingPlugin : null ,Object .assign ({}, defalutOpts, options);const getColorByThemeGroup = (color, theme ) => {return options.themeGroup [theme][color];const regColorValue = new RegExp (`\\b${options.functionName} \\(([^)]+)\\)` ,"g" ,return (style, result ) => {const hasPlugin = (name ) =>replace (/^postcss-/ , "" ) === options.nestingPlugin ||processor .plugins .some ((p ) => p.postcssPlugin === name);const getColorValue = (value, theme ) => {return value.replace (regColorValue, (match, color ) => {return getColorByThemeGroup (color, theme);walkDecls ((decl ) => {const value = decl.value ;if (!value || !regColorValue.test (value)) {return ;try {let defaultTheme;Object .keys (options.themeGroup ).forEach ((key ) => {const themeColor = getColorValue (value, key);const themeSelector = options.themeSelector .replace ("$_$" , key);let themeRule;if (hasPlugin ("postcss-nesting" )) {atRule ({name : "nest" ,params : `${themeSelector} &` ,else if (hasPlugin ("postcss-nested" )) {rule ({params : `${themeSelector} &` ,else {throw new Error ("请安装 postcss-nesting 或者 postcss-nested 插件" );const themeDecl = decl.clone ({ value : themeColor });if (themeRule) {append (themeDecl);after (themeRule);if (key === options.defaultTheme ) {if (defaultTheme) decl.replaceWith (defaultTheme);catch (error) {warn (result, error);
更改.postcssrc.js文件,加入对应插件
1
2
3
4
5
6
7
8
9
10
const { themeGroup, defaultTheme } = require ("./themeGroup" ); module .exports = {plugins : ["autoprefixer" , "tailwindcss" ,"postcss-nested" , "postcss-nesting" , require ("./themePlugin" )({ themeGroup, defaultTheme }),
重启项目,默认为绿色,切换后为黑色,再切换为白色
index.html也是一样的效果,这样就完成了主题切换的插件,本质是帮我们注入所有的主题 css 代码
6、后端项目搭建(koa 框架)
nodejs 后端项目使用场景:BFF(backend-for-fontend 给前端用的后端)、内部小系统等
初始化配置
创建文件夹(react-actual-combat 下)
1 mkdir packages/apps/back-end
初始化项目
1 cd packages/apps/back-end && pnpm init
安装devDependencies依赖(apps/back-end 下)
1 pnpm add @babel/core @babel/plugin-proposal-class -properties @babel/plugin-proposal-decorators @babel/preset-env babelrc-rollup core-js rollup rollup-plugin-babel -D
安装dependencies依赖(apps/back-end 下)
1 pnpm add jsonwebtoken koa koa-bodyparser koa-router
编写 Rollup 脚本
1
2
3
4
5
6
7
8
9
10
11
12
13
14
15
16
17
18
19
20
21
22
touch rollup.config .js const babel = require ("rollup-plugin-babel" );module .exports = {input : "./src/index.js" ,output : {name : "hzqServer" , file : "./dist/bundle.js" ,format : "umd" ,treeshake : false ,plugins : [babel ({runtimeHelpers : true ,extensions : [".js" , ".ts" ],exclude : "node_modules/**" ,externalHelpers : true ,
编写 Babel 配置
1
2
3
4
5
6
7
8
9
10
11
12
13
14
15
16
17
18
19
20
21
22
23
24
touch .babelrc "presets" : ["@babel/preset-env" ,"modules" : false ,"loose" : true ,"targets" : "node 16" ,"useBuiltIns" : "usage" ,"corejs" : {"version" : "3.36" , "proposals" : true "plugins" : ["@babel/plugin-proposal-decorators" , { "legacy" : true }],"@babel/plugin-proposal-class-properties" , { "loose" : true }]
新建入口文件src/index.js
1
2
3
4
5
6
7
8
mkdir src && touch src/index.js import { random } from "./test" ;console .log ("[ hello word ] >" , random);export default random;
新建测试文件src/test.js
1
2
3
4
touch src/test.js export const random = Math .random ();
本地运行下src/index.js
package.json新增build命令,然后运行pnpm build
1 2 3 4 5 6 7 8 9 10 {"scripts" : {"test" : "echo \"Error: no test specified\" && exit 1" ,"build" : "rollup --config rollup.config.js"
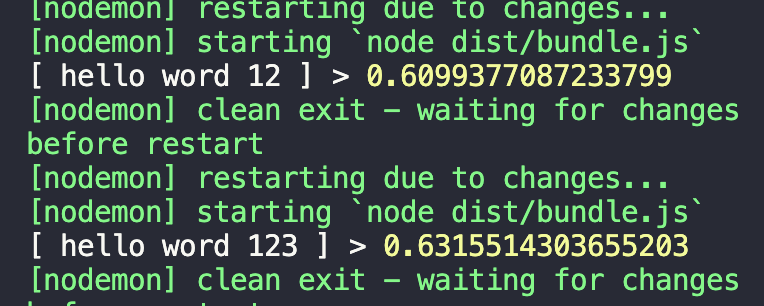
打包后的文件如下(back-end/dist/bundle.js)
1 2 3 4 5 6 7 8 9 10 11 12 13 (function (global , factorytypeof exports === 'object' && typeof module !== 'undefined' ? module .exports = factory () :typeof define === 'function' && define.amd ? define (factory) :global = typeof globalThis !== 'undefined' ? globalThis : global || self, global .hzqServer = factory ());this , (function ('use strict' ;const random = Math .random ();console .log ("[ hello word ] >" , random);return random;
然后可以运行下node dist/bundle.js
本地环境搭建 初始化完项目后,可以发现构建产物是能直接运行的,那可以这样处理本地开发
package.json新增start命令
1 2 3 4 5 6 7 8 9 10 11 {"scripts" : {"test" : "echo \"Error: no test specified\" && exit 1" ,"build" : "rollup --config rollup.config.js" ,"start" : "rollup --config rollup.config.js -w" ,
运行pnpm start,这样每次更改代码后,就会自动打包
新起终端,运行nodemon dist/bundle.js,没有的话全局安装下npm install -g nodemon,这样每次变更时可自动运行
package.json新增dev命令,以后本地开发就运行pnpm dev即可
1 2 3 4 5 6 7 8 9 10 11 12 {"scripts" : {"test" : "echo \"Error: no test specified\" && exit 1" ,"build" : "rollup --config rollup.config.js" ,"start" : "rollup --config rollup.config.js -w" ,"dev" : "pnpm start & nodemon dist/bundle.js"
练一下手
删除之前的构建测试代码,新建空的入口文件
1 rm src/index.js src/test.js && touch src/index.js
项目保持运行pnpm dev哦
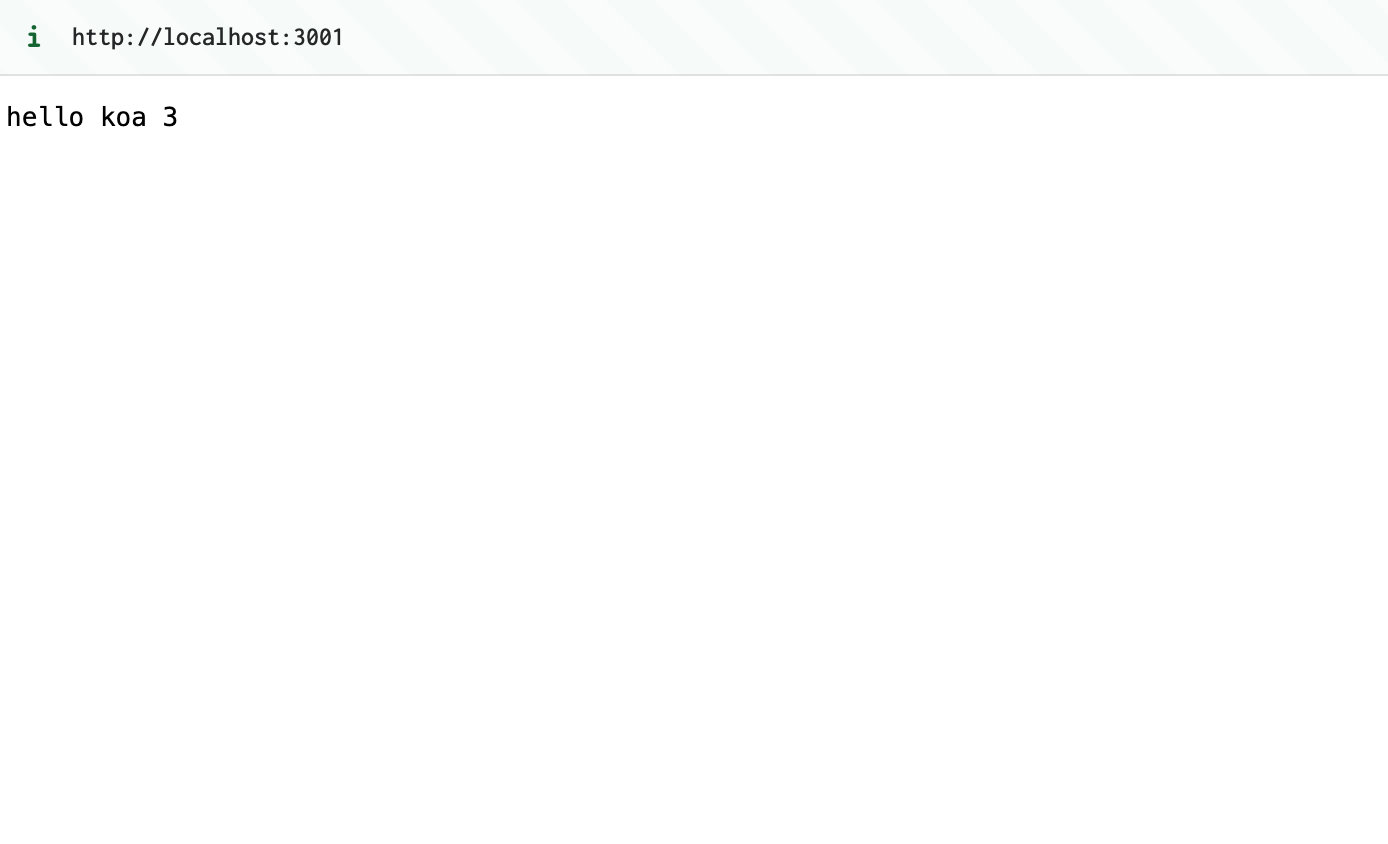
先写个 Hello Koa ,练练手
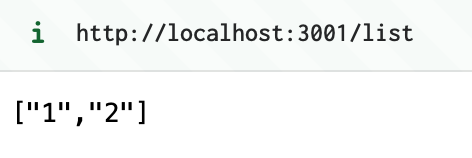
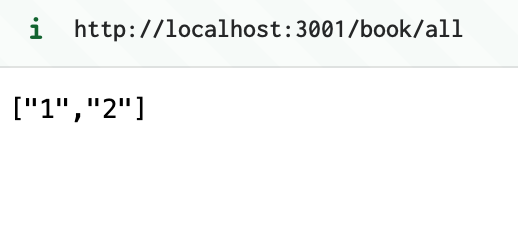
1 2 3 4 5 6 7 8 9 10 11 12 13 14 15 16 17 18 19 20 21 22 23 import Koa from "koa" ;import Router from "koa-router" ;const app = new Koa ();const router = new Router ();get ("/" , async (ctx) => {body = "hello koa 3" ;get ("/list" , async (ctx) => {body = ["1" , "2" ];use (router.routes ());const port = 3001 ;listen (port, () => {console .log (`server is running at http://localhost:${port} ` );
命令行里面点击网址,可以看到页面
http://localhost:3001/list ,也能看到数据
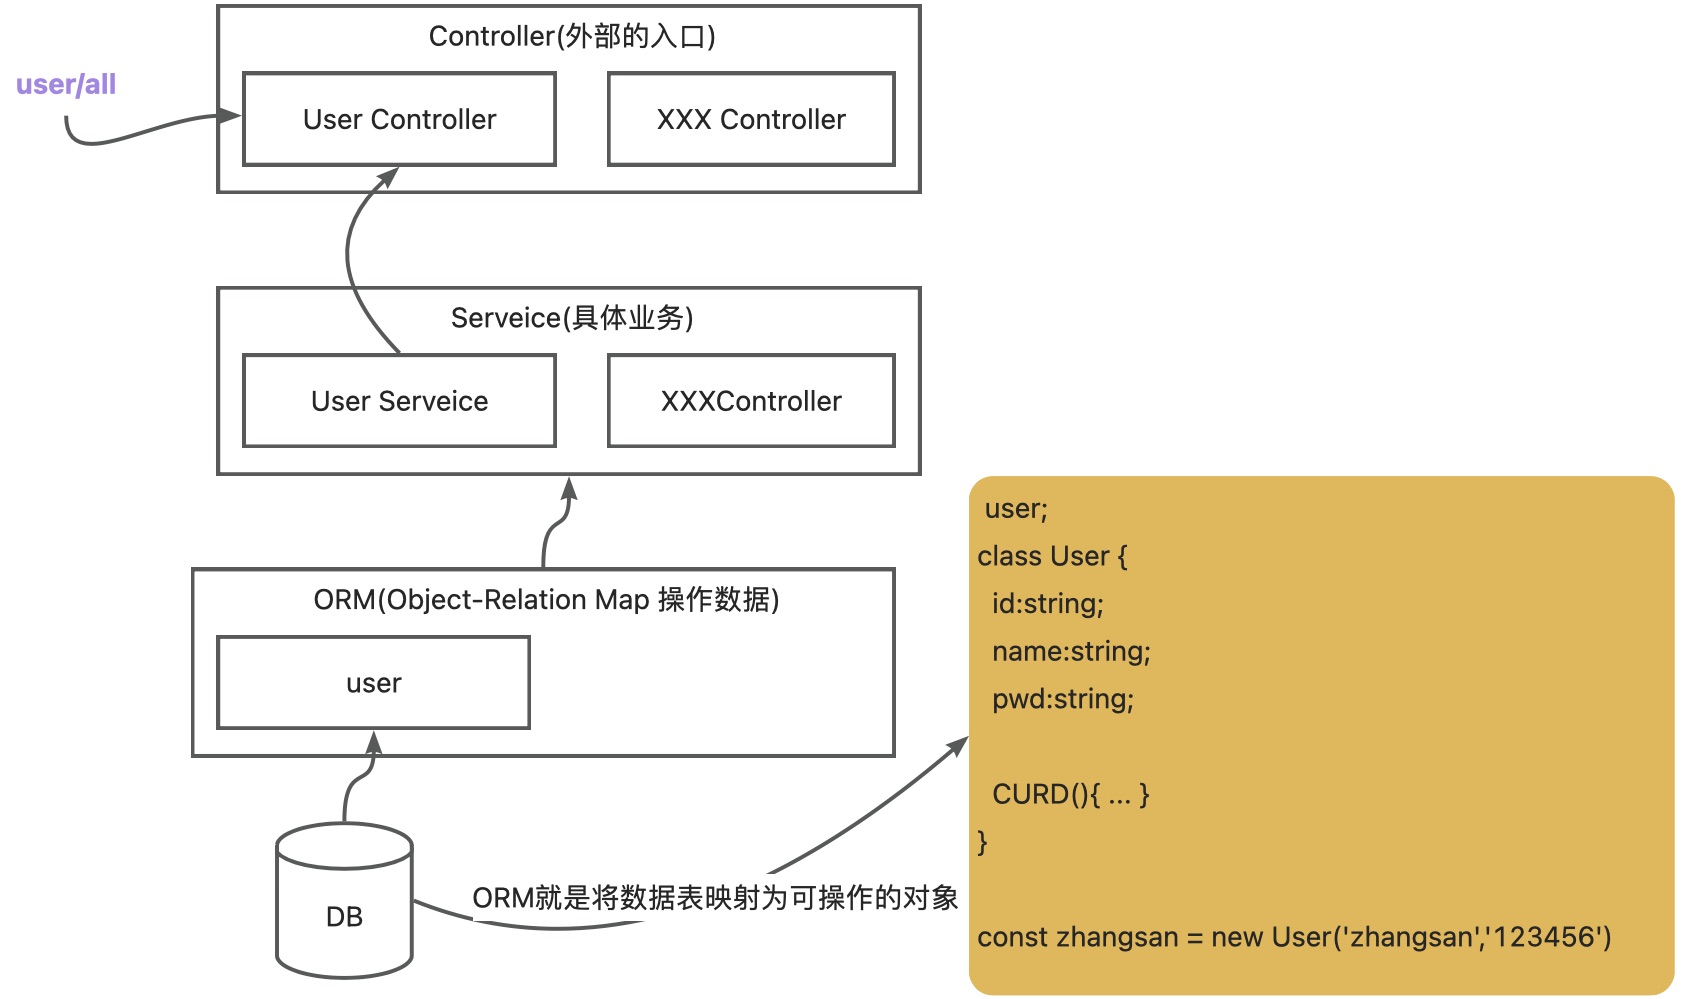
实际开发 后端项目,一般是基于 MVC 形式来组织代码的TS 的装饰器去组装我们的代码
新建controllers文件夹
1 mkdir src/controllers && touch src/controllers/book.js
新建辅助函数:装饰器等等
1 mkdir src/utils && touch src/utils/decorator.js
src/utils/decorator.js写如下代码
1 2 3 4 5 6 7 8 9 10 export const RequestMethod = {GET : "get" ,POST : "post" ,PUT : "put" ,DELETE : "delete" ,export function Controller (perfix = "" ) {}export function RequestMapping (method = "" , url = "" ) {}
src/controllers/book.js写代码
1 2 3 4 5 6 7 8 9 10 11 12 13 14 15 16 17 import { Controller , RequestMapping , RequestMethod } from "../utils/decorator" ;Controller ("/book" )export default class BookController {RequestMapping (RequestMethod .GET , "/all" )async getAll (ctx ) {body = ["1" , "2" ];
完善src/utils/decorator.js代码
1 2 3 4 5 6 7 8 9 10 11 12 13 14 15 16 17 18 19 20 21 22 23 24 25 26 27 28 29 export const RequestMethod = {GET : "get" ,POST : "post" ,PUT : "put" ,DELETE : "delete" ,export const controllers = [];export function Controller (prefix = "" ) {return function (constructor ) {prefix = prefix;export function RequestMapping (method = "" , url = "" ) {return function (target, propertyKey, decriptor ) {let path = url || `/${propertyKey} ` ;const item = {handler : decriptor.value , constructor : target.constructor , push (item);
新建src/controllers/index.js,集中导出controllers下面的文件
1 2 3 4 5 6 touch src/controllers/index.js import BookController from "./book.js" ;export default [BookController ];
现在这几个文件还毫无关系,所以我们简单点强行关联(import),更改src/index.js
1 2 3 4 5 6 7 8 9 10 11 12 13 14 15 16 17 18 19 20 21 22 23 24 25 26 27 28 29 30 31 32 33 34 35 36 37 38 39 40 41 42 43 44 45 46 47 import Koa from "koa" ;import Router from "koa-router" ;import Routers from "./controllers/index" ; import { controllers } from "./utils/decorator.js" ; const app = new Koa ();const router = new Router ();const allPath = [];Routers .forEach ((route ) => {const currRoute = controllers.find ((item ) => item.constructor === route);if (!currRoute) return ;let { method, path, handler } = currRoute;const { prefix } = route;if (prefix) path = prefix + path;push ({ method, path });get ("/" , async (ctx) => {let body = "" ;forEach ((item ) => {`<a href='${item.path} '>${item.method} : ${item.path} </a><br>` ;body = body;use (router.routes ());const port = 3001 ;listen (port, () => {console .log (`server is running at http://localhost:${port} ` );
页面效果如下:
处理跨域 首先跨域是浏览器限制 的,为了网页的安全。cors (跨源资源共享) 解决
更改src/index.js
1 2 3 4 5 6 7 8 9 10 11 12 13 14 15 16 use (async (ctx, next) => {set ("Acess-Control-Allow-Origin" , "*" ); set ("Access-Control-Allow-Headers" ,"Content-Type,Content-Length,Authorization,Accept,X-Requested-With" ,set ("Access-Control-Allow-Methods" , "OPTIONS, GET, POST, PUT, DELETE" ); set ("Content-Type" , "application/json" ); if (ctx.request .method === "OPTIONS" ) {status = 200 ; else await next ();
登录鉴权 JWT 是什么? JSON Web Token,由三段通过.连接组成:
header:类型,通常是 jwt
payload:主体内容,可以包含一些用户信息等
signature:签名结果,一般是 header、payload 加密后的结果
类似于:eyJhbGciOiAiSFMyNTYiLCAidHlwIjogIkpXVCJ9.eyJzdWIiOiAiMTIzNDU2Nzg5MCIsICJuYW1lIjogIkpvaG4gRG9lIiwgImlhdCI6IDE1MTYyMzkwMjJ9.SflKxwRJSMeKKF2QT4fwpMeJf36POk6yJV_adQssw5c
模拟一下 本次通过模拟生成来演示
创建文件
1 touch src/utils/mockJWT.js
src/utils/mockJWT.js编码
1 2 3 4 5 6 7 8 9 10 11 12 13 14 15 16 17 18 19 20 21 22 23 24 25 26 27 28 29 30 31 32 33 34 35 36 37 38 39 40 41 42 43 44 45 46 47 48 49 50 51 52 53 54 55 56 57 58 59 60 61 62 63 64 65 66 67 68 69 const crypto = require ("crypto" );function sign (payload, salt ) {const header = { type : "JWT" , alg : "HS256" };const tokenArr = [];push (base64UrlEncode (JSON .stringify (header)));push (base64UrlEncode (JSON .stringify (payload)));push (encryption (tokenArr.join ("." ), salt));return tokenArr.join ("." );function base64UrlEncode (str ) {return Buffer .from (str).toString ("base64" );function encryption (value, salt ) {return crypto.createHmac ("sha256" , salt).update (value).digest ("base64" );function verify (token, salt ) {const [header, payload, signature] = token.split ("." );return encryption ([header, payload].join ("." ), salt) === signature;const salt = "<huangzq>" ;const token = sign ({ user : "hzq" }, salt);console .log ("[ token ] >" , token);console .log ("[ verify() ] >" , verify (token, salt));
正式开搞
基于三方库,完成 JWT 模块
新建文件
src/utils/jwt.js编码,实现验证、加密逻辑
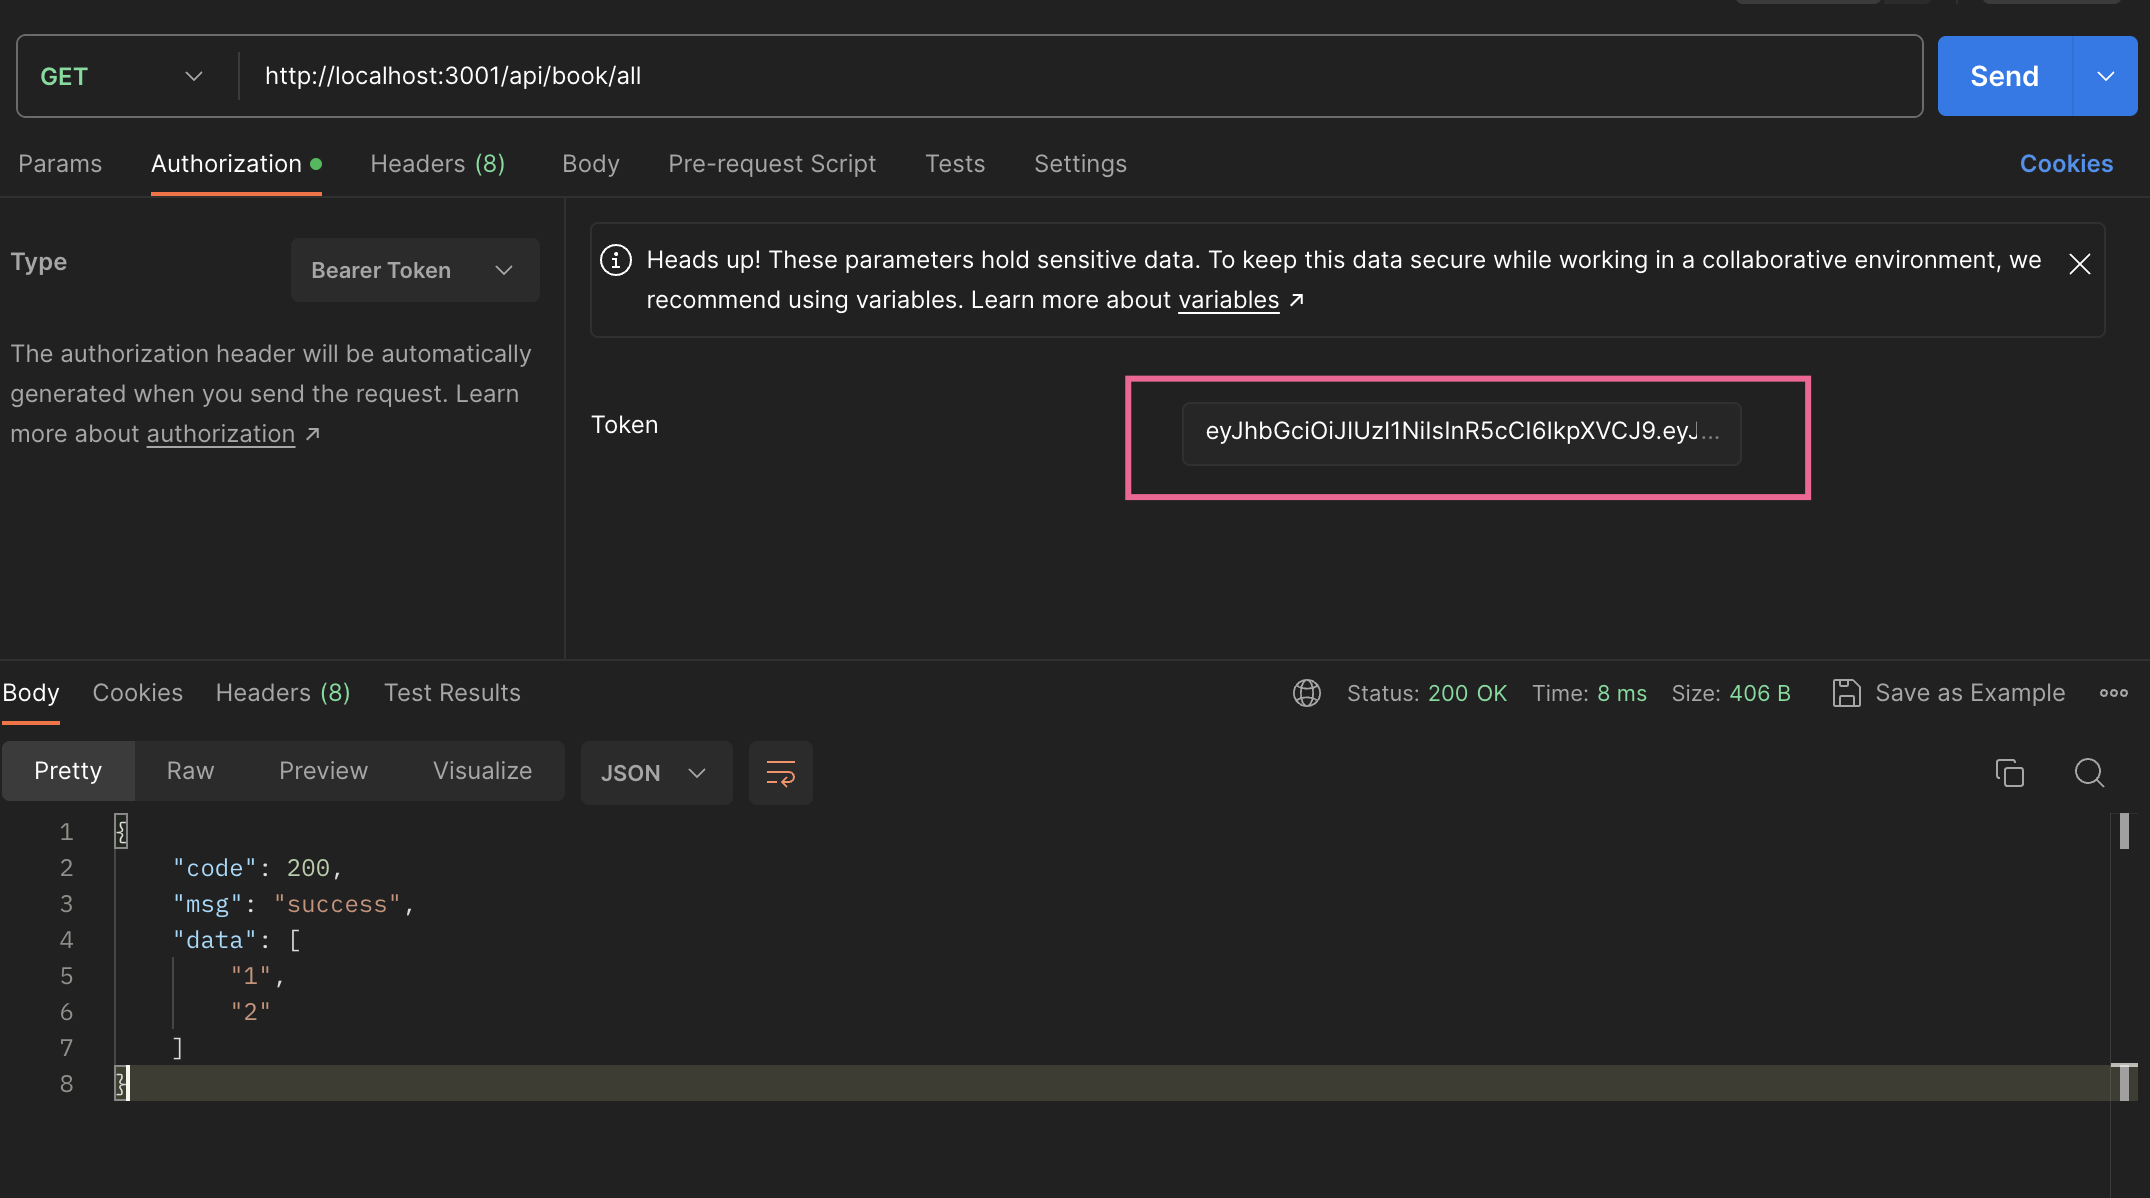
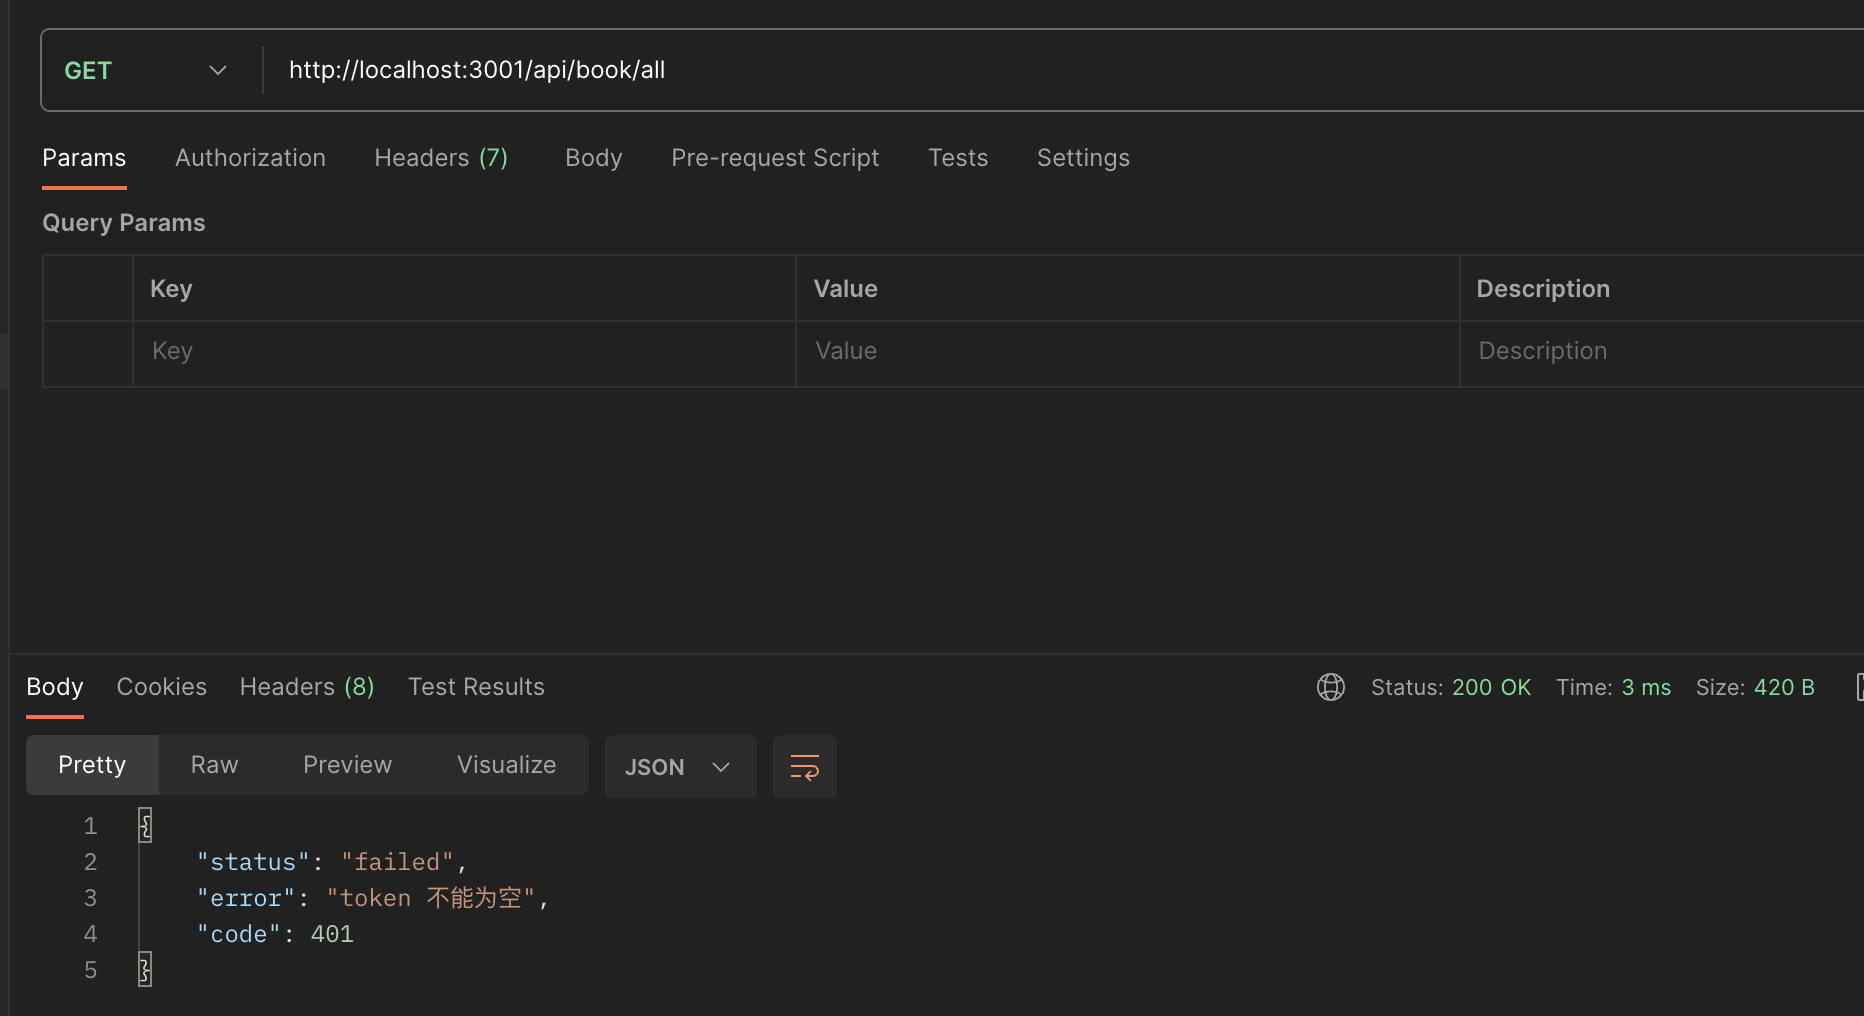
1 2 3 4 5 6 7 8 9 10 11 12 13 14 15 16 17 18 19 20 21 22 23 24 25 26 27 28 29 30 31 32 33 34 35 36 37 38 39 40 41 42 43 44 45 46 47 48 49 50 51 52 53 54 55 56 57 58 59 60 61 62 63 64 65 66 67 68 69 import jwt from "jsonwebtoken" ;const SALT = "<Huangzq666>" ;export const verify = async (token ) => {return new Promise ((resolve ) => {if (token) {verify (token, SALT , (err, data ) => {if (err) {if (err.name === "TokenExpiredError" ) {resolve ({status : "failed" ,error : "token 已过期" ,else {resolve ({status : "failed" ,error : " 认证失败" ,else {resolve ({status : "success" ,else {resolve ({status : "failed" ,error : "token 不能为空" ,export const signature = (data ) => {return jwt.sign (data, SALT , {expiresIn : "10h" , export const jwtVerify =whiteList = [] ) =>async (ctx, next) => {if (whiteList.includes (ctx.path )) {return next (ctx);else {let token;try {header .authorization .split ("Bearer " )[1 ];catch (error) {const res = await verify (token);if (res.status === "success" ) {return next (ctx);else {body = {code : 401 ,
在index.js里面进行app.use注册
1 2 3 4 5 6 7 8 import { jwtVerify } from "./utils/jwt.js" ;use (jwtVerify (["/" , "/api/user/login" , "/api/user/register" ]));
刷新下页面,就能看到无法访问了,因为没带token
新增user模块
1 touch src/controllers/user.js && mkdir src/services && touch src/services/user.js
src/controllers/user.js初始化编码
1 2 3 4 5 6 7 8 9 import { Controller , RequestMapping , RequestMethod } from "../utils/decorator" ;Controller ("/user" )export default class UserController {RequestMapping (RequestMethod .POST , "/login" )async login (ctx ) {body = "登录成功" ;
src/services/user.js初始化编码
1 export default class UserService {}
src/controllers/index.js引入
1 2 3 4 import BookController from "./book.js" ;import UserController from "./user.js" ; export default [BookController , UserController ];
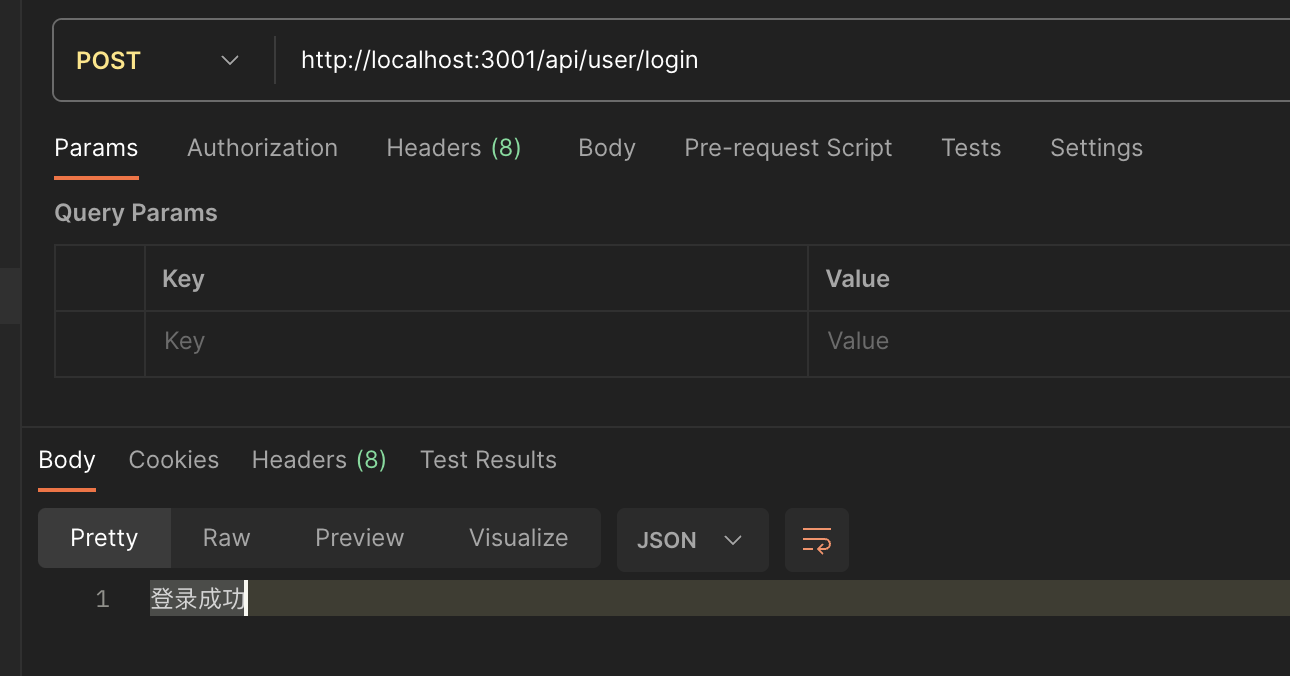
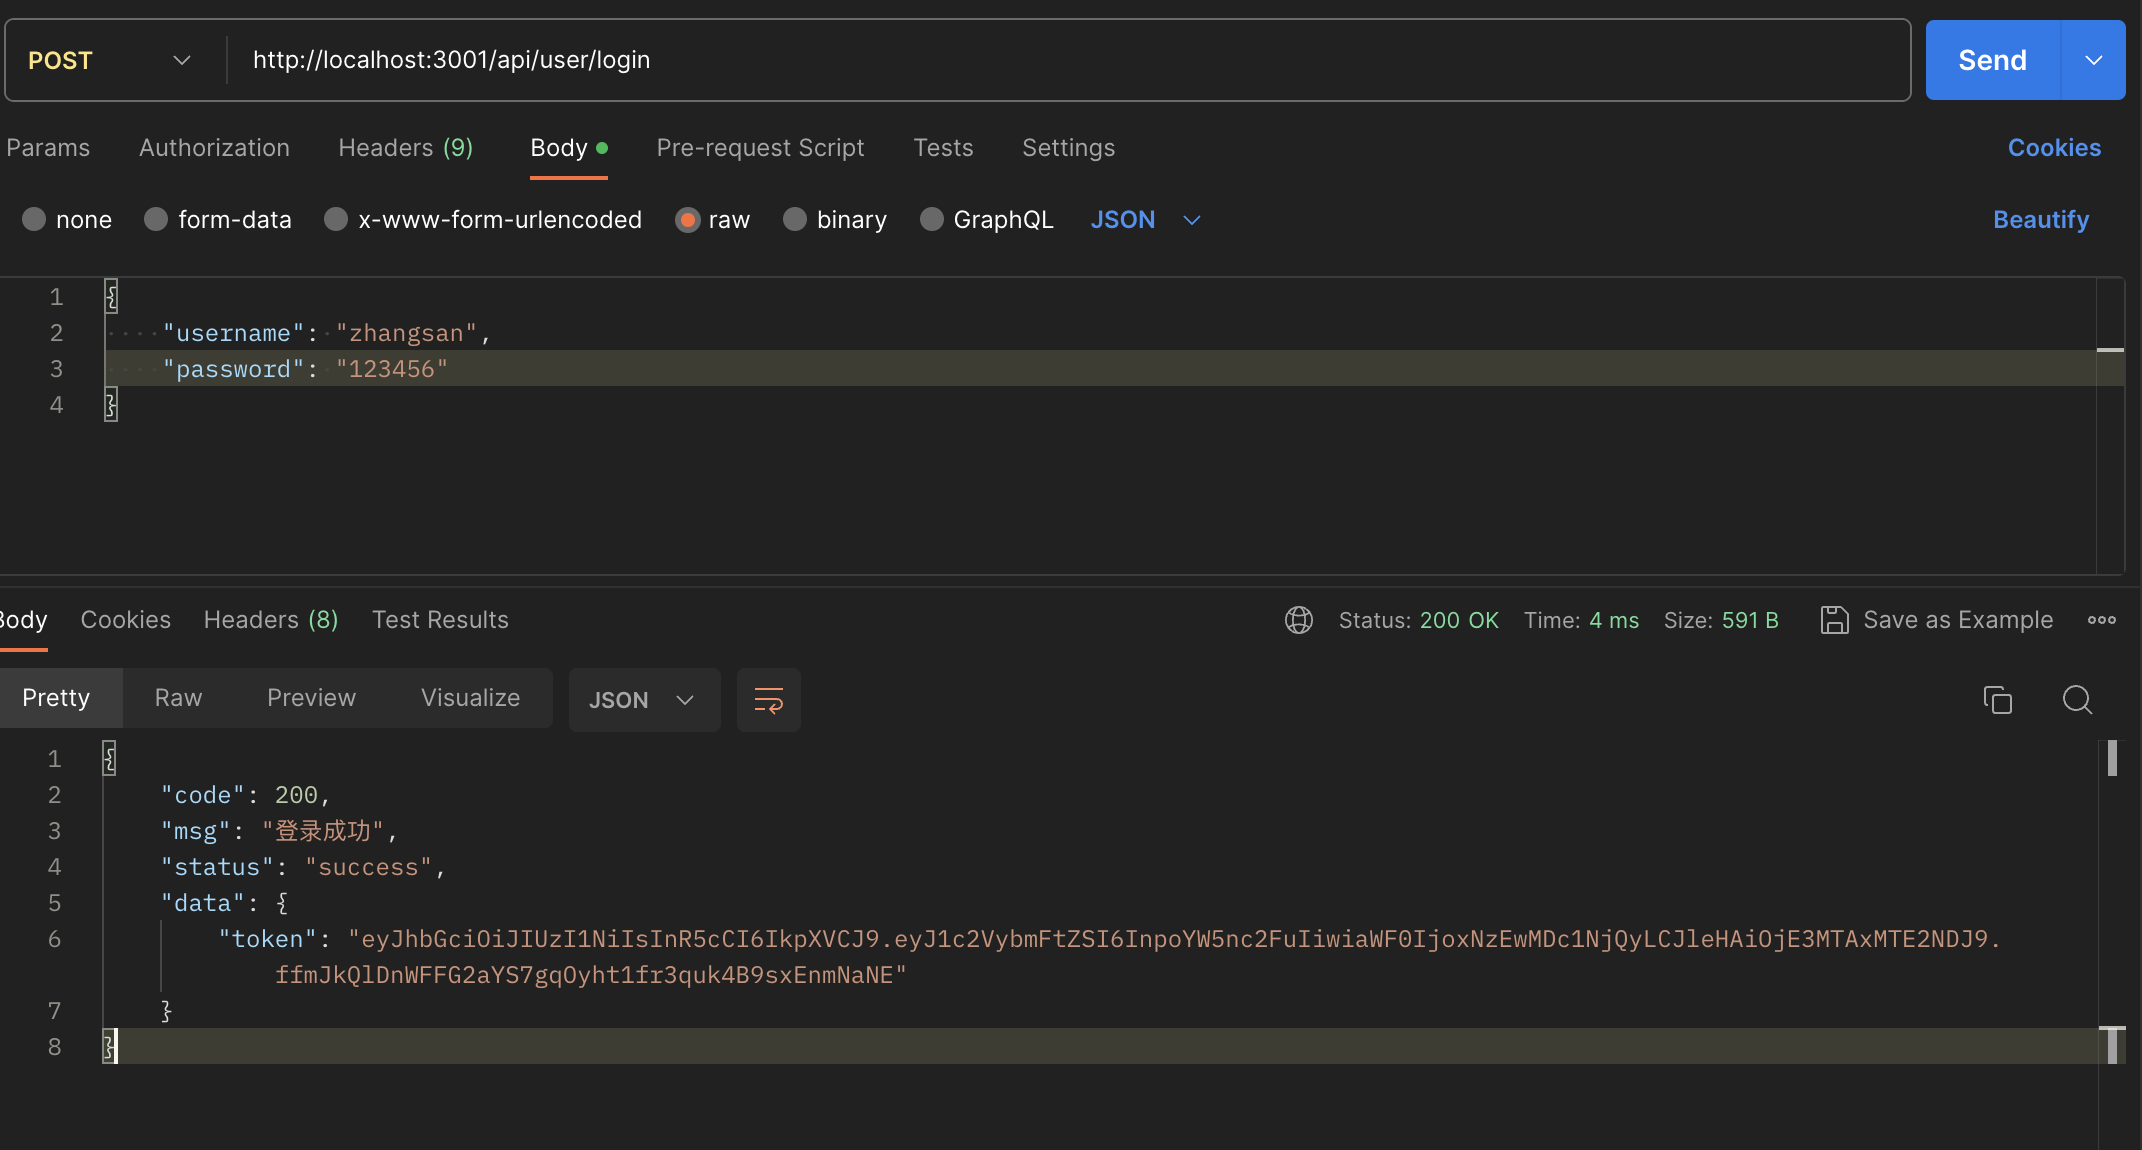
因为是post请求,就只有打开postman调用,发现能调通
src/controllers/user.js正式编码
1 2 3 4 5 6 7 8 9 10 11 12 import UserService from "../services/user" ;import { Controller , RequestMapping , RequestMethod } from "../utils/decorator" ;Controller ("/user" )export default class UserController {RequestMapping (RequestMethod .POST , "/login" )async login (ctx ) {const userService = new UserService ();const res = await userService.validate (ctx.request .body || {});body = { ...res };
src/services/user.js正式编码
1 2 3 4 5 6 7 8 9 10 11 12 13 14 15 16 17 18 19 20 21 22 23 24 25 26 27 28 29 30 31 32 33 34 35 36 37 38 39 40 41 42 43 44 45 46 47 48 49 50 51 import { signature } from "../utils/jwt" ;const mockUserTable = [username : "zhangsan" , password : "123456" },username : "lisi" , password : "654321" },username : "admin" , password : "111111" },username : "huangzq" , password : "hzq666" },export default class UserService {async validate ({ username, password } ) {if (username && password) {let findValue = mockUserTable.find ((item ) => item.username === username);if (findValue) {let findValue = mockUserTable.find ((item ) => item.username === username && item.password === password,if (findValue) {return {code : 200 ,msg : "登录成功" ,status : "success" ,data : { token : signature ({ username }) },else {return {code : 200 ,msg : "密码错误" ,status : "failed" ,data : void 0 ,else {return {code : 200 ,msg : "用户名错误" ,status : "failed" ,data : void 0 ,else {return {code : 200 ,msg : "用户名或密码不能为空" ,status : "failed" ,data : void 0 ,
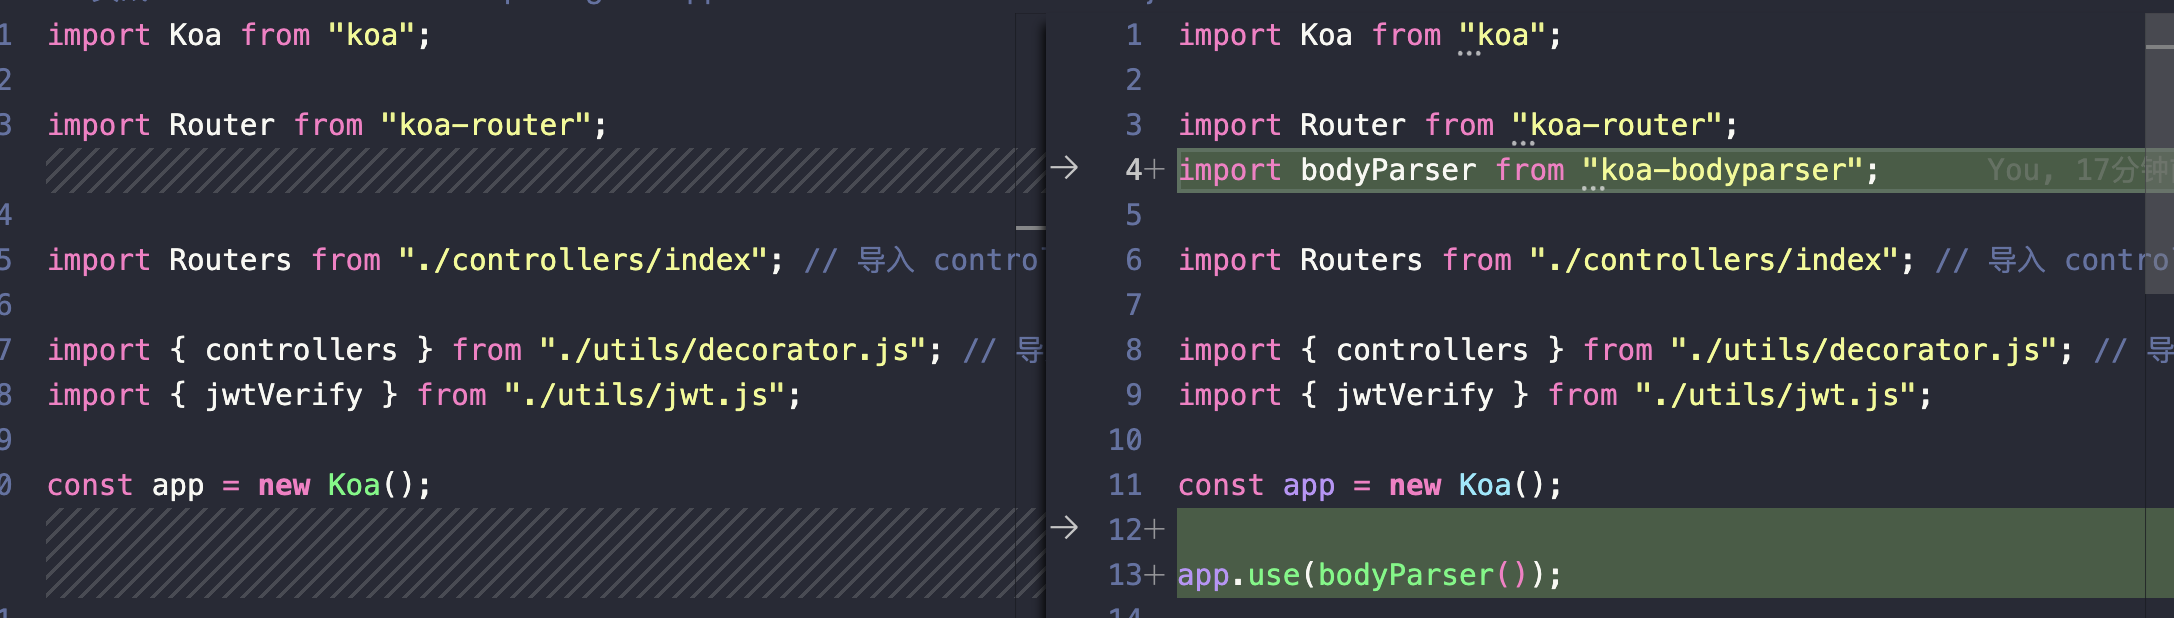
完善一下index.js,支持body参数的获取
重新启动下后端项目,然后用postman调用下,正常 ok 了
然后拿着这个 token,去调用其他接口
7、埋点实现(react-master 下)
新建目录
1 mkdir src/utils/lib && touch src/utils/lib/track.ts && touch src/utils/lib/async -track-queue.ts
安装依赖pnpm add lodash
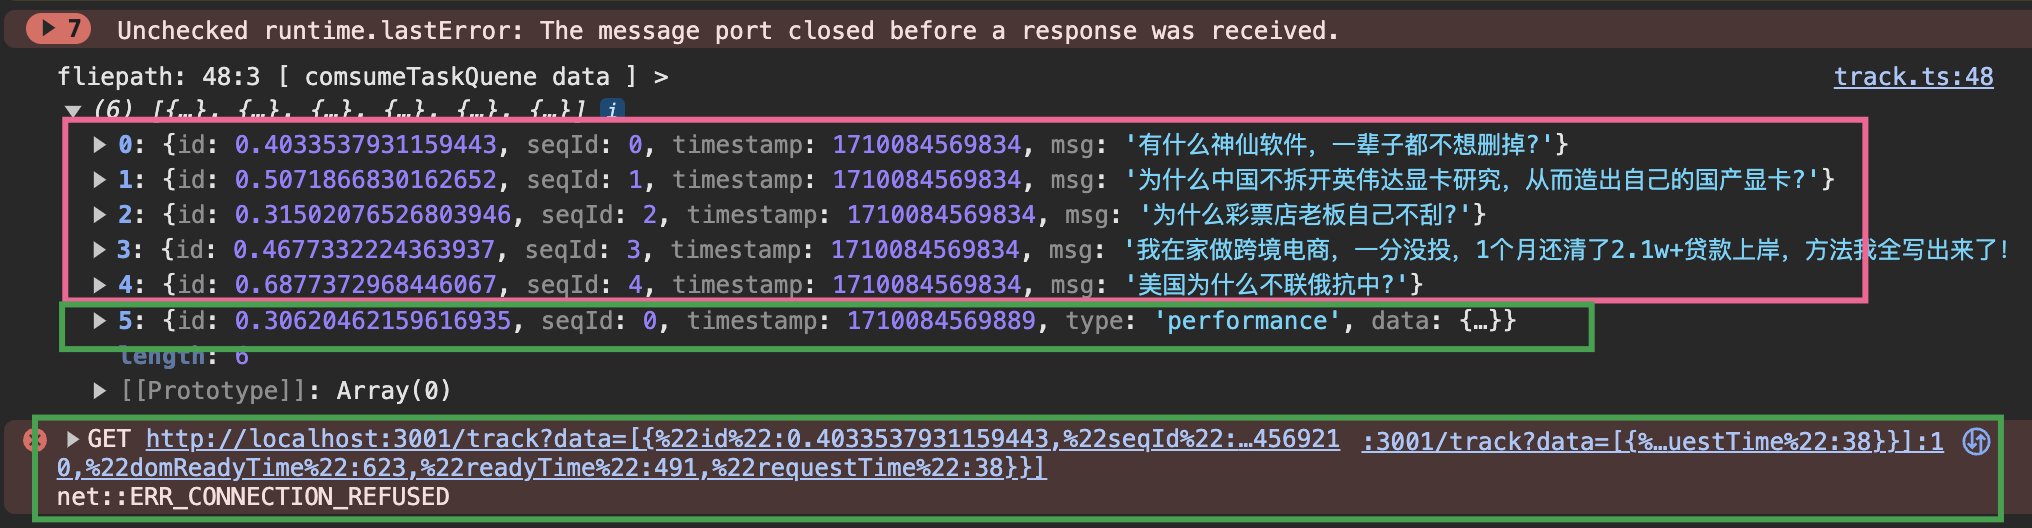
src/utils/lib/track.ts编码
1 2 3 4 5 6 7 8 9 10 11 12 13 14 15 16 17 18 19 20 21 22 23 24 25 26 27 28 29 30 31 32 33 34 35 36 37 38 39 40 41 42 43 44 45 46 47 48 49 50 51 52 53 54 55 import { AsyncTrackQueue } from "./async-track-queue" ;export interface TrackQueue {seqId : number;id : number;timestamp : number;export interface UserTrackData {type : string;data : any;export class BaseTrack extends AsyncTrackQueue <TrackQueue > {0 ;track (data: UserTrackData ) {this .addTask ({id : Math .random (),seqId : this .seq ++,timestamp : Date .now (),comsumeTaskQuene (data: Array <TrackQueue> ) {return new Promise ((resolve ) => {const image = new Image ();src = "http://localhost:3001/track?data=" + JSON .stringify (data);console .log ("[ comsumeTaskQuene data ] >" , data);onload = () => {resolve (true );
src/utils/lib/sync-track-queue.ts编码
1 2 3 4 5 6 7 8 9 10 11 12 13 14 15 16 17 18 19 20 21 22 23 24 25 26 27 28 29 30 31 32 33 34 35 36 37 38 39 40 41 42 43 44 45 46 47 48 49 50 51 52 53 54 55 56 57 58 59 60 61 62 63 64 65 66 67 68 69 70 71 72 73 74 75 76 77 78 79 80 81 82 83 84 85 86 87 88 89 90 91 92 93 94 95 96 97 98 import { debounce } from "lodash" ;RequiredData {timestamp : number | string;export abstract class AsyncTrackQueue <T extends RequiredData > {_queueData : Array <T> = [];get storageService () {return TaskQueueStorableHelper .getInstance ();get queueData (): Array <T> {return this .storageService .queueData ;set queueData (data: Array <T> ) {this .storageService .queueData = data;if (data.length ) {this .debounceRun ();addTask (data: T | Array <T> ) {this .queueData = this .queueData .concat (data);comsumeTaskQuene (data : Array <T>): Promise <unknown>;debounce (this .run .bind (this ), 500 );run (const currentDataList = this .queueData ;if (currentDataList.length ) {this .queueData = [];this .comsumeTaskQuene (currentDataList);class TaskQueueStorableHelper <T extends RequiredData = any> {static instance : TaskQueueStorableHelper | null = null ;static getInstance<T extends RequiredData = any>() {if (!this .instance ) {this .instance = new TaskQueueStorableHelper ();return this .instance ;STORAGE_KEY = "track-queue" ;store : any = null ;constructor (const localStorageVal = localStorage .getItem (this .STORAGE_KEY );if (localStorageVal) {try {this .store = JSON .parse (localStorageVal);catch (error : any) {throw new Error (error);get queueData () {return this .store ?.queueData || [];set queueData (data: Array <T> ) {this .store = {this .store ,queueData : data.sort ((a, b ) => Number (a.timestamp ) - Number (b.timestamp )),localStorage .setItem (this .STORAGE_KEY , JSON .stringify (this .store ));
新建上报文件
1 touch src/utils/lib/apis.ts
src/utils/lib/apis.ts编码
1 2 3 4 5 6 7 8 9 10 11 12 13 14 15 16 17 18 19 20 21 22 23 24 25 26 27 28 29 30 31 32 33 34 35 36 import { BaseTrack , UserTrackData } from "./track" ;export class Performance {static readonly timing = window .performance && window .performance .timing ;static init (if (!this .timing ) {console .warn ("performance is not support" );window .addEventListener ("load" , () => {const data = this .getTiming ();new BaseTrack ().track (data);static getTiming (): UserTrackData {const timing = this .timing ;return {type : "performance" ,data : {loadTime : timing.loadEventEnd - timing.navigationStart ,domReadyTime : timing.domComplete - timing.domLoading ,readyTime : timing.domContentLoadedEventEnd - timing.navigationStart ,requestTime : timing.responseEnd - timing.requestStart ,const t = new BaseTrack ();export const sendLog = <T>(data: T ) => {track (data as T & UserTrackData );
找个地方使用下上报的,我在react-master/src/pages/home/commandList/index.tsx里面调用
再找个地方使用下上报的,我在react-master/src/app.tsx里面调用
8、总结 本篇文章从项目搭建开始讲解,讲了前端 React 项目的环境搭建:Webpack 配置、Babel 配置等一系列真实开发可用的;然后手动搭建 React 的路由体系,并使用 tailwindcss 仿照知乎进行了代码书写;最后讲了一些业务“亮点”:use* API 的封装、极致的本地存储工具
之后深入组件库领域,基于 Rollup 自己搭建了一套构建逻辑
之后了解了前端微内核架构,并手写了 Webpack、Babel、postcss 插件
之后进入后端领域,基于 koa 手撸了一套装饰器模式的“MVC”架构,并且自己处理了项目打包,写了具有代表意义的登录鉴权的接口(其他接口自然也会了)
最后讲了前端埋点的一种实现方式,采用“分层设计”,讲了埋点收集、本地存储、埋点上报等逻辑
所以以上的内容,有很多是可以作为“亮点”去包装一下的
本项目的代码已全部上传 github:https://github.com/MrHzq/react-actual-combat
补充知识 什么是亮点?
具备一定的思考、技术难度、并实际解决了关键问题的事情
符合下面三个之一的可以称为“亮点”
基于业务,封装公共能力,解决业务中的标准问题,并推广使用。
为什么要封装?具体解决了什么问题?如何实现推广的?
基于工程化手段,解决流程或研发问题
比如:自研 Webpack 插件,解决 xxx 问题;提供 cli 脚手架解决项目创建问题等
创造性的弄了一个东西(这个行业之前没有的),并解决了某个问题
若是:基于 axios、vueRouter、防抖、节流封装 xxx 组件,这种已经不算什么亮点了。
构建知识 在 Webpack 的前端项目中,我们一般如下引入依赖
import A from “A”;
解答:是构建工具来决定你的语法,你在 Webpack 里面这样写,这里的 import、require 与 esm、cjs 没有任何的关系,这样写为了让你写的更方便、好记,并且也是沿用了大家熟悉的 esm、cjs 规范写法。
Webpack 的本质就是“翻译”,从你写的入口文件开始,找到所有的文件,每个不同类型的文件使用对应的“语言包”进行翻译,最后只输出一篇浏览器能看懂的文章。
所以 Webpack 强大在于插件,你需要特定翻译什么,就可以自己去开发对应的语言包,装到 Webpack 上就能用
一般 Webpack 的产物为:.html、.js、.css,用 html 去 script 加载 js,用 link 加载 css
React 的闭包陷阱 从 react hooks“闭包陷阱”切入,浅谈 react hooks - 掘金
如何学习 流派划分:连接主义、符号主义输出:找别人讨论、写文章、教别人等等(费曼技巧)。
如何变大?总结:将关键词记下来,确保看到这几个关键词后就能解释清楚
当你看到一个知识时,脑海有印象但就是想不起来,则说明这个知识正在和你的老知识在连接,但就还差一些。所以就立马去看,把连接建立起来
结合运用:将新知识总结出关键词,自己能通过关键词解释清楚,让知识变大,然后去输出,用自己的语言描述一边,建立连接,最后时常温习关键词,记不清楚了则立马去看。
这样脑海里面的知识才能形成体系,否则只能死记硬背。
如何串行 Promise? 1 2 3 4 5 6 7 8 9 10 11 12 13 14 15 16 17 18 19 20 21 22 23 24 25 26 27 28 29 const PromiseArray = [Promise .resolve (1 ),Promise .resolve (2 ),new Promise ((resolve ) => setTimeout (() => resolve (3 ), 1000 )),new Promise ((resolve ) => setTimeout (() => resolve (4 ), 2000 )),new Promise ((resolve ) => setTimeout (() => resolve (5 ), 1000 )),new Promise ((resolve ) => setTimeout (() => resolve (6 ), 1000 )),const lastPromise = PromiseArray .reduce ((prev, next ) => then ((res ) => {console .log ("[ prev promise res ] >" , res);return next;then ((res ) => {console .log ("[ last promise res ] >" , res);1 2 3 4 5 6