本文最后更新于 2024-03-22T23:32:56+00:00
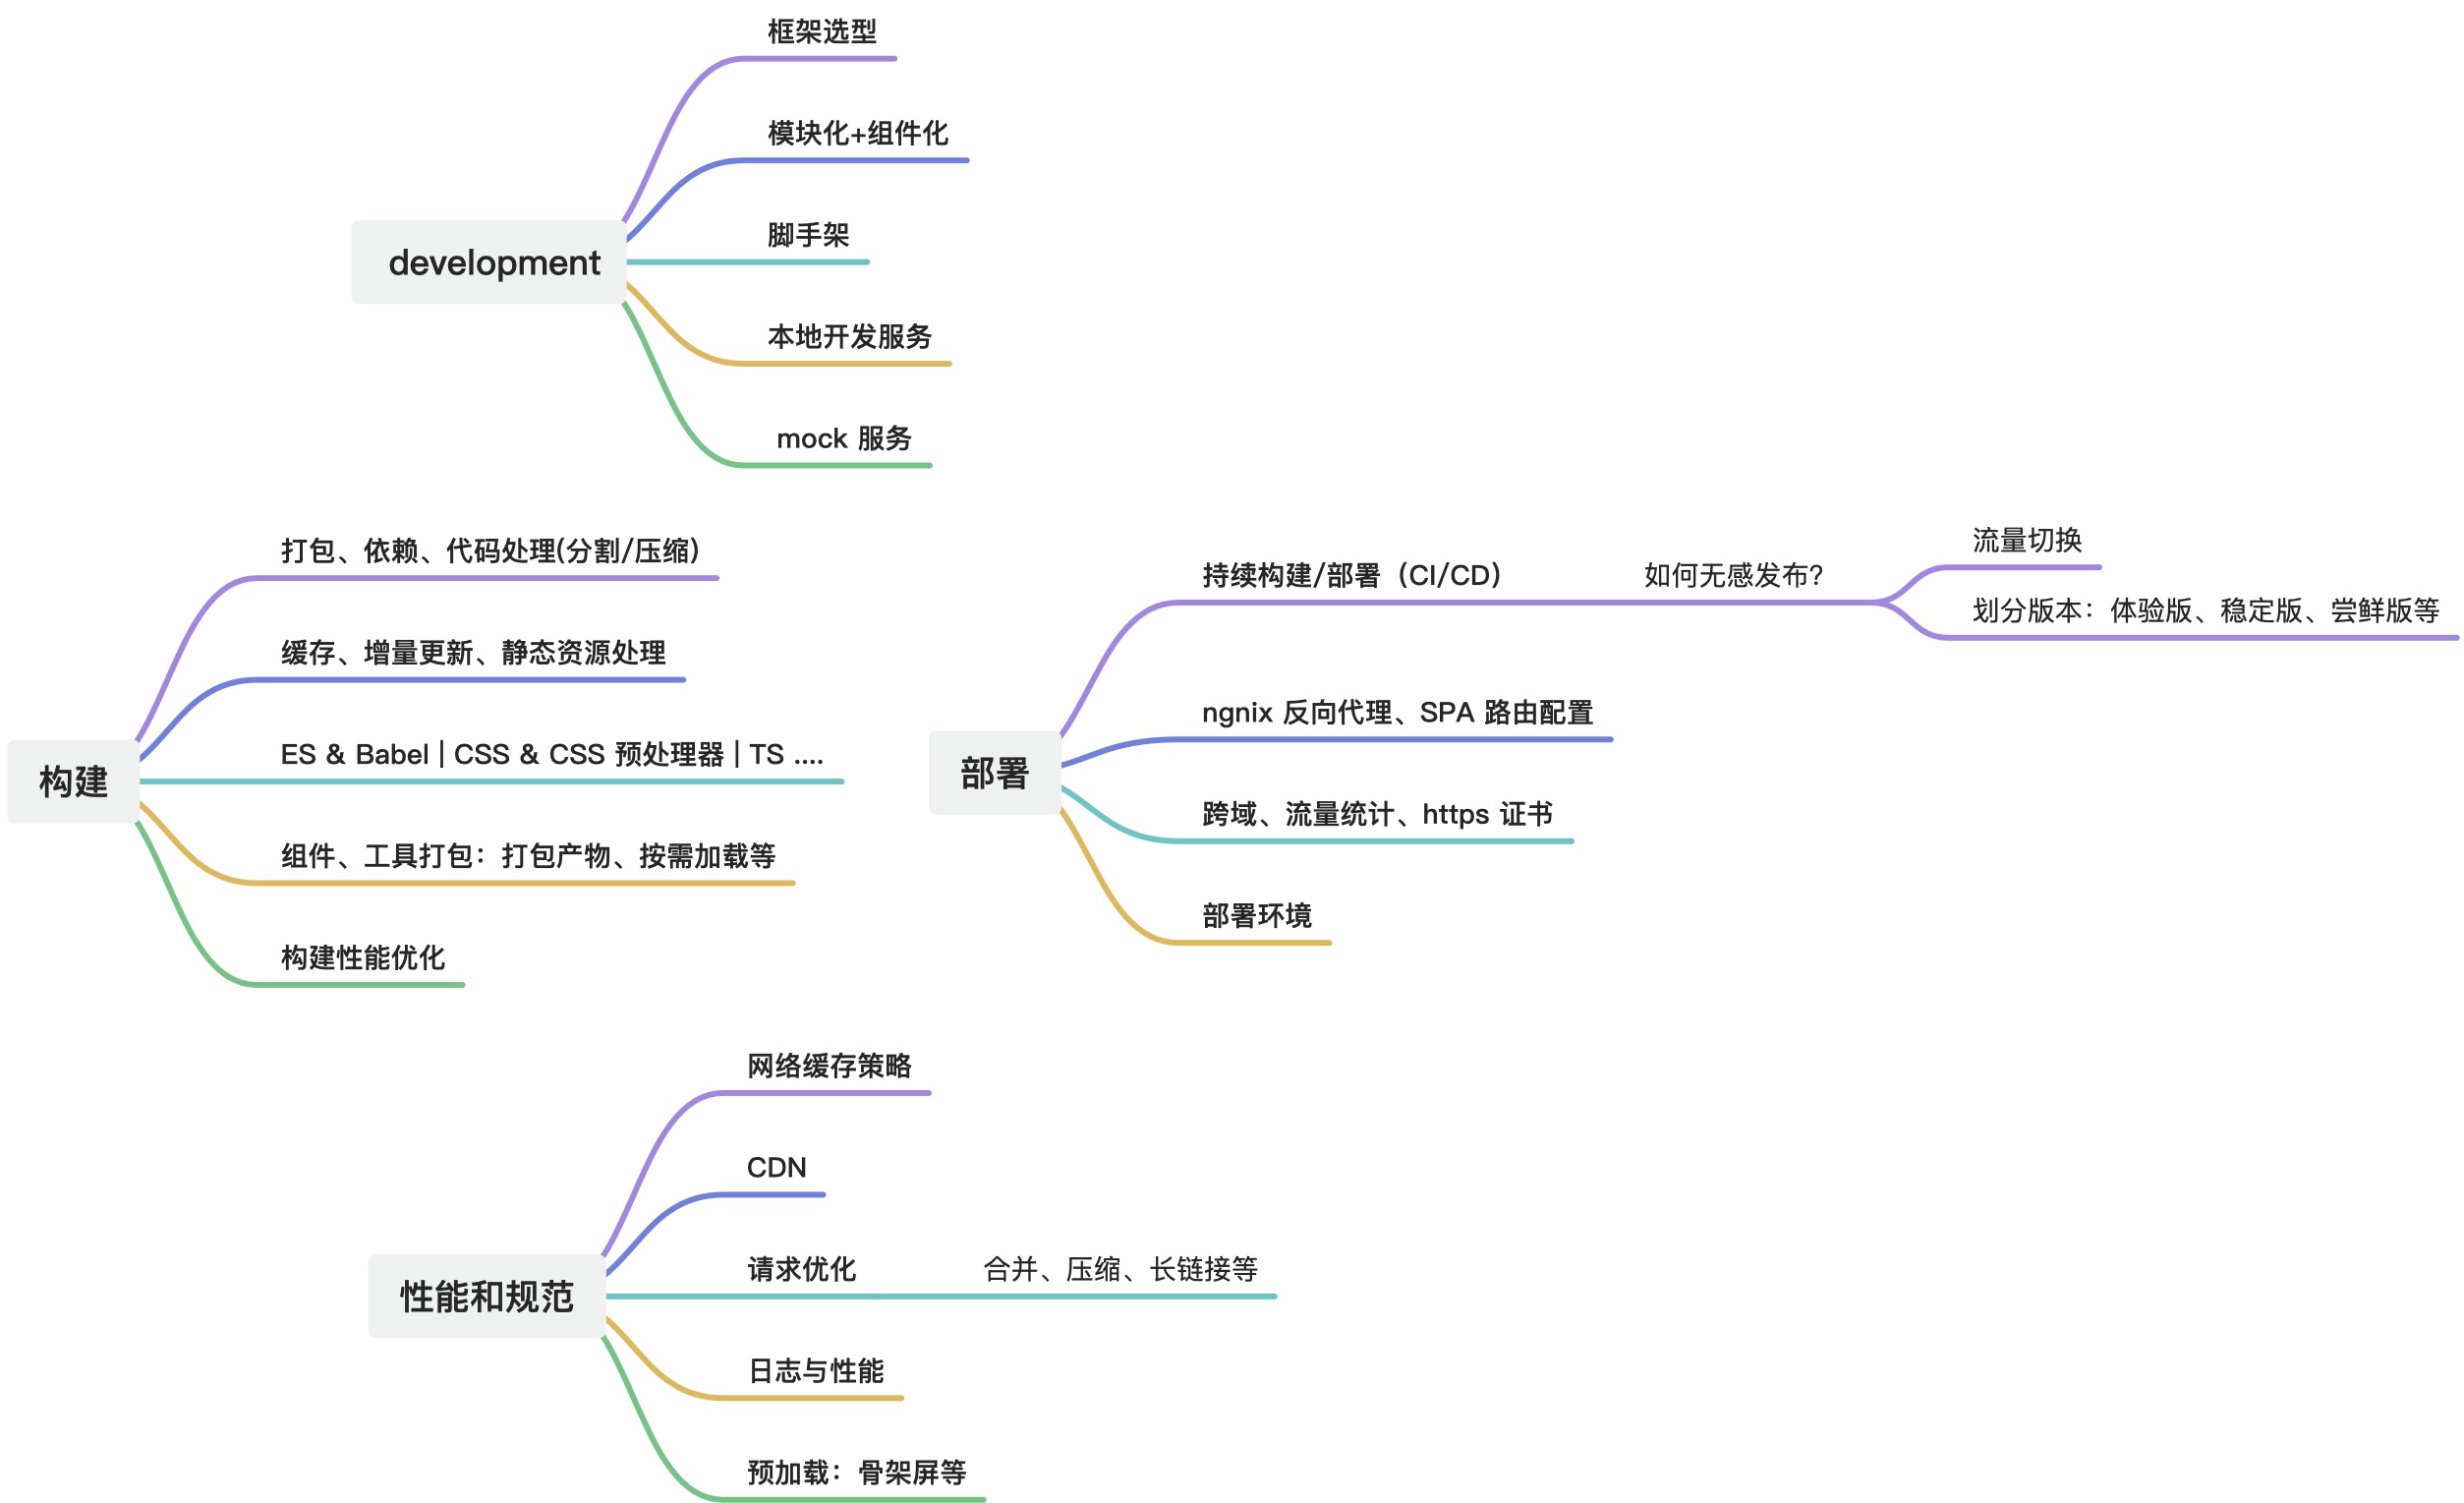
工程化定义
狭义上:基于研发流程的,包含:分支管理、开发环境、单元测试/自动化测试、部署(CI/CD)、等
广义上:开始写代码到发布、运维、bugfix、安全生产等,广义上就是很大的领域。
AST
Abstract Syntax Tree:抽象语法树,是源代码的抽象语法结构的树状表示。
常见的 JS AST,效果如下:
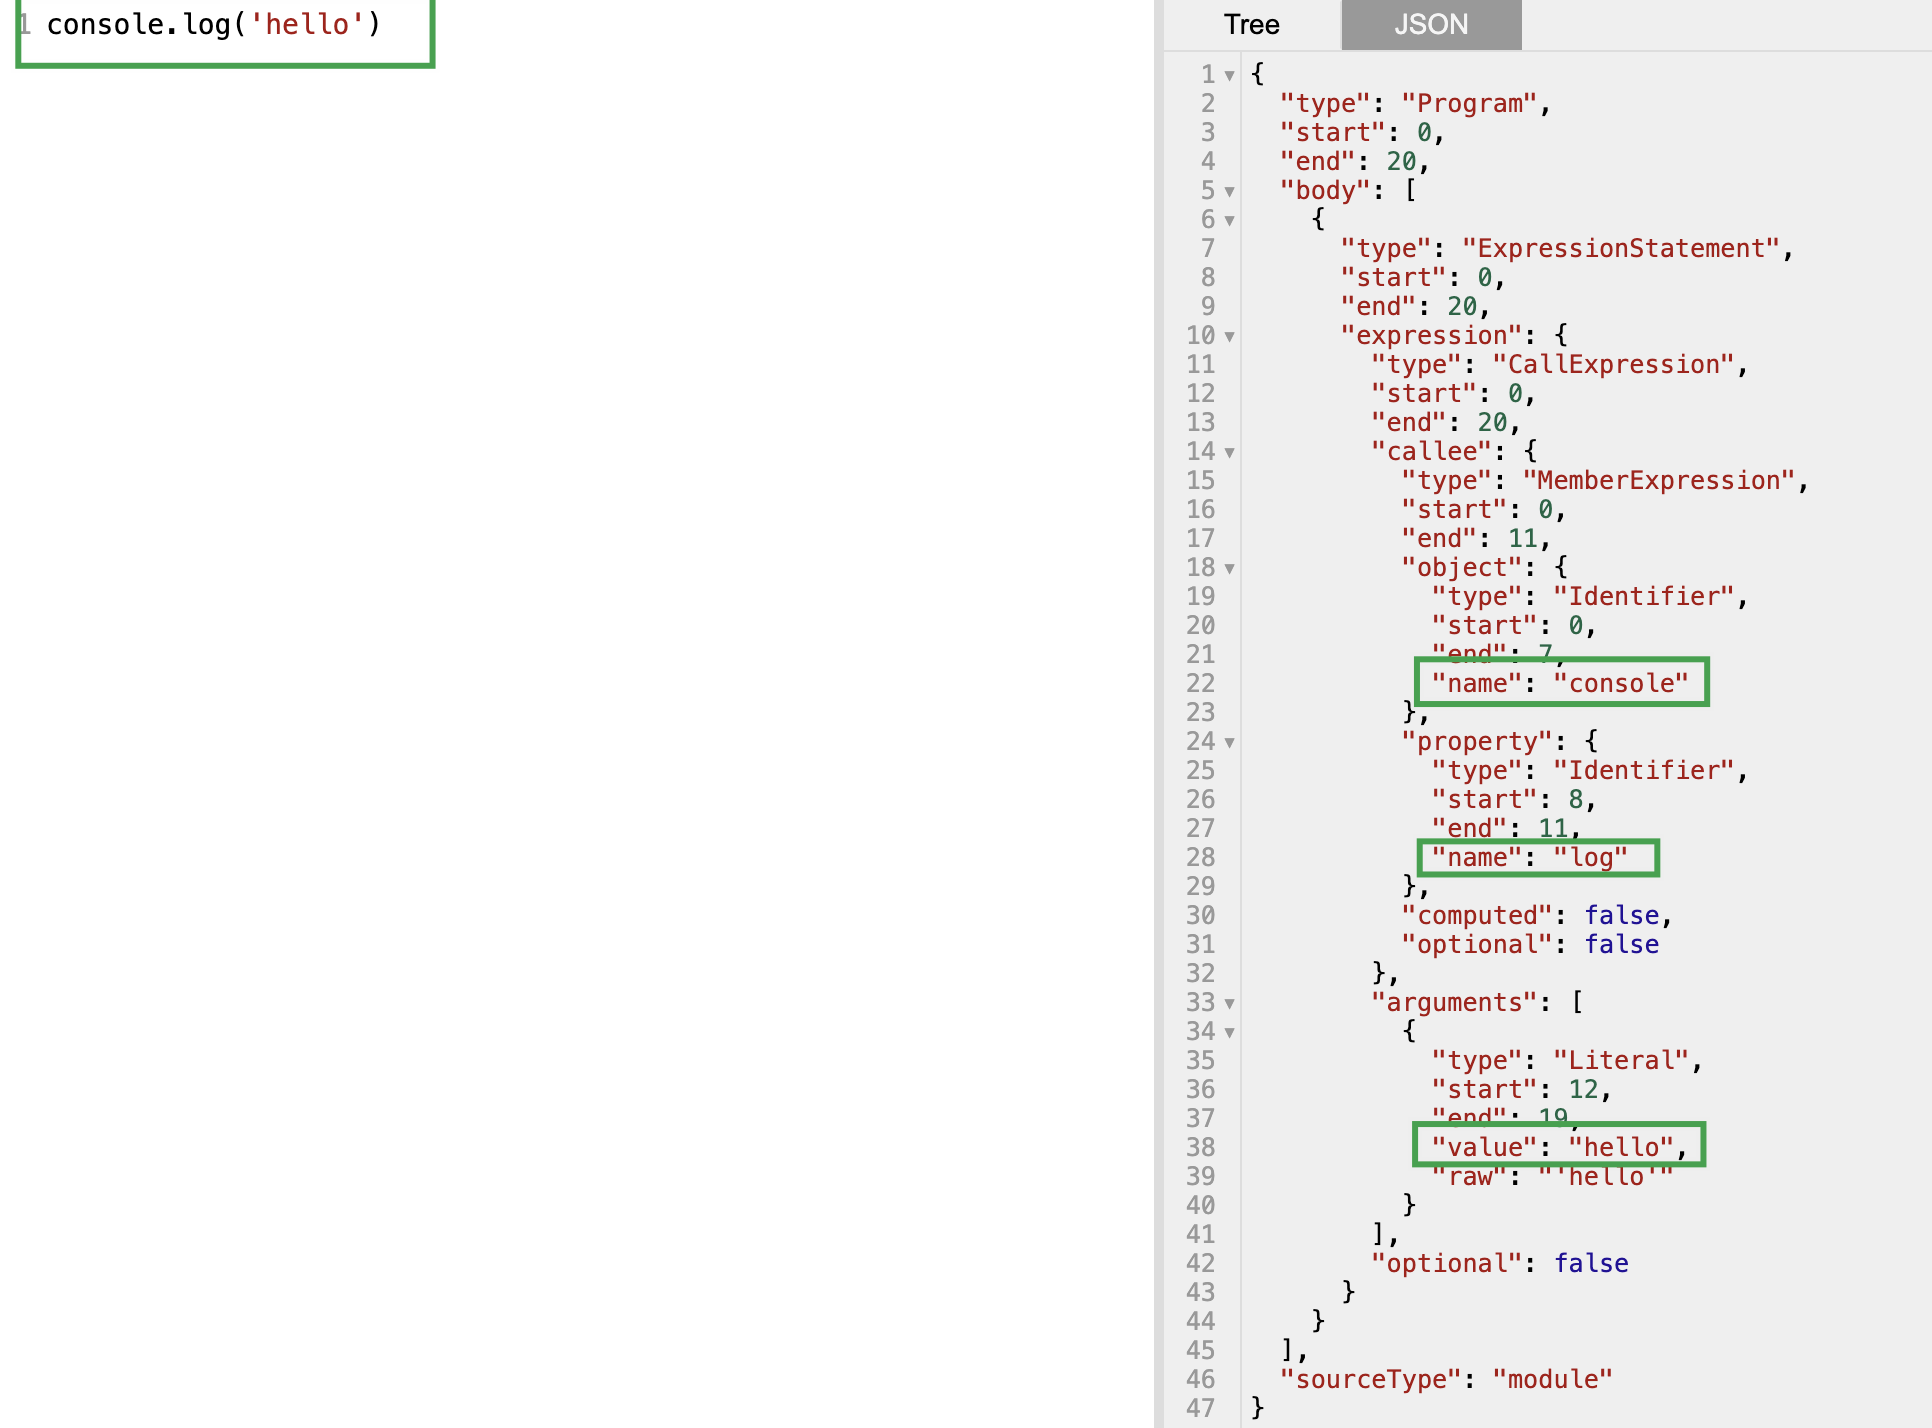
前端构建的基石就是它(Webpack、Babel、Eslint、Prettier),从 Webpack 来说,它会去加载对应的模块(*.js),然后解析为 AST,最后再转为处理过的 JS(压缩/Tree-shake 等)
所以我们可以在这个过程中,基于 AST 去改动某点,这样最后生成的代码也就会有我们想要的“功能”。
转换为 AST 的过程为:解析(词法、语法) -> 转换(特定转换规则) -> 生成(对应语言代码字符串)
1、获取到源代码,通过词法分析,分成一个个“单词”(token),一个 JSON 结构,特性:无语法信息,无法体现代码执行顺序
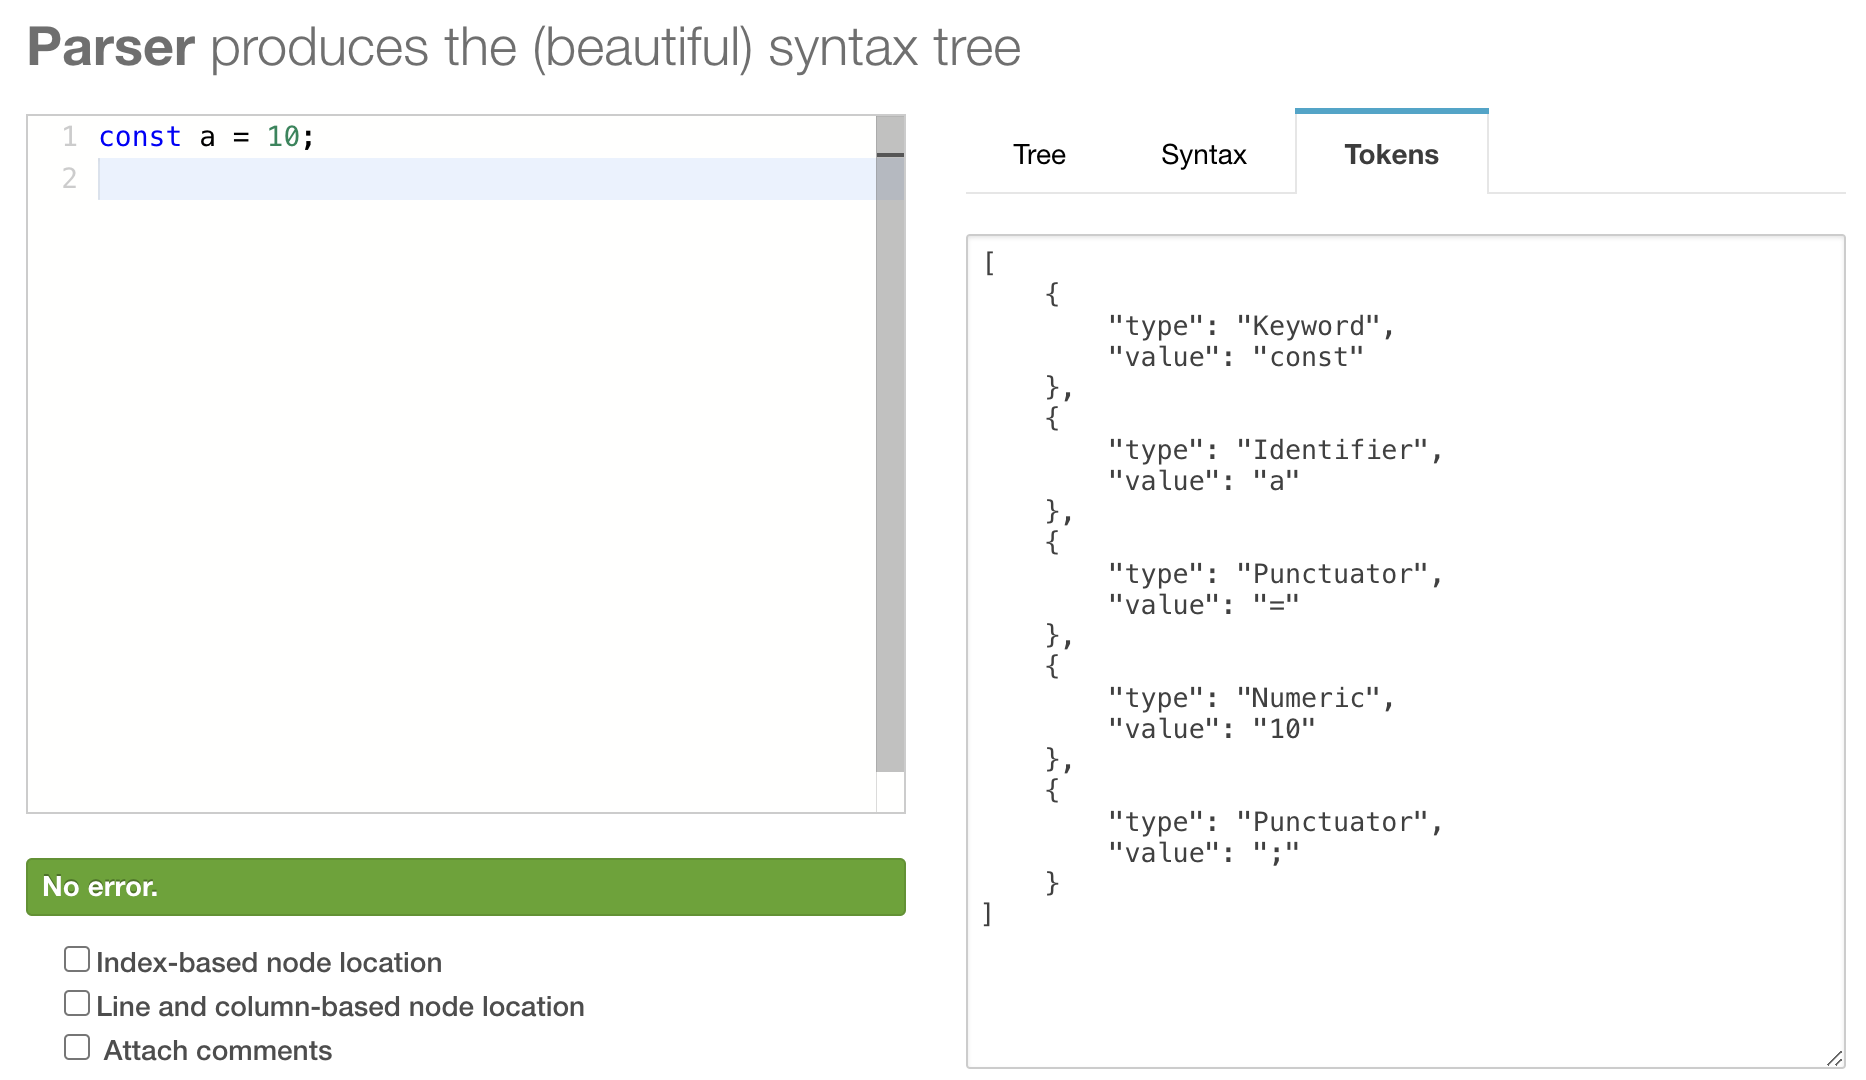
2、基于 token 进行语法分析,将其转换为 AST,这是一个具有“语法”的树结构,每一层有相同的字段
3、基于语法分析所得的 AST,进行转换(二次加工),基于自定义的转换规则对节点进行增删改查等操作
4、最后基于转换后的 AST,生成对应语言的代码字符串
脚手架开发
定义:快速、自动化的搭建、启动项目的工具
使用:通过命令行就能创建基于模板的项目
vue-cli 的脚手架流程是:1、收集用户选项;2、去 github 拉取官方配好基础的模板;3、最后通过【选项+基础模板】生成完整的可用项目;最难的就是第 3 点
本次我们实现的脚手架是:收集用户选项,去 github 拉取我们自己的模板,然后下载即可。
所需依赖
脚手架开发常用的依赖有:
- path:提供了处理文件和目录路径的实用工具,比如路径的解析、组合和规范化等。
- chalk:一个流行的 Node.js 包,用于在终端输出彩色文本,有助于美化命令行输出,提升用户体验。
- fs-extra:是对 Node.js 内置文件系统(fs)模块的扩展,提供了更方便、更强大的文件和目录操作功能,如复制、移动、删除目录及其内容等。
- inquirer:一个命令行用户界面库,常用于创建交互式的命令行问答程序,帮助开发者在初始化项目时收集用户输入的信息。
- commander.js:另一个命令行接口(CLI)工具库,它简化了命令行选项、子命令和参数的解析过程,便于构建复杂的命令行工具。
- axios:是一个基于 Promise 的 HTTP 客户端,用于在 Node.js 环境中执行 HTTP 请求,这对于脚手架在初始化项目时从远程获取资源
- download-git-repo:专门用于从 GitHub 或其他 Git 仓库下载项目的库,这对于脚手架根据用户选择的模板快速拉取项目源码非常便捷。
- ora: 用于在命令行中显示动画状态图标(spinner),在执行耗时较长的任务时,可以给用户提供正在运行中的反馈,提高用户体验。
- 创建项目文件夹,命名自取
- 初始化,使用 npm/yarn/pnpm 初始化
- 安装对应依赖,带特定版本号的是因为高版本不支持
cjs了
1
| pnpm add path chalk@4 fs-extra inquirer@^8 commander axios download-git-repo ora@^5
|
处理工程入口
- 新建入口文件
bin/hzqCli.js,命名自取
1
| mkdir bin && touch bin/hzqCli.js
|
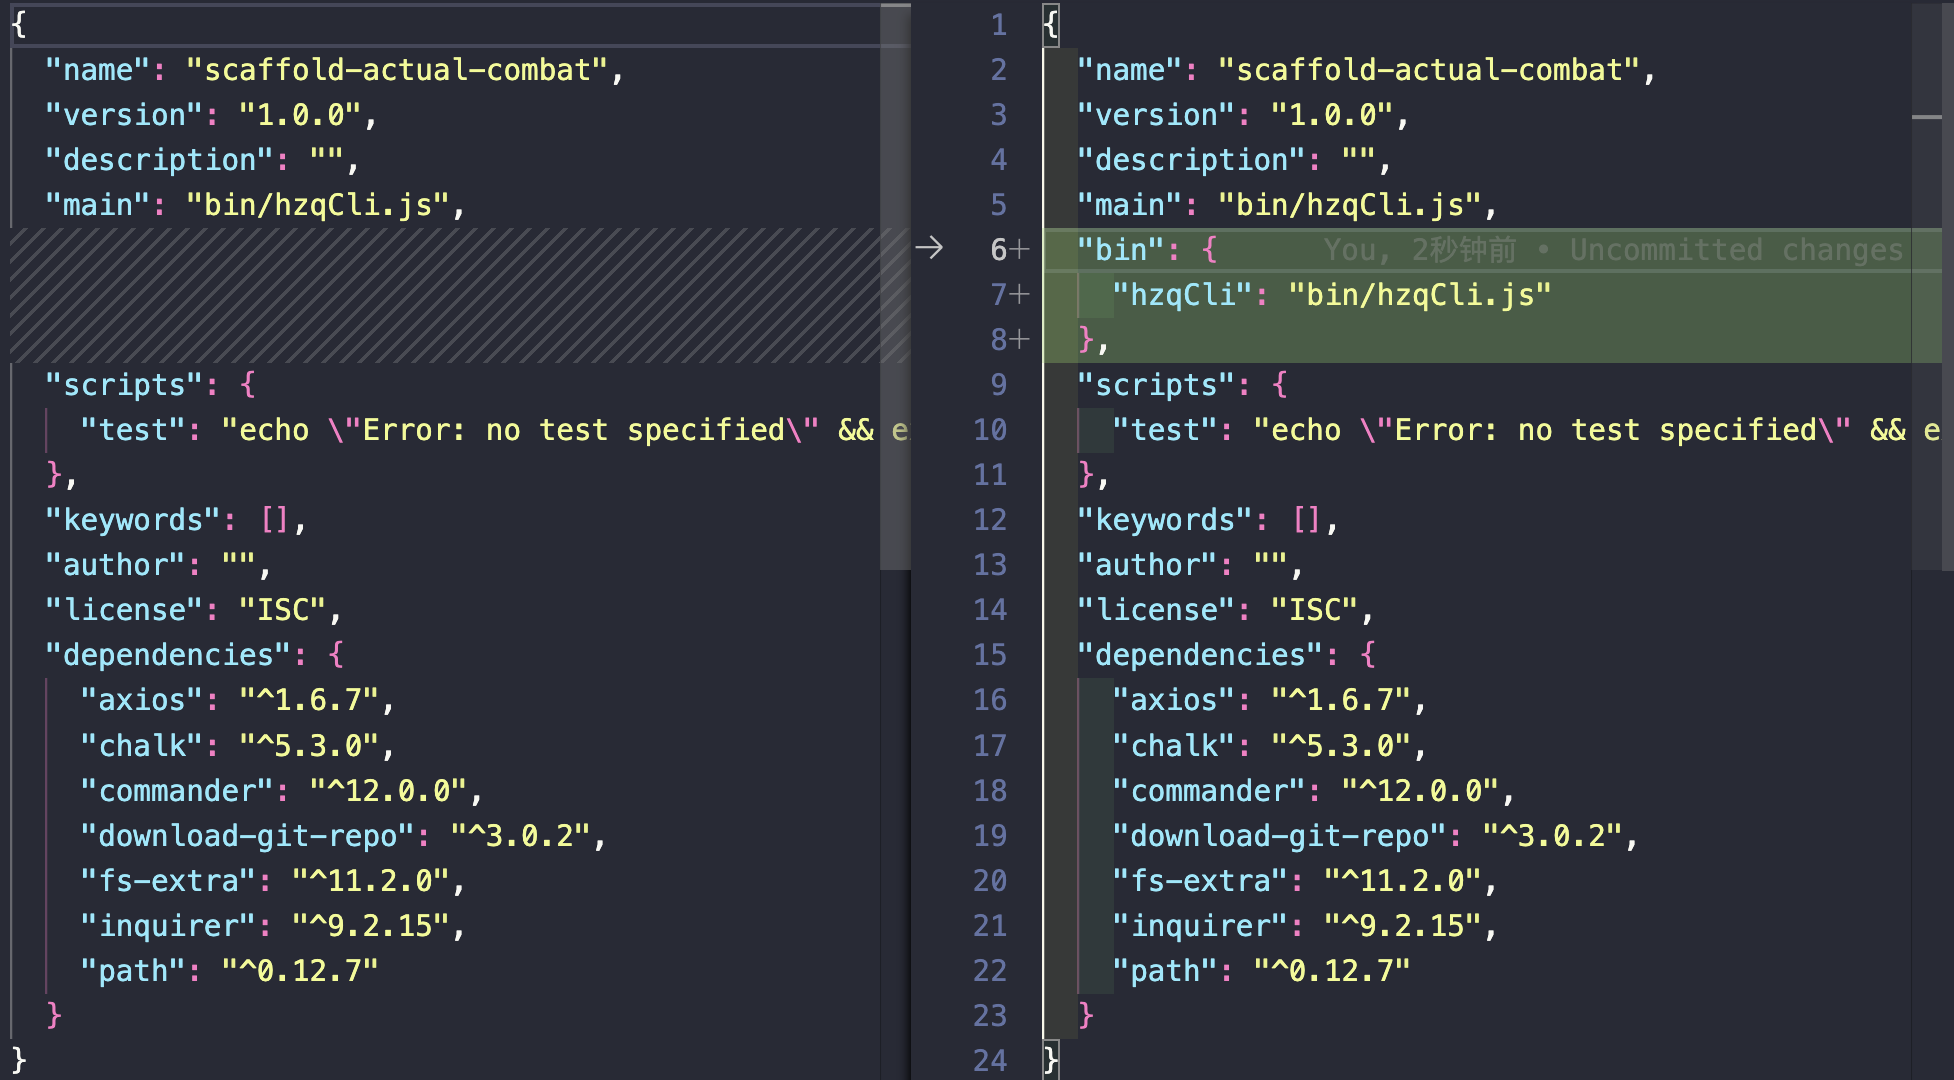
- 更改
package.json的main为bin/hzqCli.js
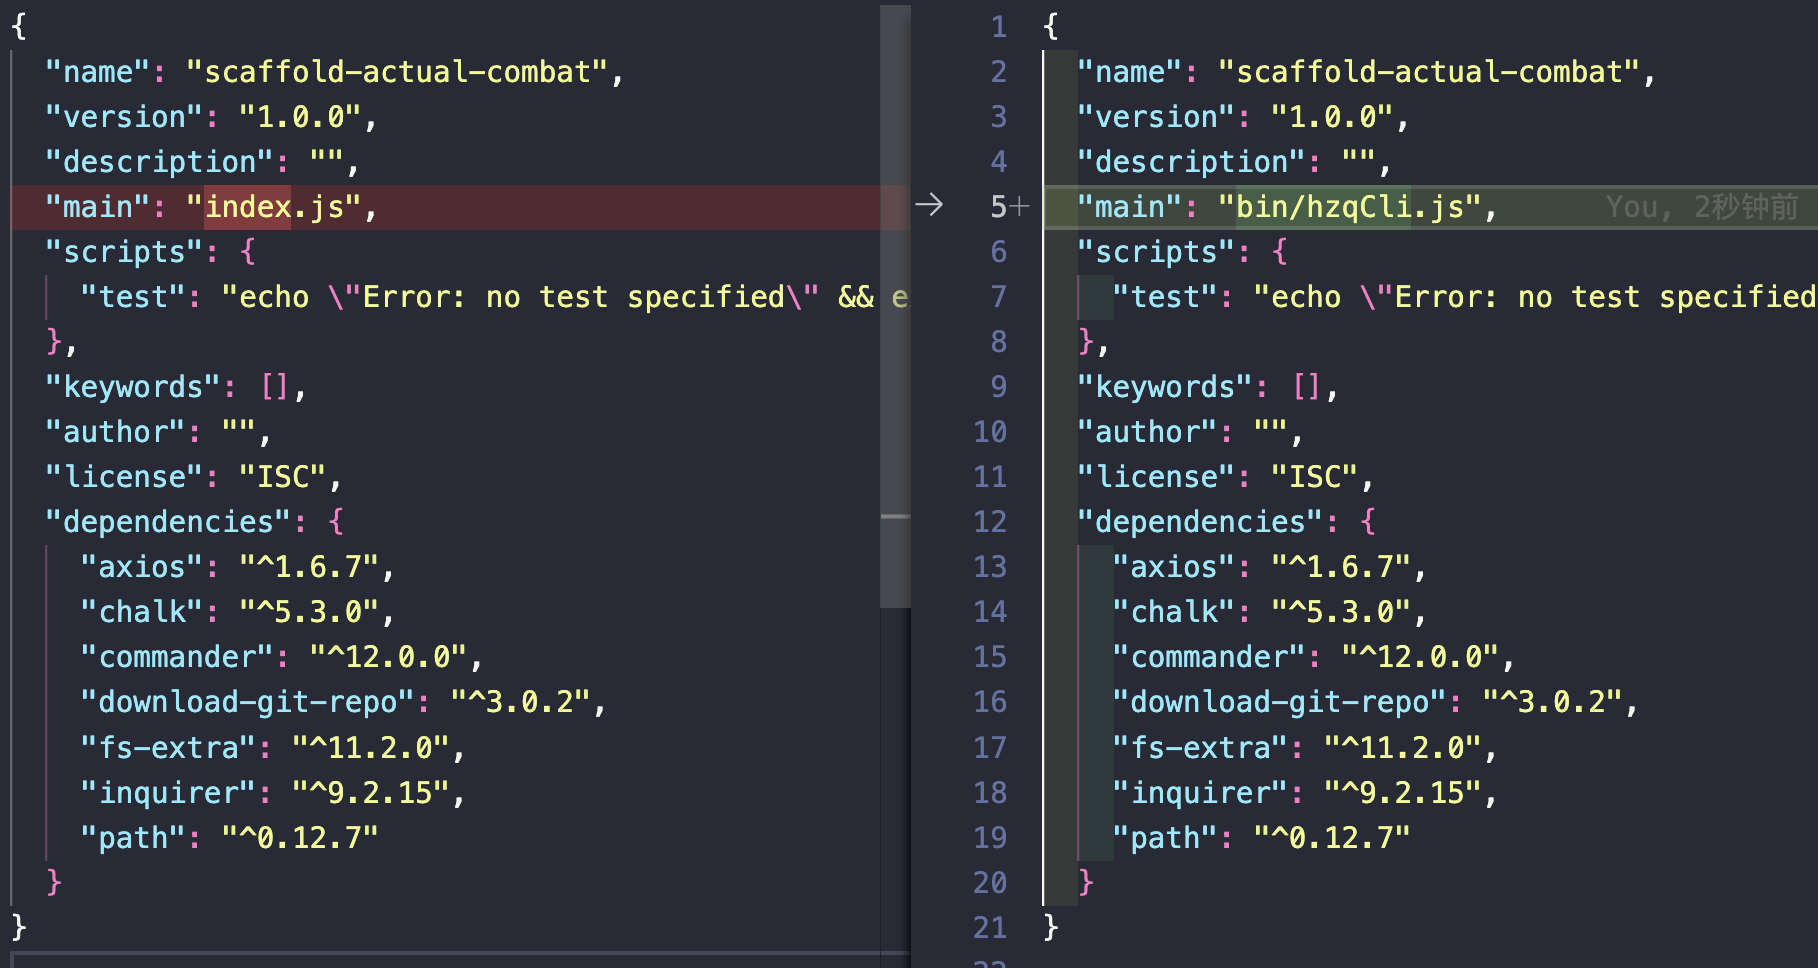
- 更改
package.json的bin为bin/hzqCli.js(bin属性用于指定项目中包含的可执行脚本,并将其暴露为全局命令,全局安装此包后,就可在命令行直接运行hzqCli命令)
bin/hzqCli.js初始化编码
1
2
3
4
5
| #! /usr/bin/env node
console.log("hello hzqCli");
|
- 本地开发时,可以通过运行
npm link,可以实现全局安装的效果,这样可以本地调试与测试(只需要一次即可,后面该代码后不需要重复执行哦)
- 命令行运行
hzqCli,可以发现不会报错,并打印hello hzqCli

功能开发
进入bin/hzqCli.js,开始正式编码了,为了更容易理解编码过程,代码将采用分段形式来展示
bin/hzqCli.js编码:基础命令 create 的基本逻辑
bin/hzqCli.js编码(一)
1
2
3
4
5
6
7
8
9
10
11
12
13
14
15
16
17
18
19
20
21
22
| #! /usr/bin/env node
console.log("hello hzqCli");
const { program } = require("commander");
program
.command("create <projectName>")
.description("create a new project")
.option("-f --force", "overwrite existed project")
.action((projectName, options) => {
console.log("create project: ", projectName);
console.log("options: ", options);
});
program.parse(process.argv);
|
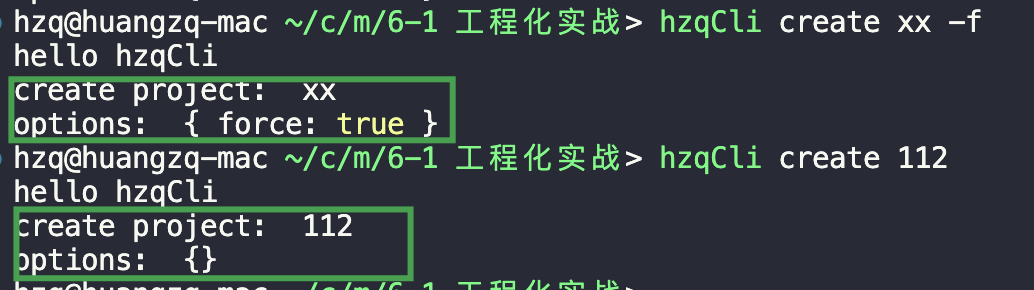
- 命令行运行
hzqCli create xx -f、hzqCli create 112,可以看到如下结果
lib/create.js编码:基础命令 create 调用的实际方法
- 新建具体执行代码文件
1
| mkdir lib && touch lib/create.js
|
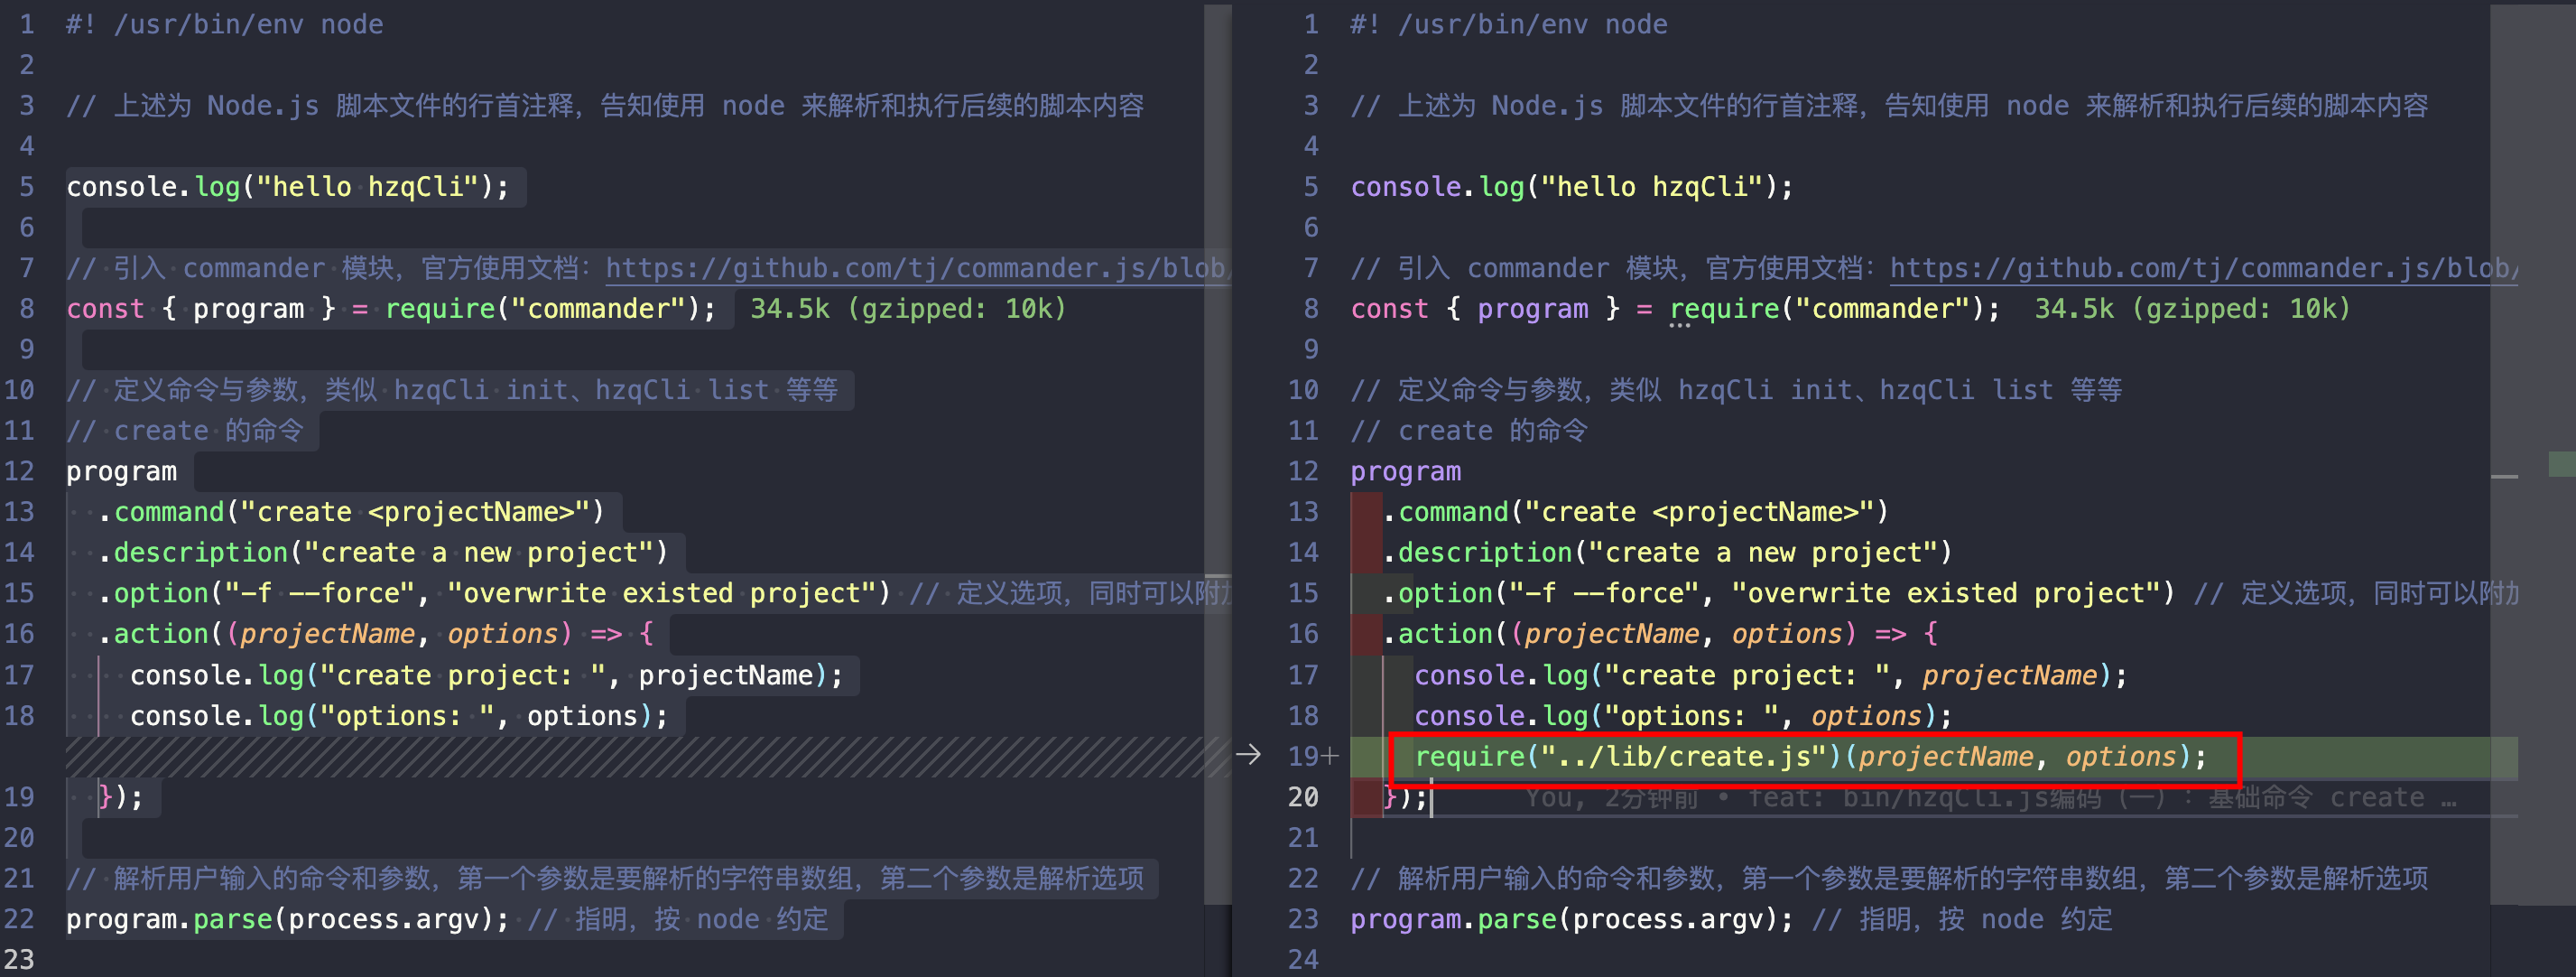
bin/hzqCli.js编码(二),引入lib/create.js
lib/create.js编码(一):项目路径处理
1
2
3
4
5
6
7
8
9
10
11
12
13
14
15
16
17
18
|
const path = require("path");
const fs = require("fs-extra");
function checkFileExist(path) {}
module.exports = async function (projectName, options) {
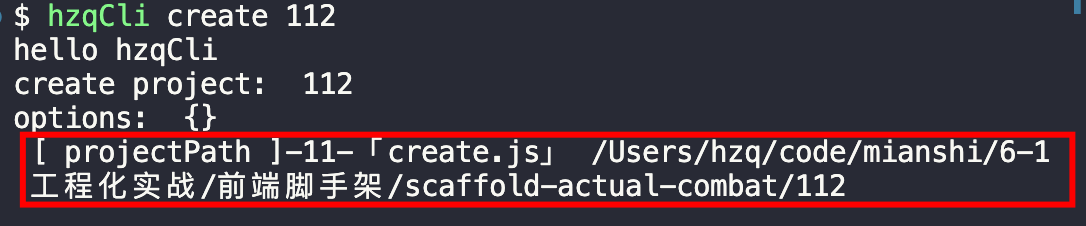
const projectPath = path.join(process.cwd(), projectName);
console.log(
"%c [ projectPath ]-11-「create.js」",
"font-size:13px; background:#9ad82a; color:#deff6e;",
projectPath
);
};
|
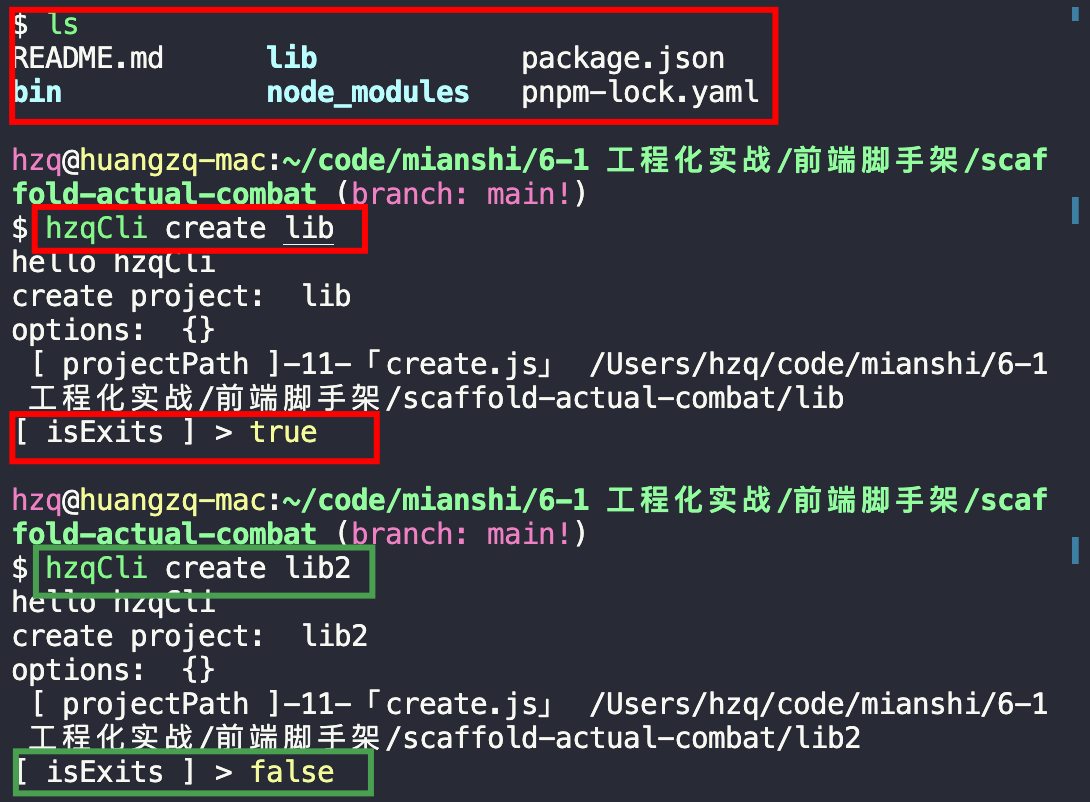
- 编码时,随时可运行命令
hzqCli create 112进行调试哦,看来我们的处理获取是正确的
lib/create.js编码(二):检查路径是否存在
1
2
3
4
5
6
7
8
9
10
11
12
13
14
15
16
17
18
19
20
21
22
|
const path = require("path");
const fs = require("fs-extra");
function checkFileExist(path) {
return fs.existsSync(path);
}
module.exports = async function (projectName, options) {
const projectPath = path.join(process.cwd(), projectName);
console.log(
"%c [ projectPath ]-11-「create.js」",
"font-size:13px; background:#9ad82a; color:#deff6e;",
projectPath
);
const isExits = await checkFileExist(projectPath);
console.log("[ isExits ] >", isExits);
};
|
- 运行调试
lib/create.js编码(三):针对检查路径是否存在做不同处理
1
2
3
4
5
6
7
8
9
10
11
12
13
14
15
16
17
18
19
20
21
22
23
24
25
26
27
28
29
30
31
32
33
34
35
36
37
38
39
40
41
42
43
44
45
46
47
48
49
50
51
52
53
54
55
56
57
58
59
60
61
62
63
64
65
66
67
68
|
const path = require("path");
const fs = require("fs-extra");
const inquirer = require("inquirer");
async function checkFileExist(path) {
return await fs.existsSync(path);
}
async function removeFile(path) {
return await fs.removeSync(path);
}
module.exports = async function (projectName, options) {
const projectPath = path.join(process.cwd(), projectName);
const isExits = await checkFileExist(projectPath);
if (isExits) {
if (options.force) {
await removeFile(projectPath);
} else {
const answer = await inquirer.prompt([
{
name: "choosedForce",
type: "list",
message: `请选择是否覆盖已存在的 ${projectName} 文件?`,
choices: [
{ name: "是(选择后将删除文件)", value: true },
{ name: "否(选择后将退出流程)", value: false },
],
},
]);
if (answer.choosedForce) {
await removeFile(projectPath);
} else {
return;
}
}
}
};
|
lib/generator.js编码:创建项目流程
- 创建对应文件,并初始化代码
1
2
3
4
5
6
7
8
9
10
11
12
13
14
| touch lib/generator.js
module.exports = class Generator {
constructor(projectName, projectPath) {
this.projectName = projectName;
this.projectPath = projectPath;
}
async create() {
console.log("[ create todo ] >", this.projectName, this.projectPath);
}
};
|
lib/create.js 引入Generator,最末尾加上:
1
2
3
4
5
6
7
8
9
10
11
|
const Generator = require("./generator");
module.exports = async function (projectName, options) {
const generator = new Generator(projectName, projectPath);
await generator.create();
}
|
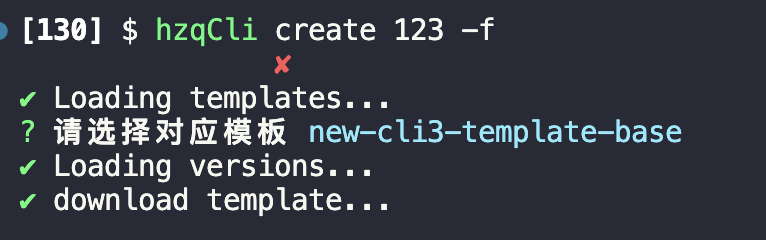
- 运行命令
hzqCli create 123

lib/generator.js编码
1
2
3
4
5
6
7
8
9
10
11
12
13
14
15
16
17
18
19
20
21
22
23
24
25
26
27
28
29
30
31
32
33
34
35
36
37
38
39
40
41
42
43
44
45
46
47
48
49
50
51
52
53
54
55
56
57
58
59
60
61
62
63
64
65
66
67
68
69
70
71
72
73
74
75
76
77
78
79
80
81
82
83
84
85
86
87
88
89
90
91
92
93
94
95
96
| const util = require("util");
const DownloadGitRepo = require("download-git-repo");
const { getRepoList, getTagList, OWNER } = require("./https");
const inquirer = require("inquirer");
const { spinner } = require("./log");
const downloadGitRepo = util.promisify(DownloadGitRepo);
const createLoading = async (fn, msg, ...fnArgs) => {
spinner.start(msg);
try {
let result;
if (typeof fn === "function") result = await fn(...fnArgs);
spinner.succeed();
return result;
} catch (error) {
spinner.fail(`【${msg}】error: ` + error.message);
spinner.fail(`【${msg}】failed, please try again later.`);
}
};
module.exports = class Generator {
constructor(projectName, projectFullPath) {
this.projectName = projectName;
this.projectFullPath = projectFullPath;
}
async create() {
const repoName = await this.getRepo();
if (repoName) {
const tag = await this.getTag(repoName);
await this.download(repoName, tag);
}
}
async getRepo() {
const repoList = await createLoading(getRepoList, "Loading templates...");
if (!repoList?.length) return;
const chooseTemplateList = repoList.filter((item) => item.name);
const promptName = "choosedTemplateName";
const answer = await inquirer.prompt([
{
name: promptName,
type: "list",
message: `请选择对应模板`,
choices: chooseTemplateList,
},
]);
return answer[promptName];
}
async getTag(repoName) {
const tagList = await createLoading(
getTagList,
"Loading versions...",
repoName
);
if (!tagList?.length) return "";
return tagList[0];
}
async download(repoName, tag) {
const repoUrl = `${OWNER}/${repoName}${tag ? "#" + tag : ""}`;
await createLoading(
downloadGitRepo,
"download template...",
repoUrl,
this.projectFullPath
);
}
};
|
- 新建请求工具
1
2
3
4
5
6
7
8
9
10
11
12
13
14
15
16
17
18
19
20
21
22
23
24
25
26
27
28
29
30
31
| touch lib/https.js
const axios = require("axios");
const BASEURL = "https://api.github.com";
const OWNER = "hzq-fe-template";
axios.defaults.baseURL = BASEURL;
axios.defaults.headers.common["User-Agent"] = "myTestApp";
axios.interceptors.response.use((res) => res.data);
async function getRepoList() {
return axios.get(`/orgs/${OWNER}/repos`);
}
async function getTagList(repoName) {
return axios.get(`/repos/${OWNER}/${repoName}/tags`);
}
module.exports = {
OWNER,
getRepoList,
getTagList,
};
|
- 新建打印工具
1
2
3
4
5
6
7
8
9
10
11
12
13
14
15
16
17
18
19
20
21
22
23
24
25
26
27
28
29
30
31
32
33
34
35
36
37
38
| touch lib/log.js
const ora = require("ora");
const chalk = require("chalk");
const log = {
successText: function (msg) {
return chalk.green.bold(`${msg}`);
},
success: function (msg) {
console.log(this.successText(msg));
},
errorText: function (msg) {
return chalk.red(`${msg}`);
},
error: function (msg) {
console.log(this.errorText(msg));
},
};
const spinner = ora();
module.exports = {
log,
spinner: {
start(text = "") {
spinner.start(text);
},
succeed(text = "") {
spinner.succeed(log.successText(text));
},
fail(text = "") {
spinner.fail(log.errorText(text));
},
},
};
|
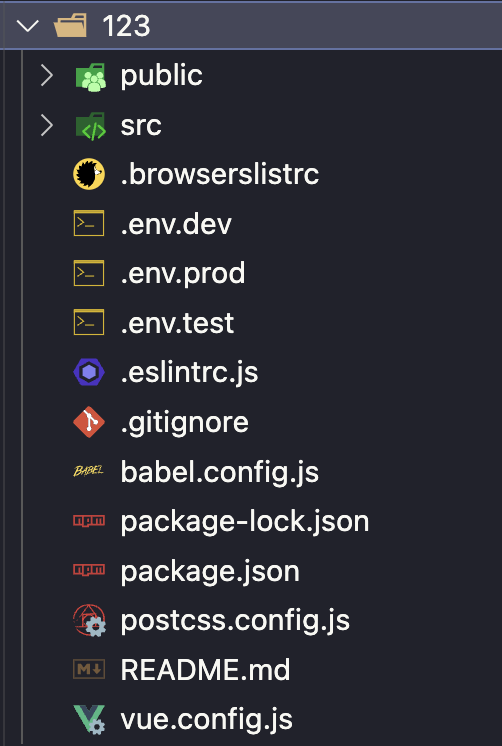
- 运行命令,就可以正确下载了
异常情况
由于 github API 自身的限制:超过速率限制 后会 403,所以不是很容易的成功……
总结
- 讲述了前端工程化可做的事情:可从研发流程切入
- 讲述了 AST 的基础概念
- 通过手写实现了一个脚手架
脚手架代码地址:https://github.com/MrHzq/scaffold-actual-combat