本文最后更新于 2024-03-22T23:32:58+00:00
模块化 定义:将代码按照功能划分为独立、可复用的单元,每个单元称为一个模块。
发展历程 无模块 将 JS 代码直接在 html 里面按顺序引入
1 2 3 4 5 6 7 8 9 10 11 12 13 14 15 16 17 18 19 20 21 22 23 24 25 26 27 28 29 30 31 function add (x, y ) {return x + yfunction subtract (x, y ) {return x - yfunction multiply (x, y ) {return x * yfunction divide (x, y ) {return x / yfunction info (msg ) {console .info ("[ info msg ] >" , msg);DOCTYPE html><html > // ... <body > <script src ="./calc.js" > </script > <script src ="./log.js" > </script > </body > </html >
缺点:
变量名全局污染,如calc.js里面定义了function add(),则其他地方就不能再使用add了,否则就会被覆盖
代码只能通过 html 里面关联,如想在log.js里面使用add函数,就只有在 html 将calc.js引入代码放在log.js前面,然后才能用add函数,JS 多了则难以维护
模块化雏形 - IIFE 基于立即执行函数,形成函数作用域,可解决变量名全局污染的问题,但还是只能放在 html 里面关联
1 2 3 4 5 6 7 8 9 10 11 12 13 14 15 16 17 18 19 20 21 22 23 24 25 26 27 28 29 30 31 32 33 34 35 36 37 38 39 40 41 42 43 44 45 46 47 48 49 50 51 52 53 var calc = (function (function add (x, y ) {return x + y;function subtract (x, y ) {return x - y;function multiply (x, y ) {return x * y;function divide (x, y ) {return x / y;return { add, subtract, multiply, divide };var log = (function (function info (msg ) {console .info ("[ info msg ] >" , msg);function error (msg ) {console .error ("[ error msg ] >" , msg);function add (msg ) {console .warn ("[ add msg ] >" , msg);return { info, error, add };<html > // ... <body > <script src ="./calc.js" /> <script src ="./xxx.js" /> <script > console .log ("[ calc ] >" , calc); console .log ("[ log ] >" , log); </script > </body > </html >
高速发展:CJS、AMD、UMD CJS:node 端的模块加载规范,仅支持同步的,语法为module.exports = {}、reqiure('./xx/xx.js')
1 2 3 4 5 6 7 8 9 10 11 12 13 14 15 16 17 18 19 20 21 22 23 24 25 26 define (function (return {name : 'simpleModule' ,doSomething : function (console .log ('Doing something...' );define (['dependency1' , 'dependency2' ], function (dep1, dep2 ) {return {method : function (someFunction ();anotherFunction ();require (['myModule' ], function (myModule ) {doSomething ();
UMD:将内容输出支持:IIFE、CJS、AMD 三种格式的语法
1 2 3 4 5 6 7 8 9 10 11 12 13 14 15 16 17 18 19 20 21 (function (root, factory ) {if (typeof define === 'function' && define.amd ) {define (['dependency1' , 'dependency2' ], factory);else if (typeof module === 'object' && module .exports ) {module .exports = factory (require ('dependency1' ), require ('dependency2' ));else {MyModule = factory (root.dependency1 , root.dependency2 );this , function (dependency1, dependency2 ) {function MyModule (return MyModule ;
虽然是高速发展了,但编码复杂性、全局污染、浏览器支持性等上都存在问题
新时代:官方下场 - ESM 最终官方下场,从语法层给出模块加载方式规范,即 ECMAScript Modules,关键词为import、export,终结了混乱的模块加载规范
1 2 3 4 5 6 7 8 9 10 11 12 13 14 15 16 17 18 19 20 export const PI = 3.14 ;export default function myDefaultExport (export function func1 (export function func2 ("module" >import log from "./js/log.js" ;console .log ("[ log ] >" , log);<script type ="module" src ="./js/log.js" > </script >
解决了以下问题:
每个模块有独立的作用域,不会再污染全局
支持同步、异步
解决模块循环引用问题
缺点:对低版本浏览器不支持
总结 所以什么是模块化呢?就是将代码分割成可复用的单元,并且通过某种规范实现互相引用
模块化是前端工程化的基石
一些考点 CJS node 端提出的模块加载机制,不支持异步,不支持浏览器,每个文件都有自己的作用域。
1 2 3 4 5 6 function add (module .exports = { add }exports .add = add
导入语法,require永远引入module.exports的值,对应 JS 文件可省略文件后缀
1 const { add } = require ('./add.js' )
特点 动态(同步):当代码执行到require那行时才去加载对应的文件并执行文件内容,可以理解为是“同步”的reqiure伪代码实现(node 端),所以它的是同步,并且是对值的“拷贝”
1
2
3
4
function require (filePath ) {const content = fs.readFileSync (filePath);return eval (content);
对值的“拷贝” 代码展示:
1 2 3 4 5 6 7 8 9 10 11 12 13 14 15 16 17 let a = 1 setTimeout (() => a++, 500 )exports .a = aconst { a } = require ('./a.js' )console .log (a)setTimeout (() => console .log (a), 1000 )1 1
module.exports 与 exports 初始时module.exports === exports 为 true,等价于**const exports = module.exports**
1
2
3
4
5
6
7
8
function add (function subtract (exports .add = addexports .subtract = subtractconsole .log (exports ) console .log (module .exports )
但当它们同时存在时,最终require得到的是module.exports的值
1
2
3
4
5
6
7
8
9
10
function add (function subtract (exports .add = addexports .subtract = subtractmodule .exports = { add }console .log (exports ) console .log (module .exports )
所以为了避免混淆,同一文件只使用一种导出方式
对循环依赖的处理 a.js 引入 b.js,b.js 引入 a.js,则形成了循环依赖
1 2 3 4 5 6 7 8 9 10 11 12 13 14 15 16 17 18 19 20 21 22 23 24 25 26 27 28 29 30 31 32 const b = require ("./b" );console .log ("b" , b);exports .a = 1 ;const a = require ("./a" );console .log ("a" , a);exports .b = 2 ;
结论:谁先执行,则它里面的能拿到值,并且伴随循环引用的报错
ESM ECMAScript 提供的模块加载规范,支持浏览器、node,支持异步、同步
1 2 3 export function add (export function subtract (
导入语法,对应 JS 文件默认不可省略文件后缀,除非有配置
1 import { add, subtract } from './add.js'
特点 静态(异步):是因为 ESM 的核心流程是分成三步(构建、实例化、求值),并且可以分别完成,所以称为异步
为什么要分成三个,不能直接一起吗?因为浏览器加载执行 JS 时会阻塞主线程,造成的后果很大。
构建:根据import创建模块之间的依赖关系图(编译时输出),然后下载模块文件生成模块记录(记录 importName、importUrl)相同导入、导出指向同一个地址 实例化后的地址内
对值的“引用” 代码展示:
1 2 3 4 5 6 7 8 9 10 11 12 13 14 15 export let a = 1 setTimeout (() => a++, 500 )import { a } from './a.js' console .log (a)setTimeout (() => console .log (a), 1000 )1 2
export 与 export default 这是两种导出方式,可并存,只是import的逻辑不同export default之后的值将被导出,可以是任意类型,但import时只能命名为一个变量,就算export default了一个对象,也不支持解构,该变量的值等于export default之后的值,一个文件只能有一个export default
1
2
3
4
5
6
7
8
9
10
11
12
function error (msg ) {console .error ("[ error msg ] >" , msg);function add (msg ) {console .warn ("[ add msg ] >" , msg);export default { error, add };import log from './log.js' import { error } from './log.js'
export之后的值将被导出,可以是任意类型,但import时只能当做对象来解构其值,就算export了一个基础类型,也不支持作为一个变量使用(除非使用* as语法)
1
2
3
4
5
6
7
8
9
10
11
12
13
function error (msg ) {console .error ("[ error msg ] >" , msg);function add (msg ) {console .warn ("[ add msg ] >" , msg);export { error, add };import { error } from './log.js' import log from './log.js' import * as log from './log.js'
总结:export default导出的只能作为变量使用,export导出的只能解构使用
对循环依赖的处理 1 2 3 4 5 6 7 8 9 10 11 12 13 14 import { b } from "./b" console .log ("b" , b);export const a = 1 ;import { a } from "./a" console .log ("a" , a);export const b = 2 ;
结论: 直接报错
Webpack 官方文档
核心概念(了解下即可,后面会讲原理的)
手写实现 Webpack 打包基本原理 初始化项目
随便创建个项目文件,然后创建src文件夹与空文件
1 mkdir src && touch src/add.js && touch src/minus.js && touch src/index.js && touch index.html
初始化项目pnpm init,然后安装依赖pnpm add fs-extra
src/add.js写入相关代码
1 export default (a, b) => a + b;
src/minus.js写入相关代码
1 export const minus = (a, b ) => a - b;
src/index.js写入相关代码
1 2 3 4 5 6 7 import add from "./add.js" ;import { minus } from "./minus.js" ;const sum = add (1 , 2 );const division = minus (2 , 1 );console .log ("[ add(1, 2) ] >" , sum);console .log ("[ minus(2, 1) ] >" , division);
index.html写入相关代码
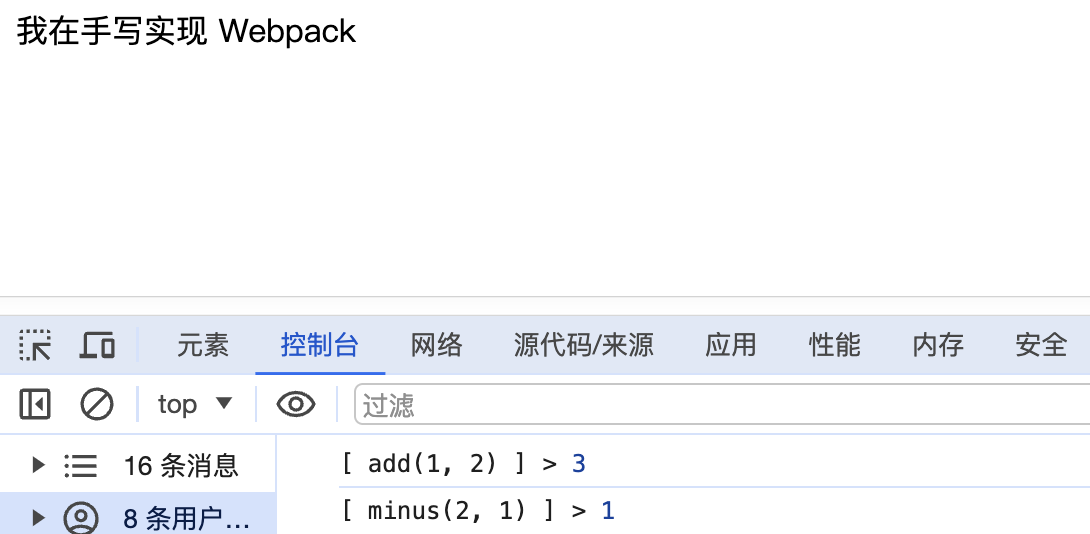
1 2 3 4 5 6 7 8 9 10 11 12 <!DOCTYPE html><html lang ="en" > <head > <meta charset ="UTF-8" /> <meta name ="viewport" content ="width=device-width, initial-scale=1.0" /> <title > 手写实现 Webpack</title > </head > <body > <div > 我在手写实现 Webpack</div > <script src ="./src/index.js" > </script > </body > </html >
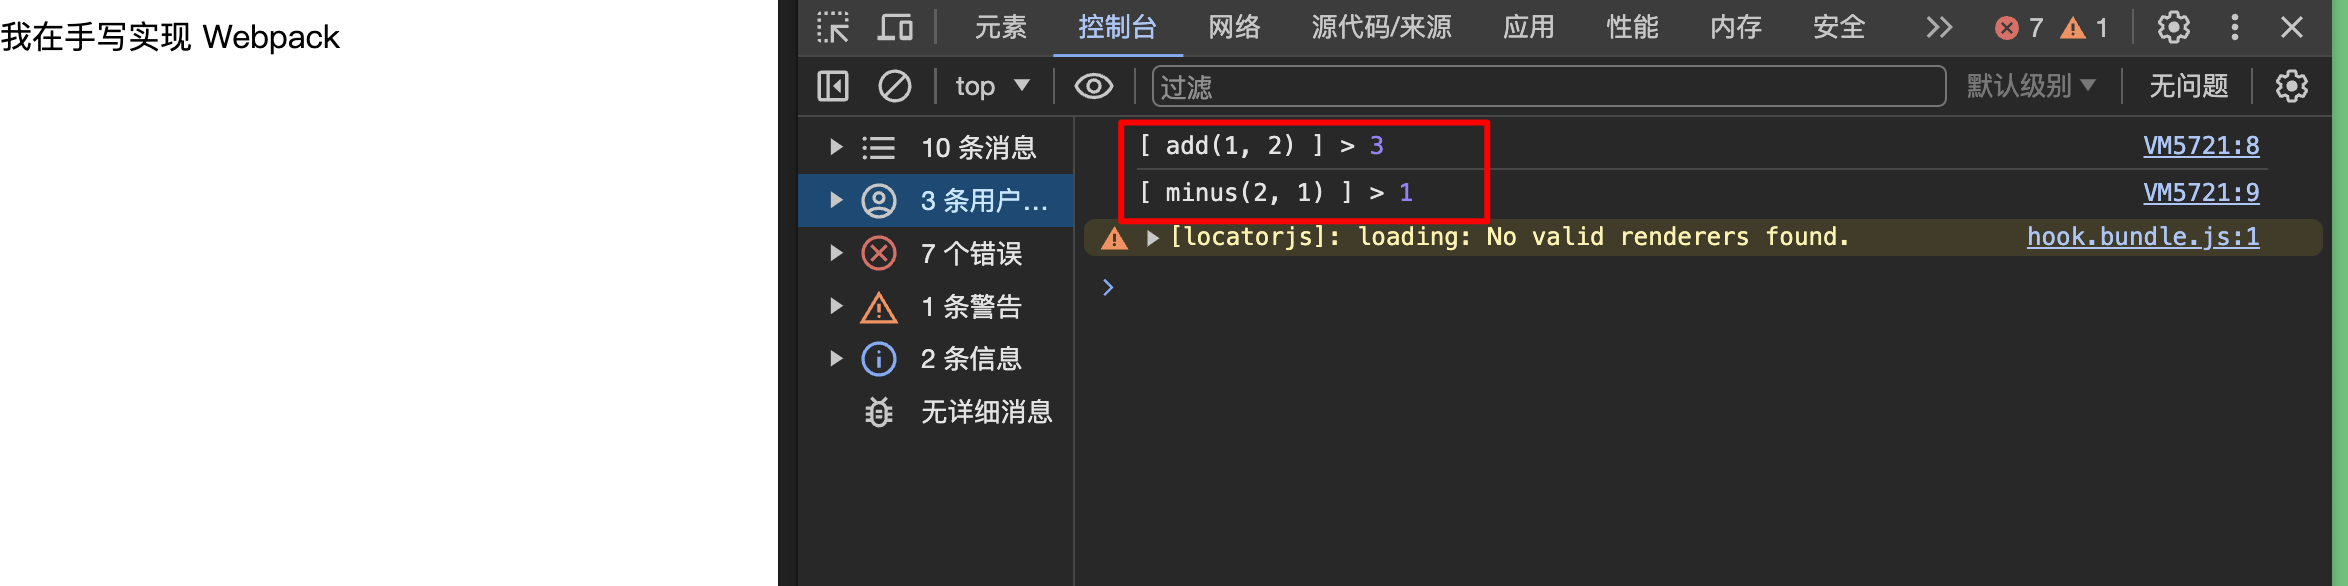
然后使用 VScode 的 Live Server 启动index.html看效果
<script没加type="module"
我们期望正确的结果是:
原理实现
Webpack 的主要作用是从入口开始就加载一系列的依赖文件,最终打包成一个文件,这也是我们要实现的功能。
新建一个webpack.js作为手写 webpack的入口(这个会基于 node 环境去运行的哦)
然后我们期望运行这个node webpack.js后,生成一个dist文件夹,其中有
一个bundle.js,包含了我们src源码下面的所有文件的代码
一个index.html,将之前的<script src="./src/index.js"></script>改为了<script src="./bundle.js"></script>后的 html
然后 Live Server 运行dist/index.html后,最终浏览器能正确运行并打印:
1、基于主入口,读取文件
webpack.js编码:基于主入口,读取文件
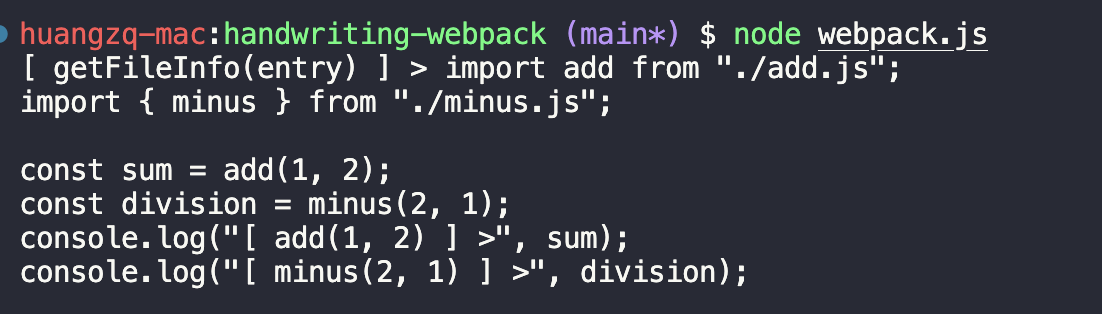
1 2 3 4 5 6 7 8 9 10 11 12 13 14 15 16 17 18 19 20 21 22 23 24 const fs = require ("fs" );const entry = "./src/index.js" ;function getFileInfo (path ) {return fs.readFileSync (path, "utf-8" );const entryFileContent = getFileInfo (entry);console .log ("[ entryFileContent ] >" , entryFileContent);
运行node webpack.js调试,发现已拿到主入口对应的代码了
将node webpack.js放到package.json中,之后就可以pnpm build执行了
2、基于入口文件内容,去分析依赖关系 (一)解析为 AST 第一步拿到了入口文件的内容,我们就需要去分析其中的依赖关系,即import关键词。import然后分析;要么借用其他工具帮我们解析与分析Babel工具来帮我们分析
什么是 Babel?JS 编译器,可将高版本转为低版本的 JS
安装@babel/parser依赖,官方使用文档:@babel/parser · Babel
引入并使用
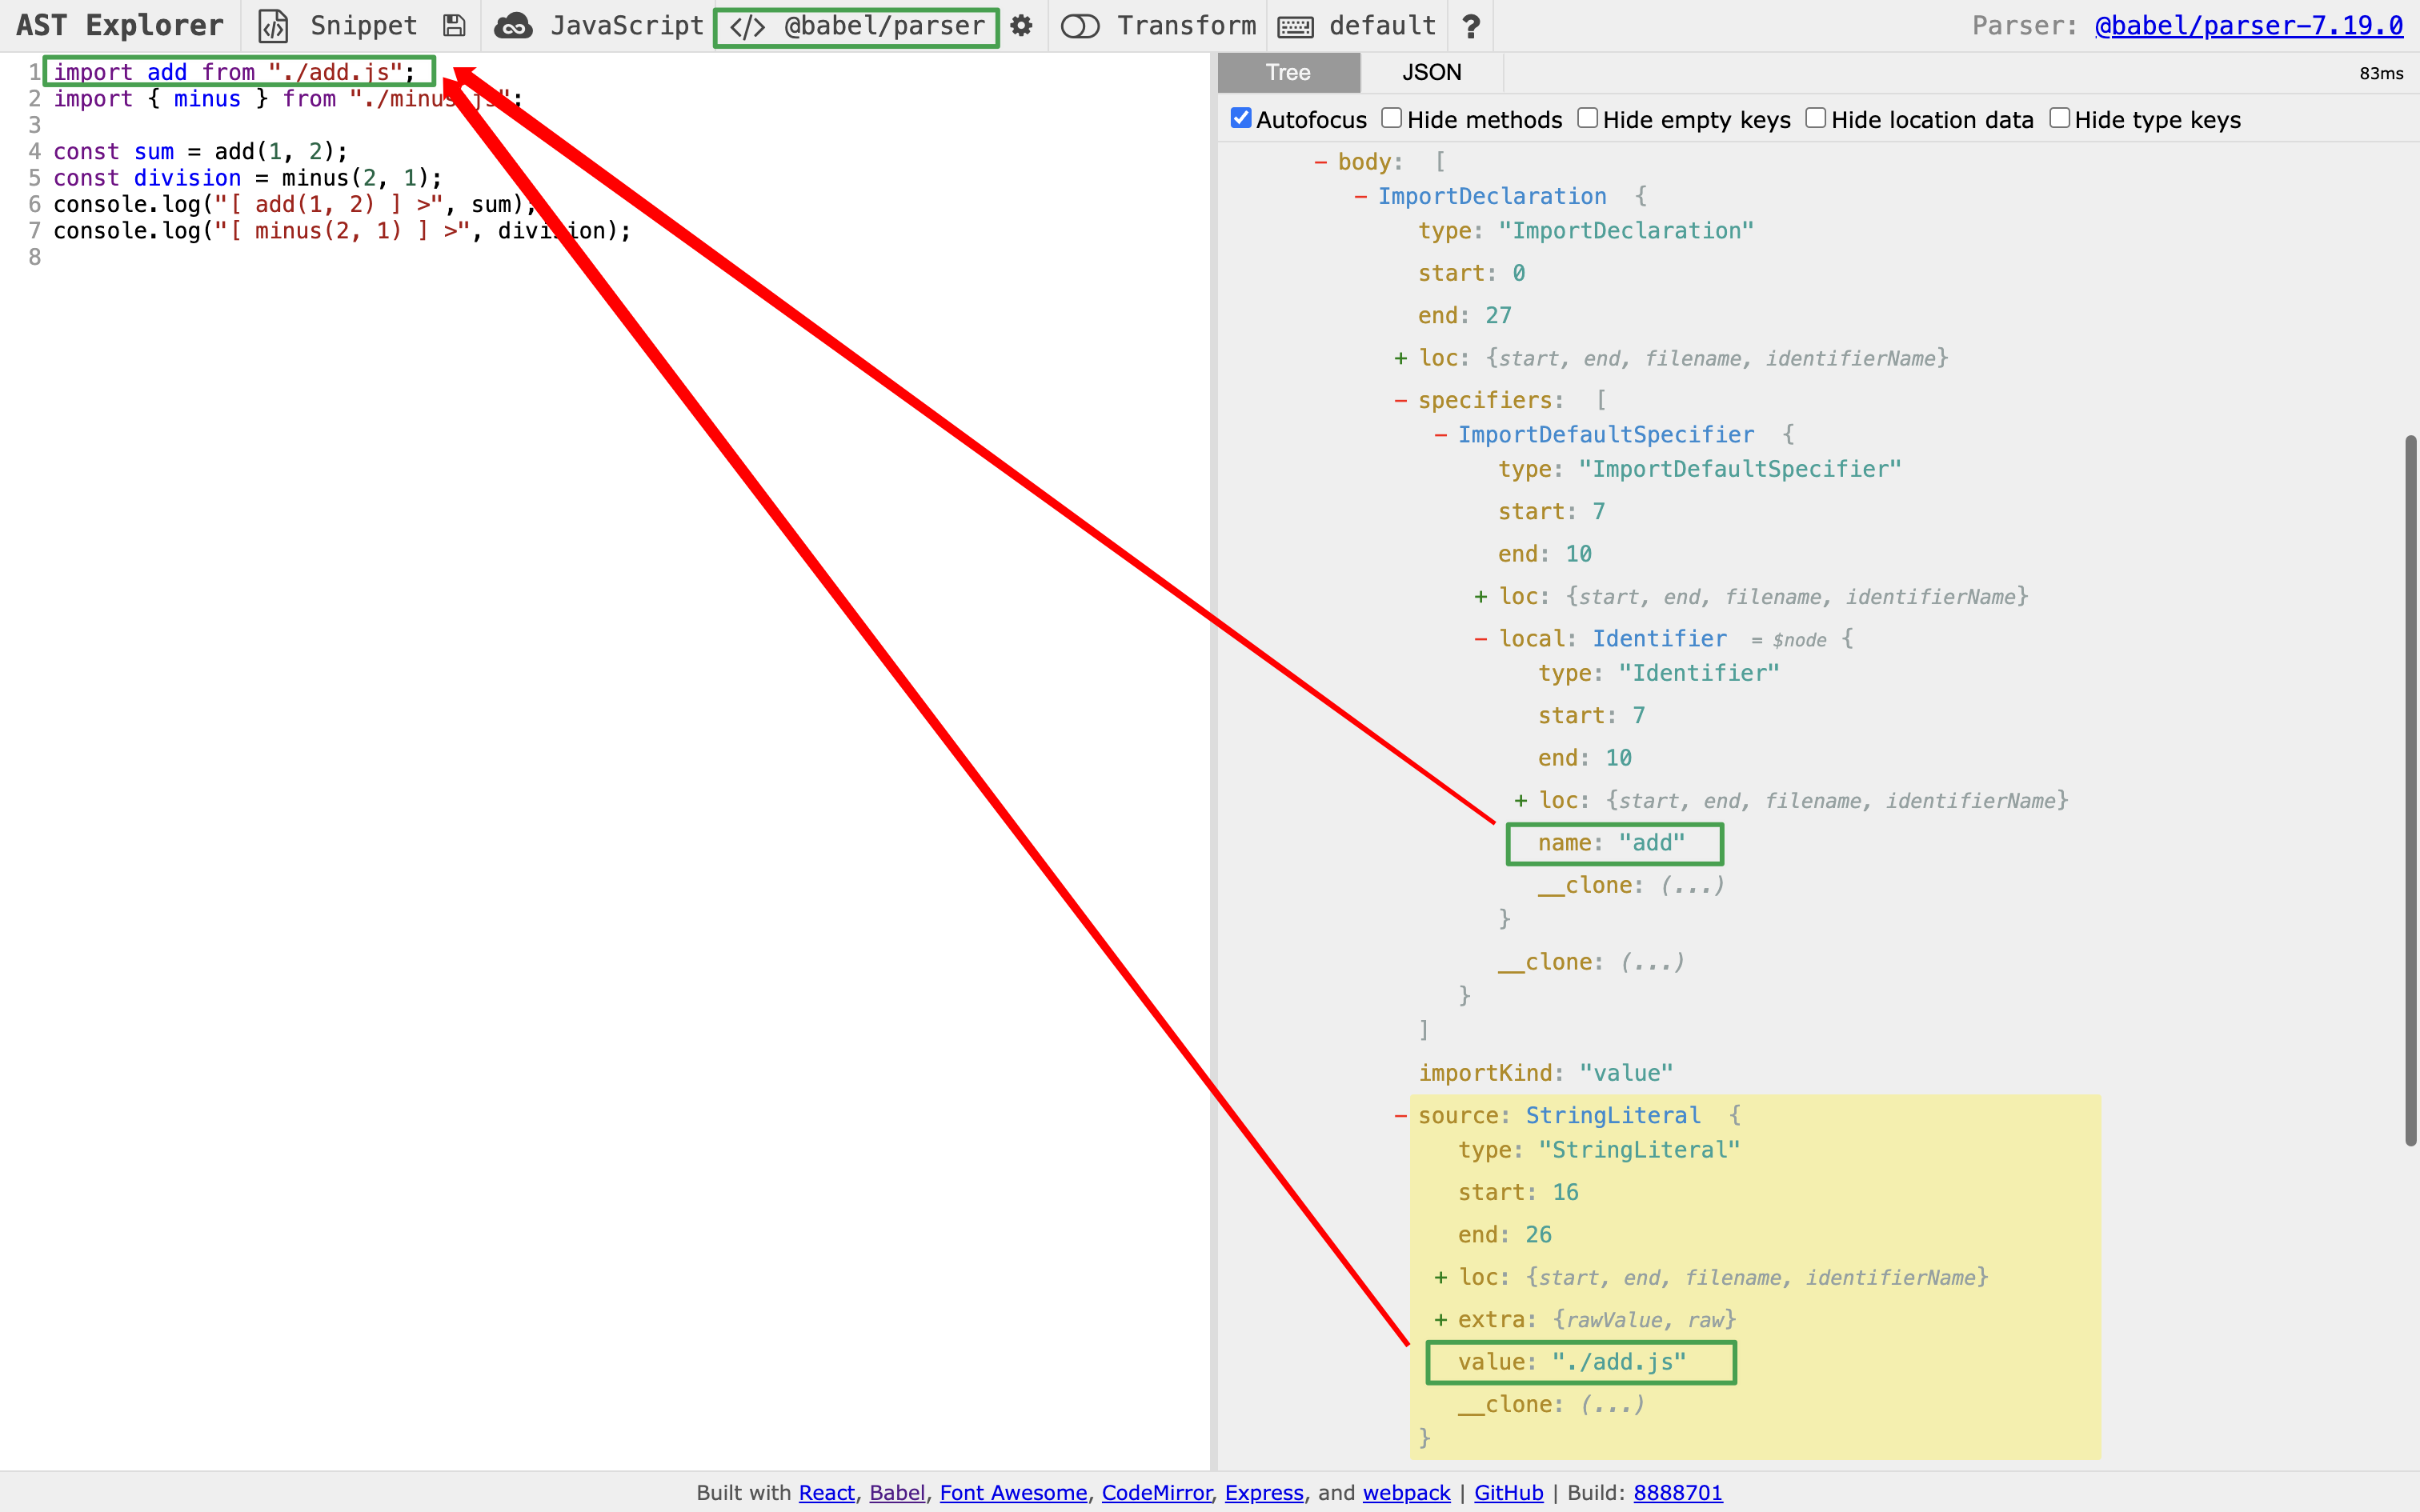
1 2 3 4 5 6 7 8 9 10 11 12 13 14 15 16 17 18 19 20 21 22 23 24 25 26 27 28 29 30 31 32 33 34 35 36 37 38 39 40 41 42 43 44 45 46 47 48 49 const fs = require ("fs" );const entry = "./src/index.js" ;function getFileInfo (path ) {return fs.readFileSync (path, "utf-8" );const entryFileContent = getFileInfo (entry);console .log ("[ entryFileContent ] >" , entryFileContent);const parser = require ("@babel/parser" );function parseFile (fileContent ) {const ast = parser.parse (fileContent, {sourceType : "module" , return ast;const entryFileContentAST = parseFile (entryFileContent);console .log ("[ entryFileContentAST ] >" , entryFileContentAST);
然后运行pnpm build,看下打印 AST 的结构
AST 在线工具 ,将我们的代码拷贝进去,看完整的结构:
(二)分析 AST,形成依赖图 还是使用工具,帮我直接分析依赖:@babel/traverse · Babel
安装@babel/traverse依赖
1 pnpm add @babel/traverse
webpack.js编码:分析 AST,形成依赖图
1 2 3 4 5 6 7 8 9 10 11 12 13 14 15 16 17 18 19 20 21 22 23 24 25 26 27 28 29 30 31 32 33 34 35 36 37 38 39 40 41 42 43 44 45 46 47 48 49 50 51 52 53 54 55 56 57 58 59 60 61 62 63 64 65 66 67 68 69 70 71 72 73 74 75 76 77 78 79 const entry = "./src/index.js" ;const path = require ("path" );const fs = require ("fs" );function getFileInfo (path ) {return fs.readFileSync (path, "utf-8" );const entryFileContent = getFileInfo (entry);const parser = require ("@babel/parser" );function parseFile (fileContent ) {const ast = parser.parse (fileContent, {sourceType : "module" , return ast;const entryFileContentAST = parseFile (entryFileContent);const traverse = require ("@babel/traverse" ).default ;function createDependencyMap (ast ) {const dependencyMap = {};traverse (ast, {ImportDeclaration ({ node }) {const { value } = node.source ; const dirname = path.dirname (entry); const abspath = "./" + path.join (dirname, value); console .log ("[ dependencyMap ] >" , dependencyMap);return dependencyMap;createDependencyMap (entryFileContentAST);
运行pnpm build,可以看到打印的依赖图
3、再将 AST 转换为低版本的 JS 代码 因为我们之前写的代码都是高版本的,所以有些浏览器不一定能识别,因此需要将其转为低版本代码,并且该低代码最终会在浏览器中运行哦
安装bable相关依赖
1 pnpm add babel @babel/preset-env @babel/core
(三)将 AST 转换为低版本的 JS 代码
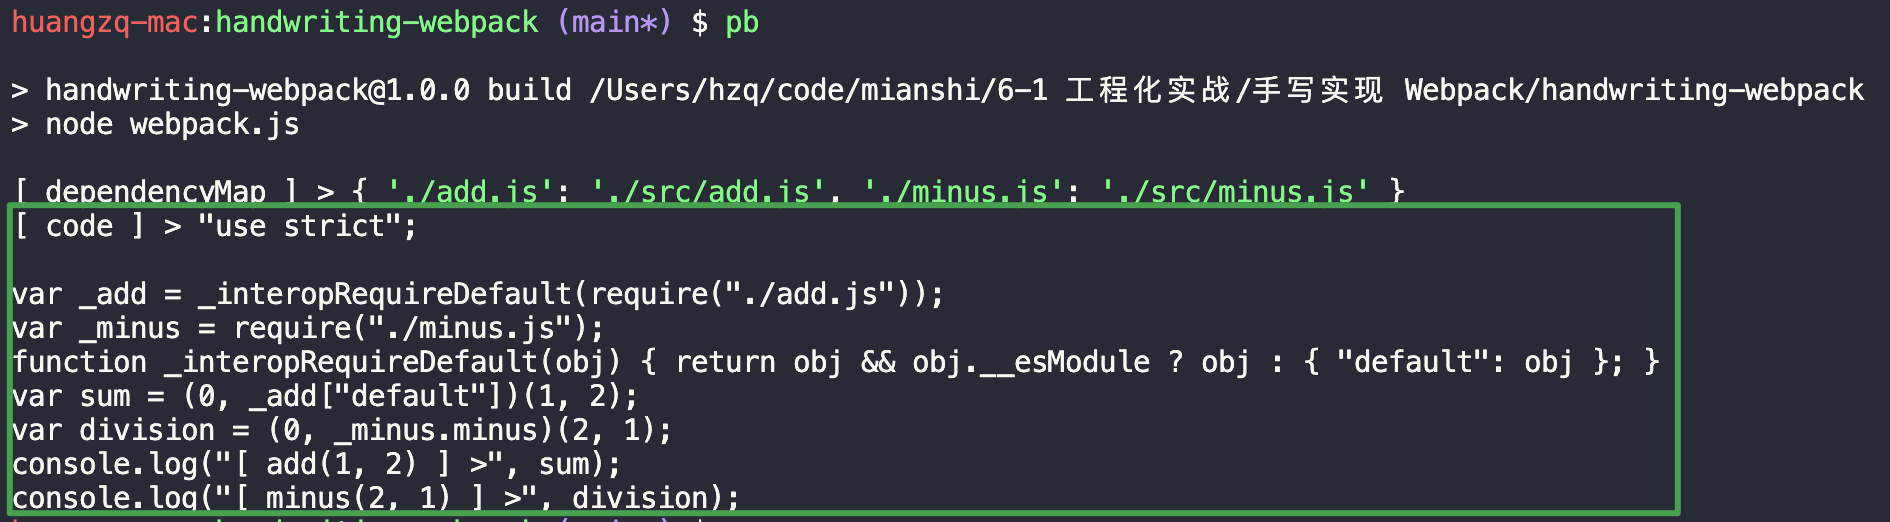
webpack.js编码:将 AST 转换为低版本的 JS 代码
1 2 3 4 5 6 7 8 9 10 11 12 13 14 15 16 17 18 19 20 21 22 23 24 25 26 27 28 29 30 31 32 33 34 35 36 37 38 39 40 41 42 43 44 45 46 47 48 49 50 51 52 53 54 55 56 57 58 59 60 61 62 63 64 65 66 67 68 69 70 71 72 73 74 75 76 77 78 79 80 81 82 83 84 85 86 87 88 89 90 91 92 93 94 95 96 97 98 const entry = "./src/index.js" ;const path = require ("path" );const fs = require ("fs" );function getFileInfo (path ) {return fs.readFileSync (path, "utf-8" );const entryFileContent = getFileInfo (entry);const parser = require ("@babel/parser" );function parseFile (fileContent ) {const ast = parser.parse (fileContent, {sourceType : "module" , return ast;const entryFileContentAST = parseFile (entryFileContent);const traverse = require ("@babel/traverse" ).default ;function createDependencyMap (ast ) {const dependencyMap = {};traverse (ast, {ImportDeclaration ({ node }) {const { value } = node.source ; const dirname = path.dirname (entry); const abspath = "./" + path.join (dirname, value); console .log ("[ dependencyMap ] >" , dependencyMap);return dependencyMap;createDependencyMap (entryFileContentAST);function generateCode (ast ) {const { code } = require ("@babel/core" ).transformFromAst (ast, null , {presets : ["@babel/preset-env" ], return code;generateCode (entryFileContentAST);
运行pnpm build,可以看到打印的 code
考点:”use strict”是什么? "use strict"是 ES5 的严格模式,JS 解释器将采用更严格的规则来解析和执行代码,目的是消除常见错误与禁用不安全的操作(因为 JS 太灵活了)
变量名不能重复使用 var 声明 eval 不能使用 变量必须先声明再使用
函数内部的 this 不会默认绑到全局对象上 对象属性名不能重复
函数参数名不能重复
等等
(四)将上述代码聚合到一个方法内 - getModuleInfo
webpack.js编码:将上述代码聚合到一个方法内 - getModuleInfo
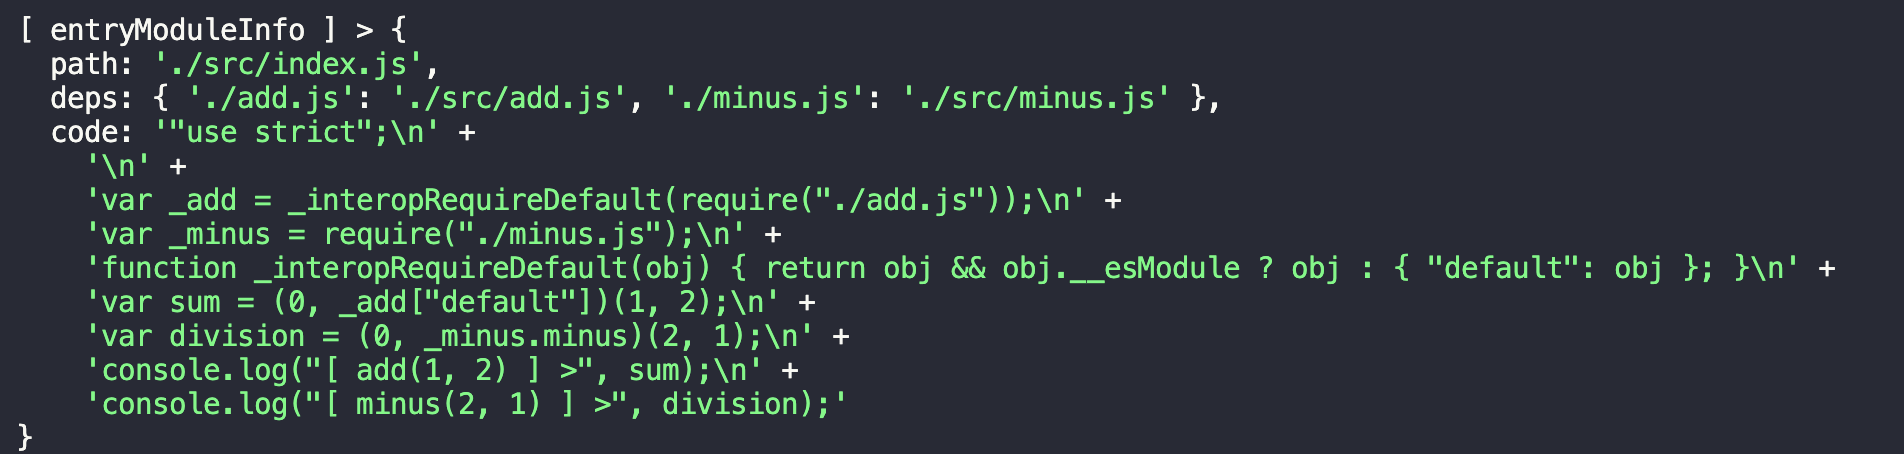
1 2 3 4 5 6 7 8 9 10 11 12 13 14 15 16 17 18 19 20 21 22 23 24 25 26 27 28 29 30 31 32 33 34 35 36 37 38 39 40 41 42 43 44 45 46 47 48 49 50 51 52 53 54 55 56 57 58 59 60 61 62 63 64 65 66 67 68 69 70 71 72 73 74 75 76 77 78 79 80 81 82 83 84 85 86 87 88 89 90 91 92 93 94 95 96 97 98 99 100 101 102 103 104 105 106 107 108 109 110 111 const entry = "./src/index.js" ;const path = require ("path" );const fs = require ("fs" );const parser = require ("@babel/parser" );const traverse = require ("@babel/traverse" ).default ;const babelCore = require ("@babel/core" );function getModuleInfo (_path ) {function getFileInfo (path ) {return fs.readFileSync (path, "utf-8" );function parseFile (fileContent ) {const ast = parser.parse (fileContent, {sourceType : "module" , return ast;function createDependencyMap (ast ) {const dependencyMap = {};traverse (ast, {ImportDeclaration ({ node }) {const { value } = node.source ; const dirname = path.dirname (entry); const abspath = "./" + path.join (dirname, value); return dependencyMap;function generateCode (ast ) {const { code } = babelCore.transformFromAst (ast, null , {presets : ["@babel/preset-env" ], return code;const _pathFileContent = getFileInfo (_path);const _pathFileContentAST = parseFile (_pathFileContent);const _pathFileDepsMap = createDependencyMap (_pathFileContentAST);const _pathFileCode = generateCode (_pathFileContentAST);return { path : _path, deps : _pathFileDepsMap, code : _pathFileCode };const entryModuleInfo = getModuleInfo (entry);console .log ("[ entryModuleInfo ] >" , entryModuleInfo);
运行 build,得到如下结果
4、基于依赖关系图,去加载对应的所有文件
webpack.js编码:基于依赖关系图,去加载对应的所有文件
1 2 3 4 5 6 7 8 9 10 11 12 13 14 15 16 17 18 19 20 21 22 23 24 25 26 27 28 29 30 31 32 function loadModules (dependencyMap ) {const modules = [];if (!dependencyMap) return [];for (let key in dependencyMap) {const moduleInfo = getModuleInfo (dependencyMap[key]);push (moduleInfo);if (moduleInfo.deps ) modules.push (...loadModules (moduleInfo.deps ));return modules;const allModules = [entryModuleInfo].concat (loadModules (entryModuleInfo.deps ));console .log ("[ allModules ] >" , allModules);
运行 build,得到如下结果
然后将数组结构转为对象结构,便于通过path取值
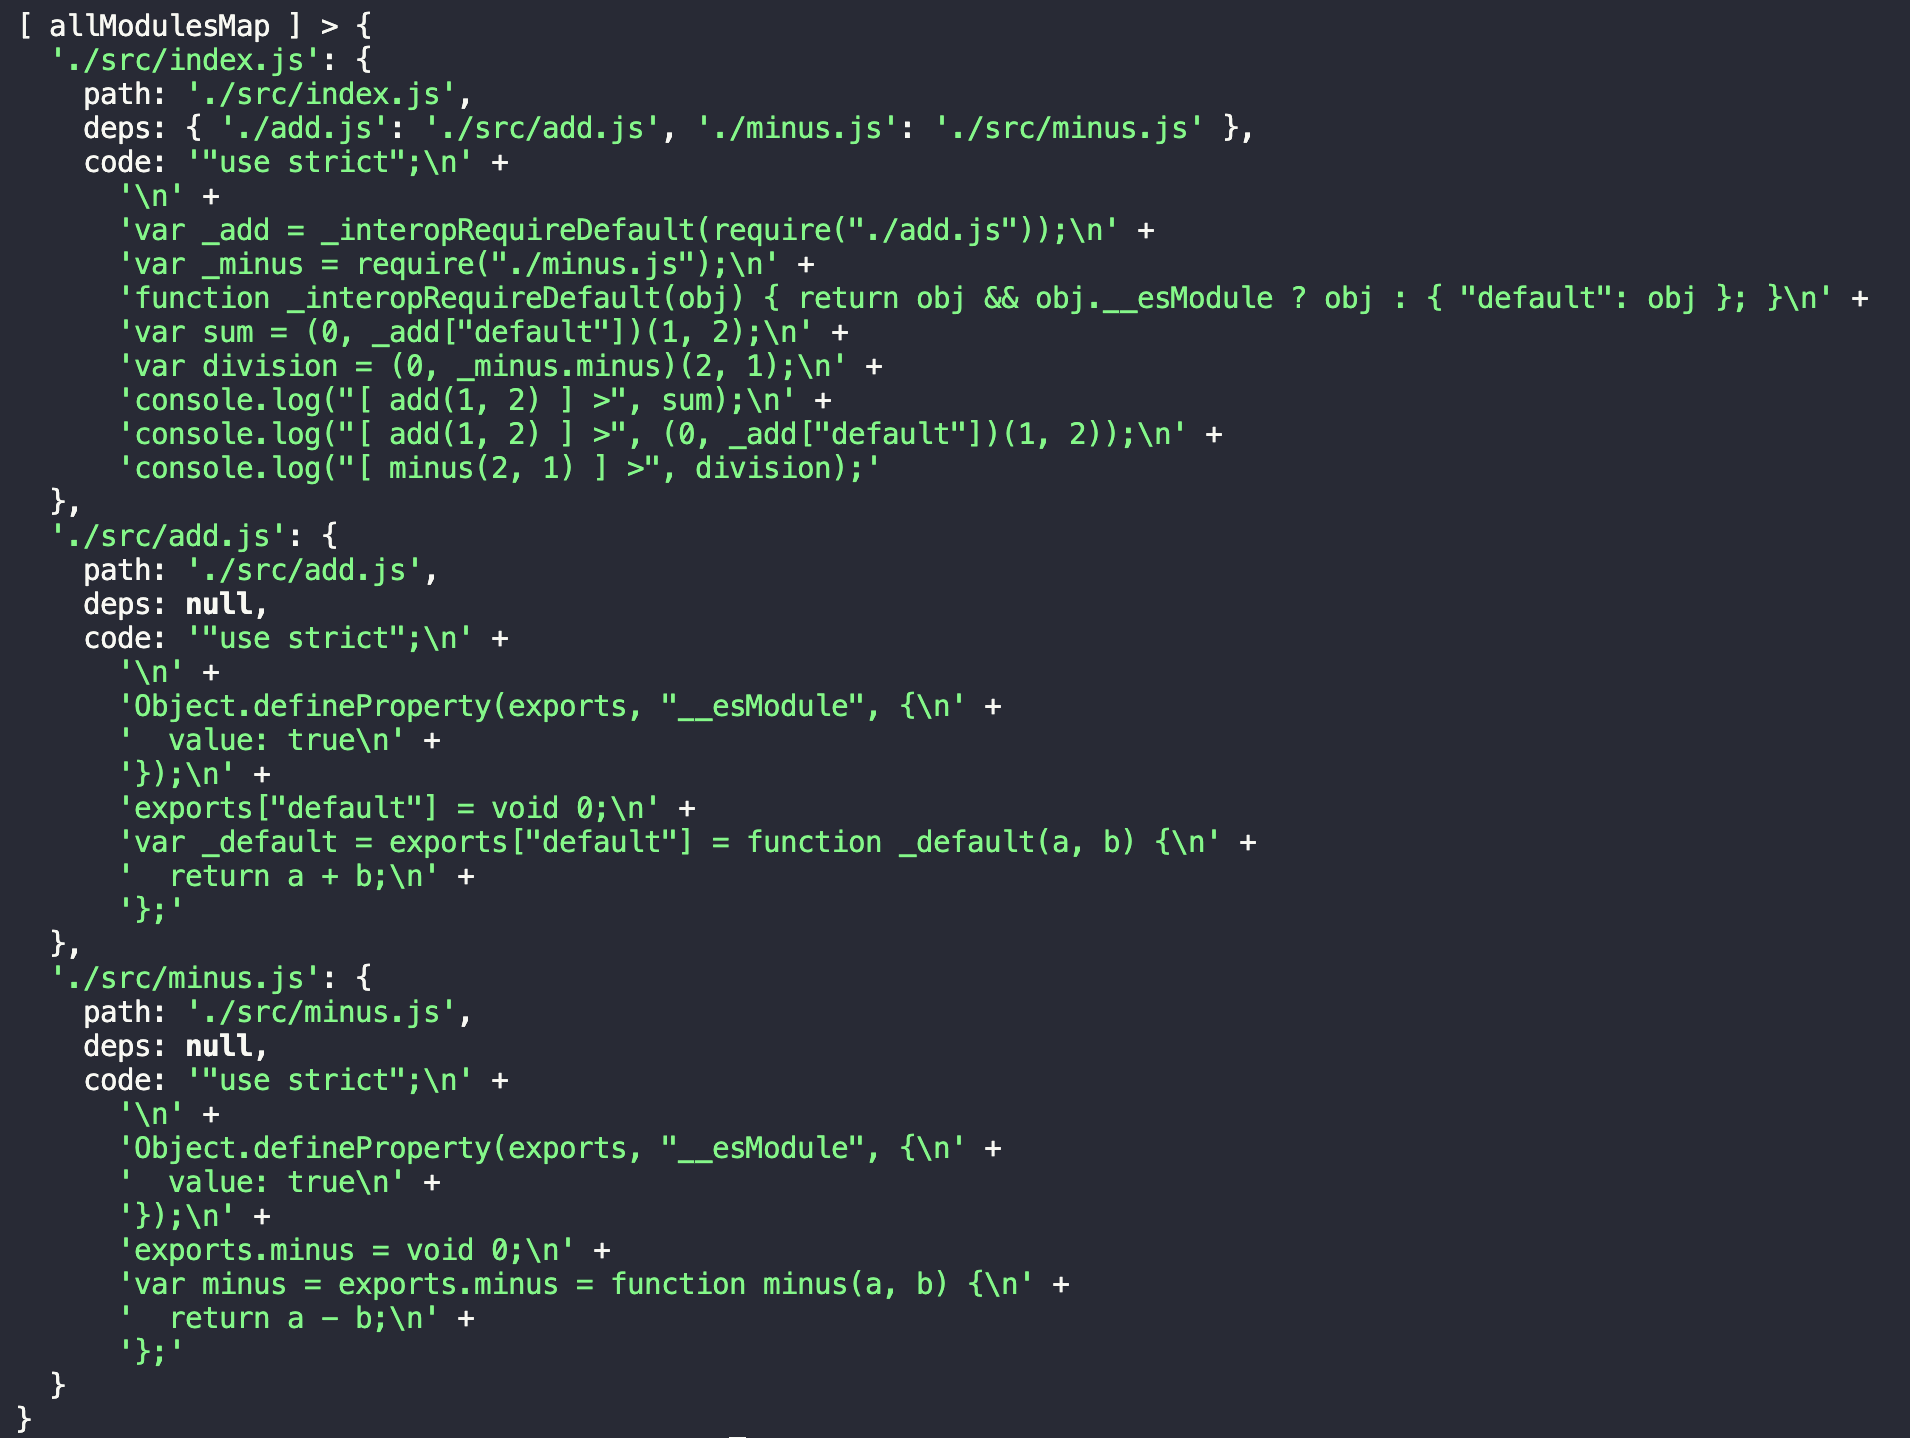
1 2 3 4 5 6 7 8 9 10 11 12 13 14 15 16 17 18 19 20 21 22 23 24 25 const allModulesArray = [entryModuleInfo].concat (loadModules (entryModuleInfo.deps )function createModuleMap (modules ) {return modules.reduce ((modulesMap, module ) => {module .path ] = module ;return modulesMap;const allModulesMap = createModuleMap (allModulesArray);console .log ("[ allModulesMap ] >" , allModulesMap);
运行 build,得到如下结果
(五)将本阶段的代码聚合到一个方法内 - parseModules
webpack.js编码:将本阶段的代码聚合到一个方法内 - parseModules
1 2 3 4 5 6 7 8 9 10 11 12 13 14 15 16 17 18 19 20 21 22 23 24 25 26 27 28 29 30 31 32 33 34 35 36 37 38 39 40 41 42 43 44 45 46 47 48 49 50 51 52 53 54 55 56 57 58 59 60 61 62 63 64 65 66 67 68 69 70 71 72 73 74 75 76 77 78 79 80 81 82 83 84 85 86 87 88 89 90 91 92 93 94 95 96 97 98 99 100 101 102 103 104 105 106 107 108 109 110 111 112 113 114 115 116 117 118 119 120 121 122 123 124 125 126 127 128 129 130 131 132 133 134 135 136 137 138 139 140 141 142 143 144 145 146 147 148 149 150 151 152 153 154 155 156 157 158 159 160 161 162 163 164 const entry = "./src/index.js" ;const path = require ("path" );const fs = require ("fs" );const parser = require ("@babel/parser" );const traverse = require ("@babel/traverse" ).default ;const babelCore = require ("@babel/core" );function getModuleInfo (_path ) {function getFileInfo (path ) {return fs.readFileSync (path, "utf-8" );function parseFile (fileContent ) {const ast = parser.parse (fileContent, {sourceType : "module" , return ast;function createDependencyMap (ast ) {let dependencyMap = null ;traverse (ast, {ImportDeclaration ({ node }) {const { value } = node.source ; const dirname = path.dirname (entry); const abspath = "./" + path.join (dirname, value); if (!dependencyMap) dependencyMap = {};return dependencyMap;function generateCode (ast ) {const { code } = babelCore.transformFromAst (ast, null , {presets : ["@babel/preset-env" ], return code;const _pathFileContent = getFileInfo (_path);const _pathFileContentAST = parseFile (_pathFileContent);const _pathFileDepsMap = createDependencyMap (_pathFileContentAST);const _pathFileCode = generateCode (_pathFileContentAST);return { path : _path, deps : _pathFileDepsMap, code : _pathFileCode };function parseModules (moduleInfo ) {function loadModules (dependencyMap ) {const modules = [];if (!dependencyMap) return [];for (let key in dependencyMap) {const _moduleInfo = getModuleInfo (dependencyMap[key]);push (_moduleInfo);if (_moduleInfo.deps ) modules.push (...loadModules (_moduleInfo.deps ));return modules;function createModuleMap (modules ) {return modules.reduce ((modulesMap, module ) => {module .path ] = module ;return modulesMap;const modulesArray = [moduleInfo].concat (loadModules (moduleInfo.deps ));return createModuleMap (modulesArray);const entryModuleInfo = getModuleInfo (entry);const allModulesMap = parseModules (entryModuleInfo);console .log ("[ allModulesMap ] >" , allModulesMap);
5、处理上下文 我们分析下打印出来的code,我们要求它能直接在浏览器中运行,但它里面有两个关键点reqiure(函数)、exports(对象),咋一看这是 CJS 的语法,肯定是不能在浏览器中运行的,所以我们需要分别给定义出reqiure、exports在浏览器上的上下文
webpack.js编码:注入上下文
1 2 3 4 5 6 7 8 9 10 11 12 13 14 15 16 17 18 19 20 21 22 23 24 25 26 27 28 29 30 31 32 33 34 function handleContext (modulesMap ) {const modulesMapString = JSON .stringify (modulesMap);return `(function (modulesMap) { function require(path) { function absRequire(absPath) { return require(modulesMap[path].deps[absPath]); } var exports = {}; (function (require, exports, code) { eval(code); })(absRequire, exports, modulesMap[path].code); return exports; } require('${entry} '); })(${modulesMapString} );` ;const bundle_js_code_string = handleContext (allModulesMap);
6、生成 dist 与相关文件 1 2 3 4 5 6 7 8 9 10 11 12 13 14 15 16 17 18 19 20 21 22 23 24 25 26 27 28 29 30 31 32 33 34 35 36 37 38 39 40 41 42 43 44 45 46 47 48 49 50 51 52 53 54 55 56 57 58 59 60 61 function createOutPutFiles (_output, codeString ) {function createFolder (path ) {const isExist = fs.existsSync (path);if (isExist) fs.removeSync (path);mkdirSync (path);function createHTML (path, scriptSrc ) {const htmlName = "index.html" ;const htmlContent = fs.readFileSync (htmlName, "utf-8" );const insertPointPattern = /<\/body>/i ;const insertionPoint = htmlContent.search (insertPointPattern);if (insertionPoint !== -1 ) {const scriptTags = `<script src="./${scriptSrc} "></script>` ;const newHtmlContent = `${htmlContent.slice(0 , insertionPoint)} ${scriptTags} ${htmlContent.slice(insertionPoint)} `const htmlPath = path + "/" + htmlName;writeFileSync (htmlPath, newHtmlContent);const { path, filename } = _output;createFolder (path);writeFileSync (path + "/" + filename, codeString);createHTML (path, filename);const bundle_js_code_string = handleContext (allModulesMap);createOutPutFiles (output, bundle_js_code_string);
7、代码完成,运行看效果 index.html完整代码如下:
1 2 3 4 5 6 7 8 9 10 11 <!DOCTYPE html><html lang ="en" > <head > <meta charset ="UTF-8" /> <meta name ="viewport" content ="width=device-width, initial-scale=1.0" /> <title > 手写实现 Webpack</title > </head > <body > <div > 我在手写实现 Webpack</div > </body > </html >
webpack.js完整代码如下:
1 2 3 4 5 6 7 8 9 10 11 12 13 14 15 16 17 18 19 20 21 22 23 24 25 26 27 28 29 30 31 32 33 34 35 36 37 38 39 40 41 42 43 44 45 46 47 48 49 50 51 52 53 54 55 56 57 58 59 60 61 62 63 64 65 66 67 68 69 70 71 72 73 74 75 76 77 78 79 80 81 82 83 84 85 86 87 88 89 90 91 92 93 94 95 96 97 98 99 100 101 102 103 104 105 106 107 108 109 110 111 112 113 114 115 116 117 118 119 120 121 122 123 124 125 126 127 128 129 130 131 132 133 134 135 136 137 138 139 140 141 142 143 144 145 146 147 148 149 150 151 152 153 154 155 156 157 158 159 160 161 162 163 164 165 166 167 168 169 170 171 172 173 174 175 176 177 178 179 180 181 182 183 184 185 186 187 188 189 190 191 192 193 194 195 196 197 198 199 200 201 202 203 204 205 206 207 208 209 210 211 212 213 214 215 216 217 218 219 220 221 222 223 224 225 226 227 228 229 230 231 232 233 234 235 236 237 238 239 240 241 242 243 244 245 246 247 248 249 250 251 252 253 254 255 256 257 258 259 const entry = "./src/index.js" ;const output = { path : "_dist" , filename : "bundle.js" };const path = require ("path" );const fs = require ("fs-extra" );const parser = require ("@babel/parser" );const traverse = require ("@babel/traverse" ).default ;const babelCore = require ("@babel/core" );function getModuleInfo (_path ) {function getFileInfo (path ) {return fs.readFileSync (path, "utf-8" );function parseFile (fileContent ) {const ast = parser.parse (fileContent, {sourceType : "module" , return ast;function createDependencyMap (ast ) {let dependencyMap = null ;traverse (ast, {ImportDeclaration ({ node }) {const { value } = node.source ; const dirname = path.dirname (entry); const abspath = "./" + path.join (dirname, value); if (!dependencyMap) dependencyMap = {};return dependencyMap;function generateCode (ast ) {const { code } = babelCore.transformFromAst (ast, null , {presets : ["@babel/preset-env" ], return code;const _pathFileContent = getFileInfo (_path);const _pathFileContentAST = parseFile (_pathFileContent);const _pathFileDepsMap = createDependencyMap (_pathFileContentAST);const _pathFileCode = generateCode (_pathFileContentAST);return { path : _path, deps : _pathFileDepsMap, code : _pathFileCode };function parseModules (moduleInfo ) {function loadModules (dependencyMap ) {const modules = [];if (!dependencyMap) return [];for (let key in dependencyMap) {const _moduleInfo = getModuleInfo (dependencyMap[key]);push (_moduleInfo);if (_moduleInfo.deps ) modules.push (...loadModules (_moduleInfo.deps ));return modules;function createModuleMap (modules ) {return modules.reduce ((modulesMap, module ) => {module .path ] = module ;return modulesMap;const modulesArray = [moduleInfo].concat (loadModules (moduleInfo.deps ));return createModuleMap (modulesArray);const entryModuleInfo = getModuleInfo (entry);const allModulesMap = parseModules (entryModuleInfo);function handleContext (modulesMap ) {const modulesMapString = JSON .stringify (modulesMap);return `(function (modulesMap) { function require(path) { function absRequire(absPath) { return require(modulesMap[path].deps[absPath]); } var exports = {}; (function (require, exports, code) { eval(code); })(absRequire, exports, modulesMap[path].code); return exports; } require('${entry} '); })(${modulesMapString} );` ;function createOutPutFiles (_output, codeString ) {function createFolder (path ) {const isExist = fs.existsSync (path);if (isExist) fs.removeSync (path);mkdirSync (path);function createHTML (path, scriptSrc ) {const htmlName = "index.html" ;const htmlContent = fs.readFileSync (htmlName, "utf-8" );const insertPointPattern = /<\/body>/i ;const insertionPoint = htmlContent.search (insertPointPattern);if (insertionPoint !== -1 ) {const scriptTags = `<script src="./${scriptSrc} "></script>` ;const newHtmlContent = `${htmlContent.slice(0 , insertionPoint)} ${scriptTags} ${htmlContent.slice(insertionPoint)} `const htmlPath = path + "/" + htmlName;writeFileSync (htmlPath, newHtmlContent);const { path, filename } = _output;createFolder (path);writeFileSync (path + "/" + filename, codeString);createHTML (path, filename);const bundle_js_code_string = handleContext (allModulesMap);createOutPutFiles (output, bundle_js_code_string);
运行pnpm build,生成如下代码:
_dist/index.html:
1 2 3 4 5 6 7 8 9 10 11 12 13 <!DOCTYPE html><html lang ="en" > <head > <meta charset ="UTF-8" /> <meta name ="viewport" content ="width=device-width, initial-scale=1.0" /> <title > 手写实现 Webpack</title > </head > <body > <div > 我在手写实现 Webpack</div > <script src ="./bundle.js" > </script > </body > </html >
_dist/bundle.js:
1 2 3 4 5 6 7 8 9 10 11 12 13 14 15 16 17 18 19 20 21 22 23 24 25 26 27 28 29 30 31 32 (function (modulesMap ) {function require (path ) {function absRequire (absPath ) {return require (modulesMap[path].deps [absPath]);var exports = {};function (require , exports , codeeval (code);exports , modulesMap[path].code );return exports ;require ("./src/index.js" );"./src/index.js" : {path : "./src/index.js" ,deps : { "./add.js" : "./src/add.js" , "./minus.js" : "./src/minus.js" },code : '"use strict";\n\nvar _add = _interopRequireDefault(require("./add.js"));\nvar _minus = require("./minus.js");\nfunction _interopRequireDefault(obj) { return obj && obj.__esModule ? obj : { "default": obj }; }\nvar sum = (0, _add["default"])(1, 2);\nvar division = (0, _minus.minus)(2, 1);\nconsole.log("[ add(1, 2) ] >", sum);\nconsole.log("[ minus(2, 1) ] >", division);' ,"./src/add.js" : {path : "./src/add.js" ,deps : null ,code : '"use strict";\n\nObject.defineProperty(exports, "__esModule", {\n value: true\n});\nexports["default"] = void 0;\nvar _default = exports["default"] = function _default(a, b) {\n return a + b;\n};' ,"./src/minus.js" : {path : "./src/minus.js" ,deps : null ,code : '"use strict";\n\nObject.defineProperty(exports, "__esModule", {\n value: true\n});\nexports.minus = void 0;\nvar minus = exports.minus = function minus(a, b) {\n return a - b;\n};' ,
然后 Live Server 启动_dist/index.html
至此最简单的实现了手写 Webpack 功能
总结 上面手动实现了一个最简单的 Webpack 打包功能,可以发现我们以前配的 Webpack 选项影子Loader、Plugin系统,你可以粗暴理解就是我们手写时引入的其他依赖(fs-extra、babel),帮我做更多的事情Loader、Plugin系统做的很完善和强大Webpack 原生 **Loader**支持加载的文件有:JS 和 JSON ,其他类型(css/svg 等)的就要安装对应的Loader来处理
Loader 简介 是对模块的源代码进行转换的,默认只能处理js、json,其他类型的css、txt、less 等需要专门的 Loader 进行转换处理。
1 2 3 4 5 module .exports = {module : {rules :[ { test :/\.less$/ , use : 'less-loader' } ]
Loader 是链式传递的,Webpack 会按顺序链式调用每个 Loader,Loader 的输入与输出都是字符串,并且每个 Loader 只应该做一件事并且无状态
less-loader: 将 less 文件处理后通过 style 标签渲染到页面上
Plugin 简介 在 Webpack 构建工程中,特定时间注入的扩展逻辑,用来改变或优化构建结果。
1 2 3 4 5 const HTMLWebpackPlugin = require ('html-webpack-plugin' )module .exports = {plugin : [ new HTMLWebpackPlugin ({ template : './public/index.html' }) ]
自定义插件开发文档:自定义插件 | webpack 中文文档 、常用钩子 apply方法,通过compiler.hooks[钩子名].tap(插件名称, 插件功能),然后重点写我们的插件功能即可。
插件功能就可以随意发挥了,它是运行在node环境下的,所以可以使用fs来创建你想要的文件,也可以使用jszip将dist压缩为.zip等等,甚至可以使用axios调用接口干事情
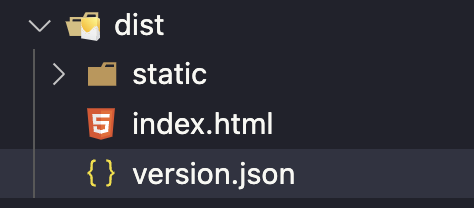
比如写一个打包时,创建一个version.json文件的插件,用于表示本次的版本
1 2 emit :输出 asset 到 output 目录之前执行。这个钩子不会被复制到子编译器。
1 2 3 4 5 6 7 8 9 10 11 12 13 14 15 16 17 18 19 20 21 22 23 24 25 const { RawSource } = require ("webpack-sources" );class VersionFilePlugin {apply (compiler ) {hooks .emit .tap (VersionFilePlugin .name , (compilation ) => {const version = `${Number (new Date ())} _${Math .random().toString(36 )} ` ;emitAsset ("version.json" ,new RawSource (JSON .stringify ({ version })),module .exports = { VersionFilePlugin };const { VersionFilePlugin } = require ("../webpack-plugin/versionFile" );module .exports = {plugins : [new VersionFilePlugin ()],
输入结果如下:
Chunk 简介
Tree Shaking 简介 官方文档:Tree Shaking | webpack 中文文档 import、export、export defaultoptimization.usedExports 为 truemode=production(常用的)optimization.minimize = trueoptimization.minimizer数组
原理 先标记 模块导出中未被使用的值,再使用terser来删除相关代码。
Webpack 5 的新增功能 1、新增了cache属性,可支持本地缓存编译结果,提供构建性能
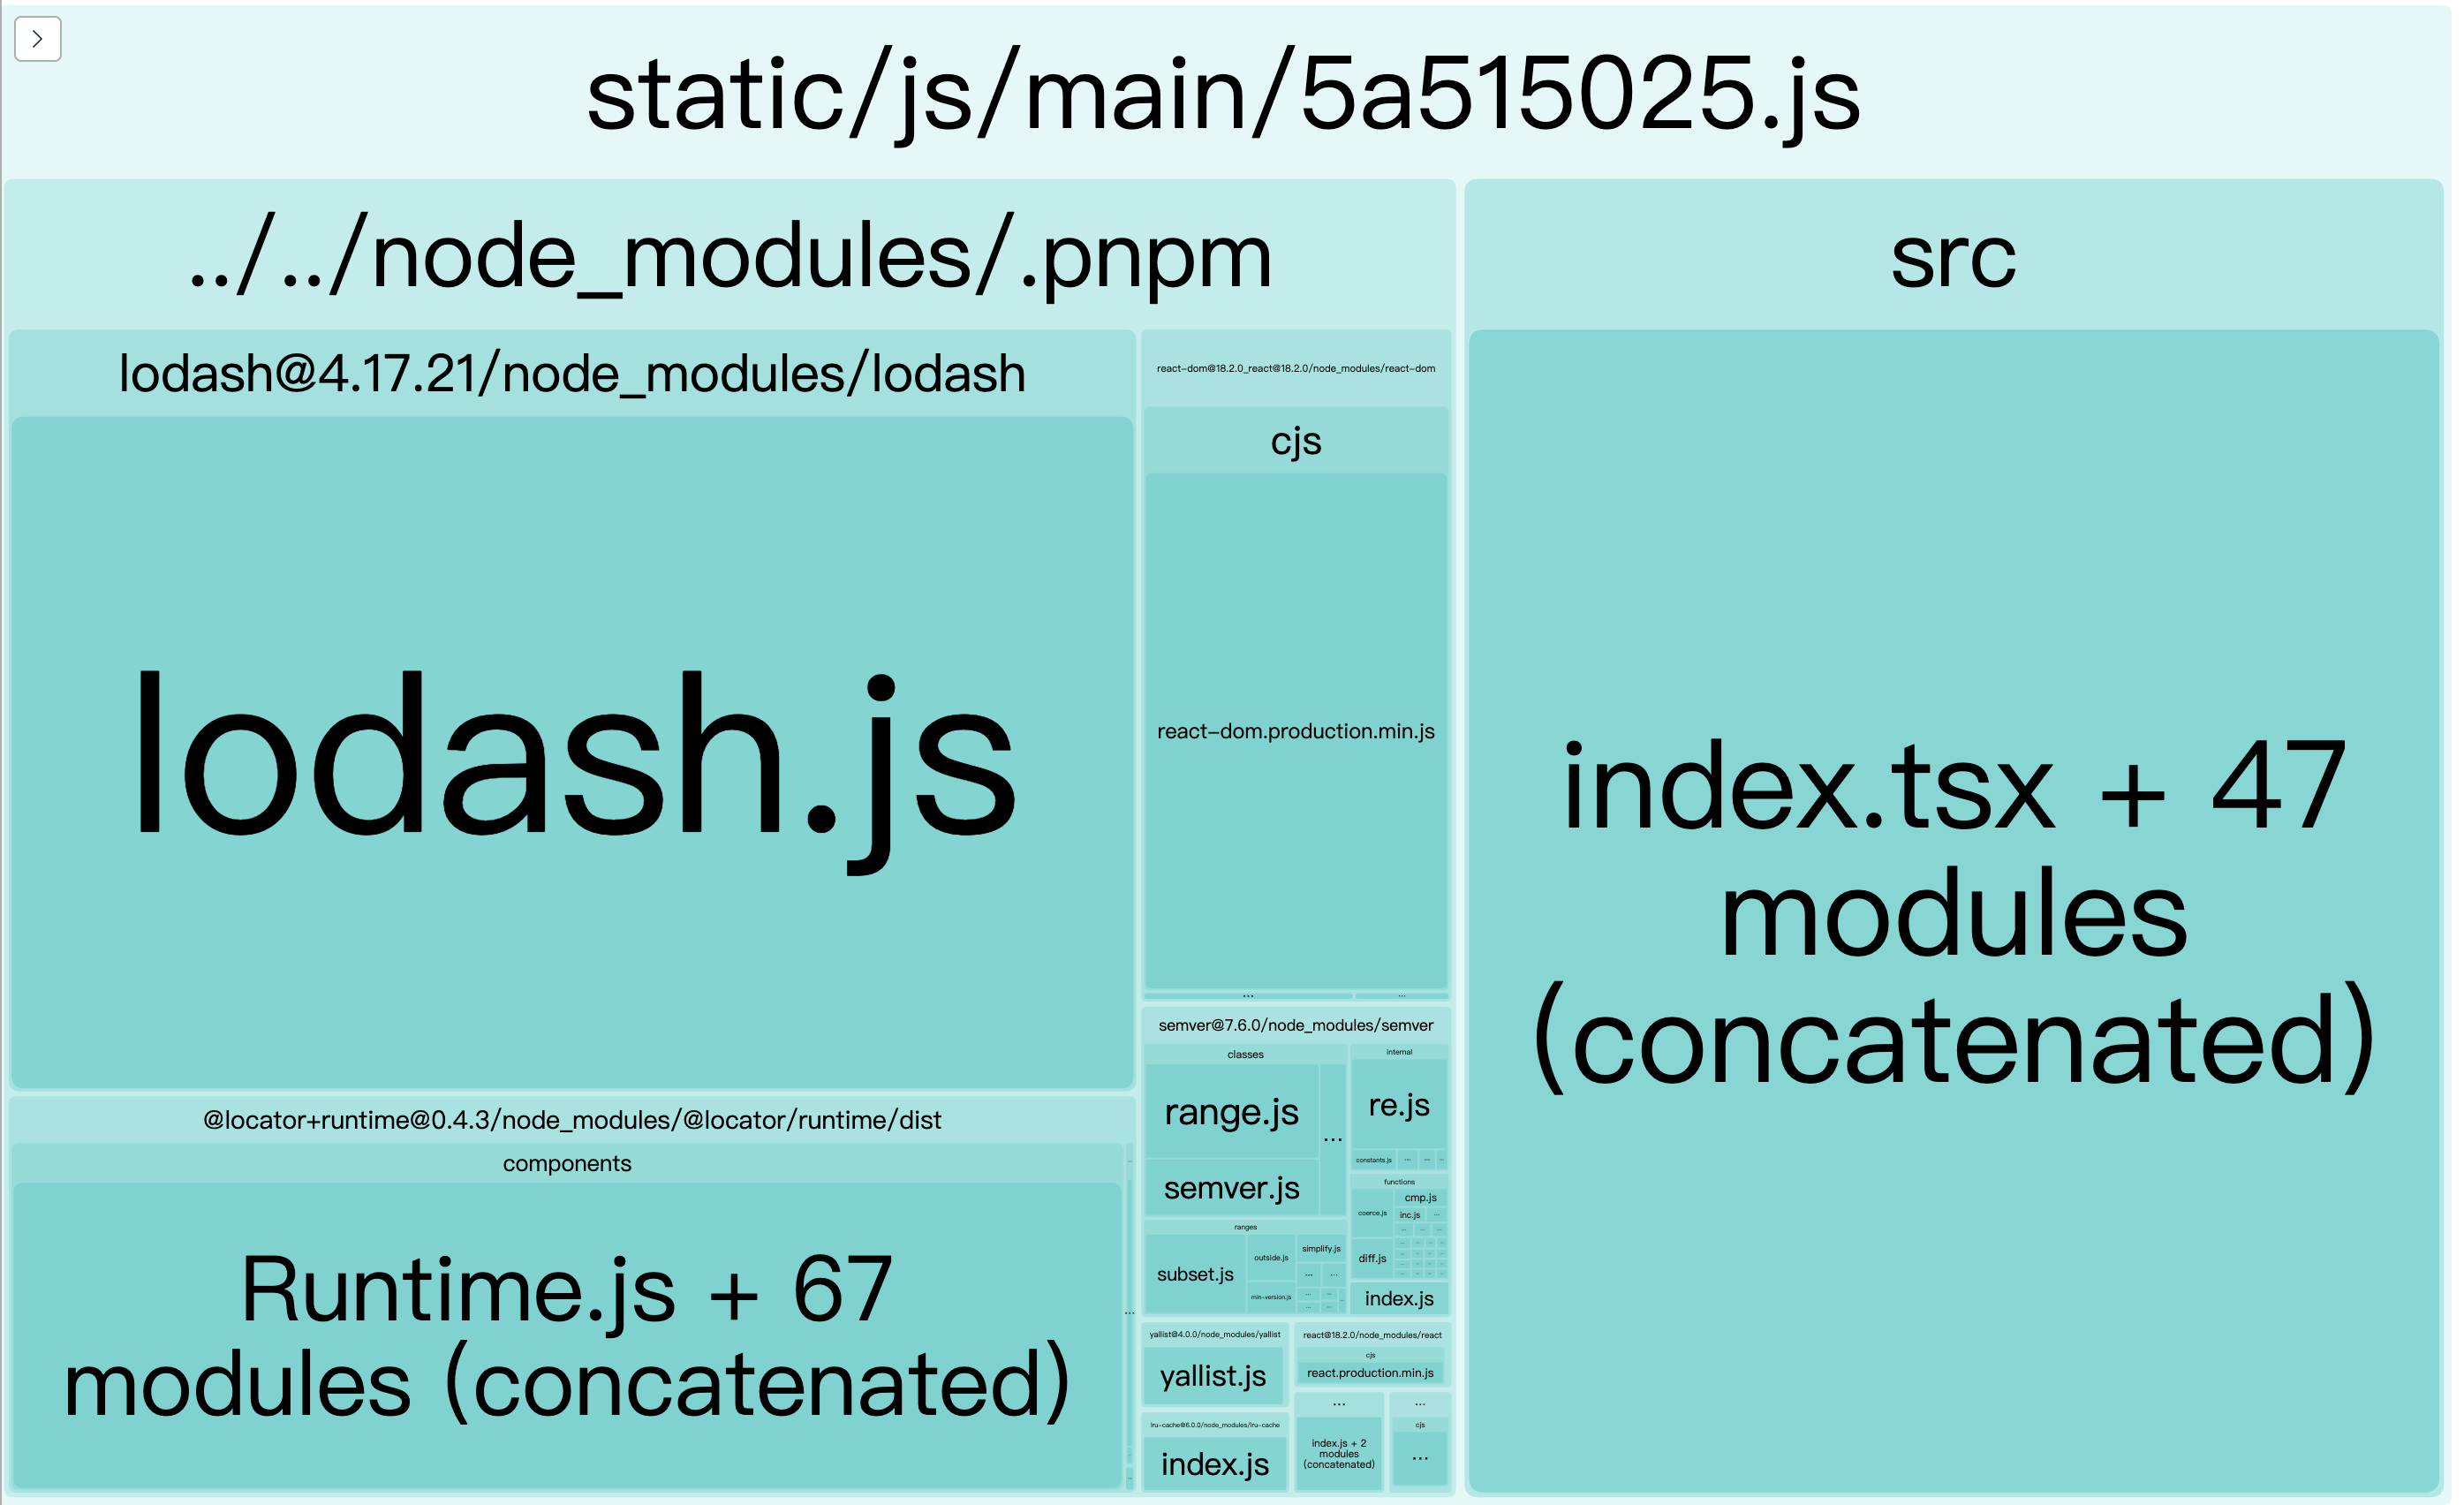
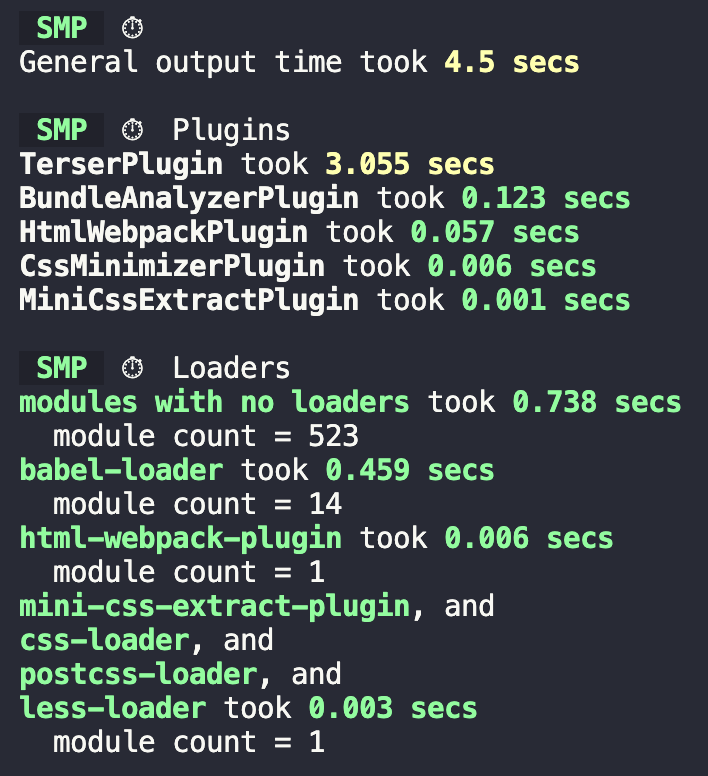
一些优化思路 思路 1 :先确定需要进行哪些优化,可基于 Webpack 的配置:resolve、module、externals、plugins 等思路 2 :优化产物体积,利用webpack-bundle-analyzer插件进行分析思路 3 :优化构建速度,利用speed-measure-webpack-plugin插件进行分析
一些优化操作 1、配置[cache](https://webpack.docschina.org/configuration/cache/)属性,会缓存生成的 webpack 模块和 chunk,来改善构建速度 。Webpack5 之前使用专门的cache-loader来缓存[externals](https://webpack.docschina.org/configuration/externals/#externals)属性,防止将某些 import 的包(package)打包到 bundle 中,而是在运行时(runtime)再去从外部获取这些扩展依赖(external dependencies)。可减少产物体积 [resolve.alias](https://webpack.docschina.org/configuration/resolve/#resolvealias)属性,这样Utilities是一个绝对路径的别名,有助于降低解析文件的成本
1 2 3 4 5 6 7 8 9 10 11 12 13 14 const path = require ('path' );module .exports = {resolve : {alias : {Utilities : path.resolve (__dirname, 'src/utilities/' ),Templates : path.resolve (__dirname, 'src/templates/' ),import Utility from 'Utilities/utility' ;
4、配置[resolve.mainFields](https://webpack.docschina.org/configuration/resolve/#resolvemainfields)属性,影响 Webpack 搜索第三方库的顺序。一般 npm 库使用的是main
1 2 3 4 5 6 module .exports = {resolve : {mainFields : ['main' ],
5、配置[resolve.extensions](https://webpack.docschina.org/configuration/resolve/#resolveextensions) 属性,影响 Webpack 解析文件的顺序,将高频文件类型放在前面。
1 2 3 4 5 6 module .exports = {resolve : {extensions : ['.js' , '.json' , '.wasm' ],
以上优化代码:
1 2 3 4 5 6 7 8 9 10 11 12 13 14 15 16 17 18 19 const path = require ('path' )module .exports = {resolve : {alias : {"@" : path.resolve (__dirname, './src' ),"utils" : path.resolve (__dirname, './src/utils' )externals : {react : 'React' ,mainFields : ['main' ],extensions : ['.js' , '.jsx' ]
Vite 新一代构建工具。两个阶段 :开发环境使用 Esbuild (干的事跟 Webpack 一样,速度却更快);生成环境使用 Rollup ;开发环境时 :类似于Webpack + Webpack Dev Server Plugin的集合,Vite它自带Dev Server,当你采用ESM导入模块时,自建的Dev Server就给你按需编译(Esbuild)然后返回,这样就跳过了整体的打包流程,所以本地开发很快;生成环境时 :使用 Rollup 将代码打包成 bundle
那为什么要使用两个构建工具呢?
因为 Esbuild 不支持一些常用的设置
不支持降级到 es5 的代码,低版本浏览器跑不起来(es6/es7+)。
不支持 const、enum 等语法,会报错
打包不够灵活:无法配置打包流程、不支持代码分割
所以生成环境要使用其他工具,然后 Rollup 比 Webpack 简单高效一些,所以用了 Rollup
包管理工具 Lerna:管理多版本的 npm,文档:https://lerna.js.org/docs/introduction What is Verdaccio? | Verdaccio