本文最后更新于 2024-03-22T23:33:00+00:00
思考
开发一个 Web Server 需要考虑的点有:
1、接受请求,解析参数,解析方法类型
2、处理静态资源:缓存、存储等
3、连接、操作数据库
4、登录处理:session、cookie、token 等
5、api 的分层、参数过滤
6、拦截器的开发
7、mq(消息队列)处理、分布式架构
8、websocket、webrtc(音视频通话或 P2P 通信) 实时性
9、并发处理、事务处理(nodejs 弱项)
10、SSR 渲染前端页面
事务处理:白话来说就是一大堆有关联的操作的集合,若里面的任一操作有问题,则该事务就失败了,其中做了操作的还需要进行回滚。而 nodejs 本身对这块的实现很难,它是借助数据库来支持事务处理。
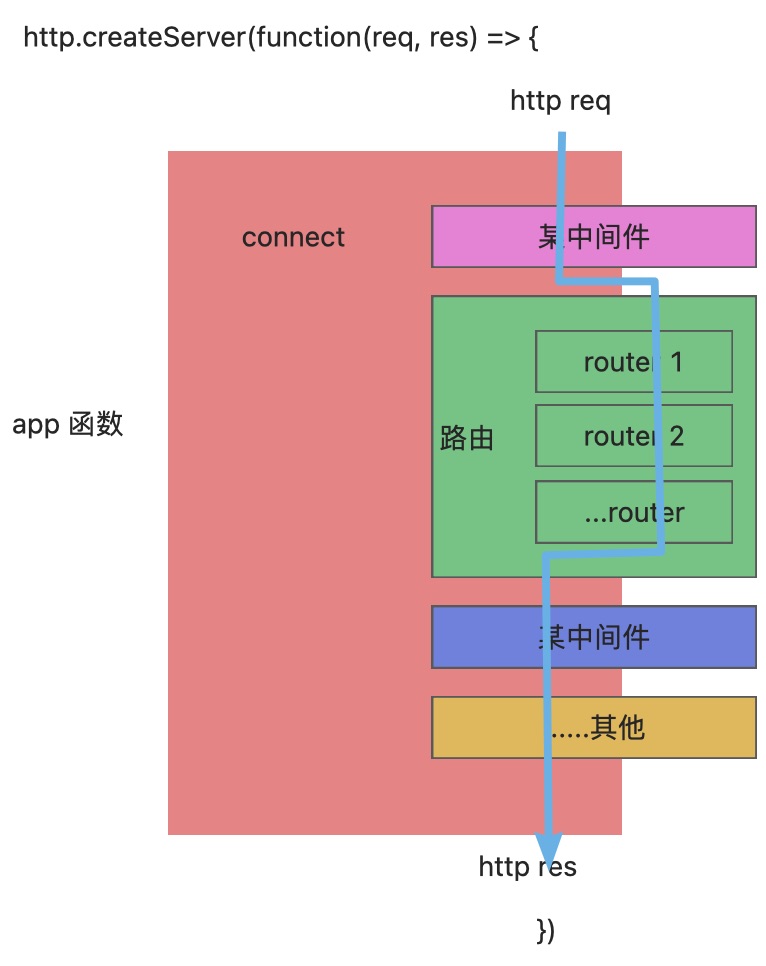
Express
官网文档:Express 中文文档
核心是:异步串行流程控制
伪代码实现:
1
2
3
4
5
6
7
8
9
10
11
12
13
14
15
16
17
18
19
20
21
22
23
24
25
26
27
28
29
| const tasks = [
function A(){
next()
},
function B(){
next()
},
function X(){
next()
}
]
function next(err, result) {
if(err) throw err
var currentTask = tasks.shift()
if(currentTask) currentTask(result)
next()
}
next()
|
Koa2 使用
官网:Koa | Koa 中文文档 | Koa 中文网
Koa 是一个很简洁的库,所以很多功能需要自己去找,在这里可以找:Koa 中间件
初始准备
- 新建个文件夹,然后初始化项目
1
| mkdir koa2-actual-combat && cd koa2-actual-combat && pnpm init
|
- 安装 koa 依赖
- 新建 src 文件夹与入口文件 && 安装 ip 依赖(可选)
1
| mkdir src && touch src/server.js && pnpm add ip
|
src/server.js编码
1
2
3
4
5
6
7
8
9
10
11
12
13
14
15
16
| const Koa = require("koa");
const ip = require("ip");
const app = new Koa();
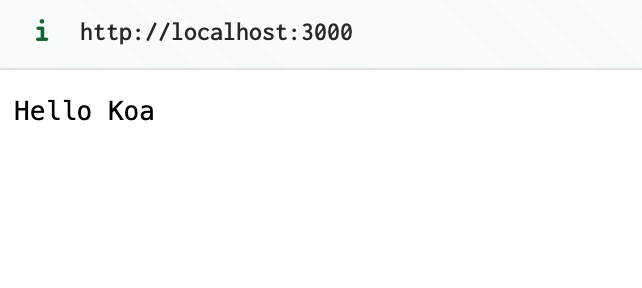
app.use((ctx) => {
ctx.body = "Hello Koa";
});
app.listen(3000, () => {
console.log(
`server is running: http://${ip.address()}:3000 or http://localhost:3000`
);
});
|
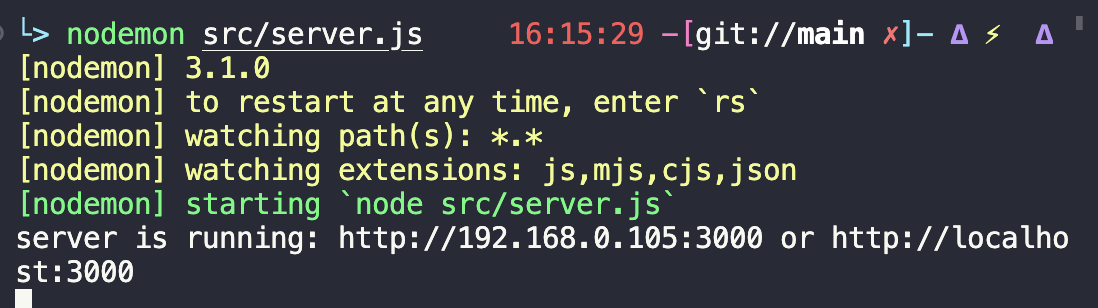
- 命令行运行
nodemon src/server.js,然后浏览器打开 http://localhost:3000 看效果
简单开发
完整线上项目代码:https://github.com/MrHzq/koa2-actual-combat
body 参数处理
- 安装 koa-bodyparser,用于将 string 类型的 body 参数转为 json 格式
1
| pnpm add @koa/bodyparser
|
- 使用 @koa/bodyparser
1
2
3
4
5
6
7
8
9
10
11
12
13
14
15
16
17
18
19
20
21
22
| const Koa = require("koa");
const ip = require("ip");
const { bodyParser } = require("@koa/bodyparser");
const app = new Koa();
app.use(bodyParser());
app.use((ctx) => {
console.log("[ ctx.request.body ] >", ctx.request.body);
ctx.body = "Hello Koa";
});
app.listen(3000, () => {
console.log(
`server is running: http://${ip.address()}:3000 or http://localhost:3000`
);
});
|
路由处理
- 安装依赖
[@koa/router](https://github.com/koajs/router)
- 使用路由
1
2
3
4
5
6
7
8
9
10
11
12
13
14
15
16
17
18
19
20
21
22
23
| const Koa = require("koa");
const ip = require("ip");
const { bodyParser } = require("@koa/bodyparser");
const Router = require("@koa/router");
const app = new Koa();
const router = new Router({ prefix: "/api" });
app.use(bodyParser());
router.get("/", (ctx) => {
ctx.body = "helloworld";
});
app.use(router.routes()).use(router.allowedMethods());
app.listen(3000, () => {
console.log(
`server is running: http://${ip.address()}:3000 or http://localhost:3000`
);
});
|
- 路由封装
连接 Mongodb
- 安装
mongoose依赖
- 创建文件,写连接代码
1
2
3
4
5
6
7
8
9
10
11
12
13
14
15
16
17
18
19
20
21
22
23
24
25
26
27
28
29
30
31
32
33
34
35
| touch db.js
const mongoose = require("mongoose");
const Connect = () => {
const DB_URL = "mongodb://127.0.0.1:27017/my-test";
mongoose.connect(DB_URL);
mongoose.connection.on("connected", function () {
console.log("Mongoose connection open to " + DB_URL);
});
mongoose.connection.on("error", function (err) {
console.log("Mongoose connection error: " + err);
});
mongoose.connection.on("disconnected", function () {
console.log("Mongoose connection disconnected");
});
};
module.exports = Connect;
|
- 创建数据文件
1
| mkdir models && touch models/other.js
|
models/other.js写入代码
1
2
3
4
5
6
7
8
9
10
11
12
13
14
15
16
17
18
19
20
21
| const mongoose = require("mongoose");
const OtherSchema = new mongoose.Schema(
{
username: String,
password: String,
}
);
const collationName = "Other";
const Other = mongoose.model(collationName, OtherSchema);
module.exports = Other
|
5、server.js引入数据库相关
1
2
3
4
5
6
7
8
9
10
11
12
13
14
15
16
17
18
19
20
21
22
23
24
25
26
27
28
29
30
31
32
33
34
35
36
37
38
39
40
41
42
43
44
45
46
47
48
49
| const Koa = require("koa");
const ip = require("ip");
const { bodyParser } = require("@koa/bodyparser");
const Router = require("@koa/router");
const MongooseConnect = require("./db");
MongooseConnect();
const { Other } = require("./models/other");
const app = new Koa();
const router = new Router({ prefix: "/api" });
app.use(bodyParser());
router.get("/", (ctx) => {
ctx.body = "helloworld";
});
router.post("/other/create", async (ctx) => {
const { username, password } = ctx.request.body;
const res = await Other.create({ username, password });
ctx.body = {
status: 200,
msg: "success",
data: res,
};
});
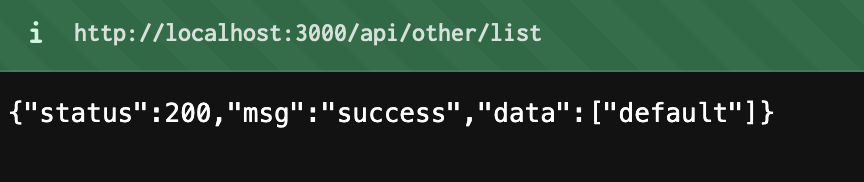
router.get("/other/list", async (ctx) => {
const res = await Other.findOne();
ctx.body = {
status: 200,
msg: "success",
data: res || ["default"],
};
});
app.use(router.routes()).use(router.allowedMethods());
app.listen(3000, () => {
console.log(
`server is running: http://${ip.address()}:3000 or http://localhost:3000`
);
});
|
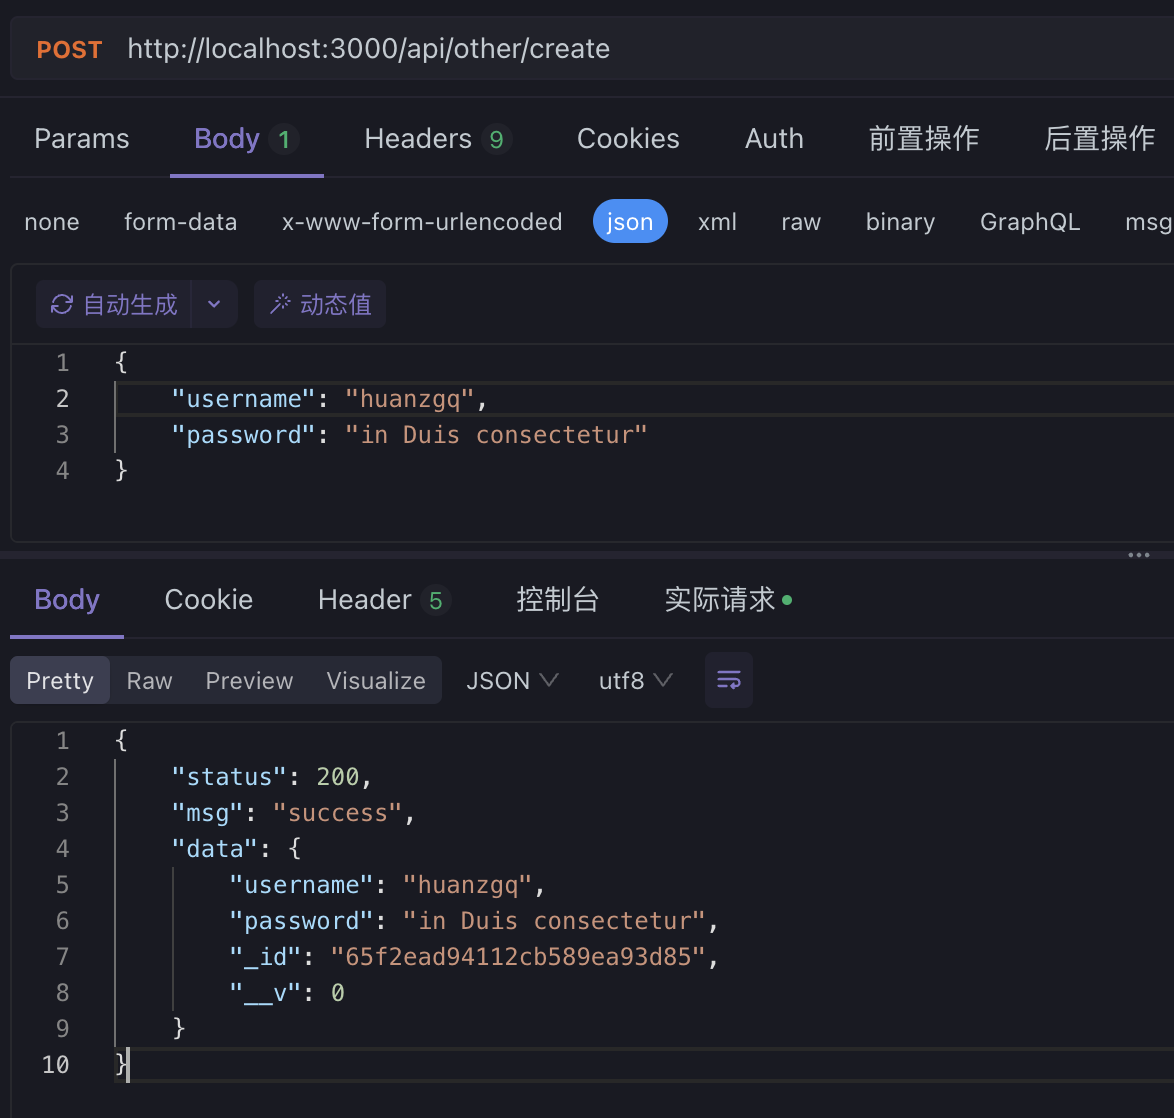
- 浏览器打开:http://localhost:3000/api/other/list
- 调用接口,插入数据
mac M1 电脑安装 mongodb
mongod 是用来连接到 mongodb 数据库服务器的,即服务器端。
mongo 是用来启动 MongoDB shell 的,是 mongodb 的命令行客户端
brew 安装流程(首推方式)
(可选)1、查看 xcode-select 版本,没有的话就需要安装
1
2
3
| xcode-select -v
xcode-select --install
|
(可选)2、查看 brew 版本,没有的话就需要安装
1
2
3
| brew -v
/bin/bash -c "$(curl -fsSL https://raw.githubusercontent.com/Homebrew/install/HEAD/install.sh)"
|
3、安装为 MongoDB 定制的 Homebrew tap
1
2
3
4
5
6
7
8
9
10
| brew tap mongodb/brew
brew tap
|
4、更新 brew
5、安装 MongoDB 5.0 社区版
1
| brew install mongodb-community@5.0
|
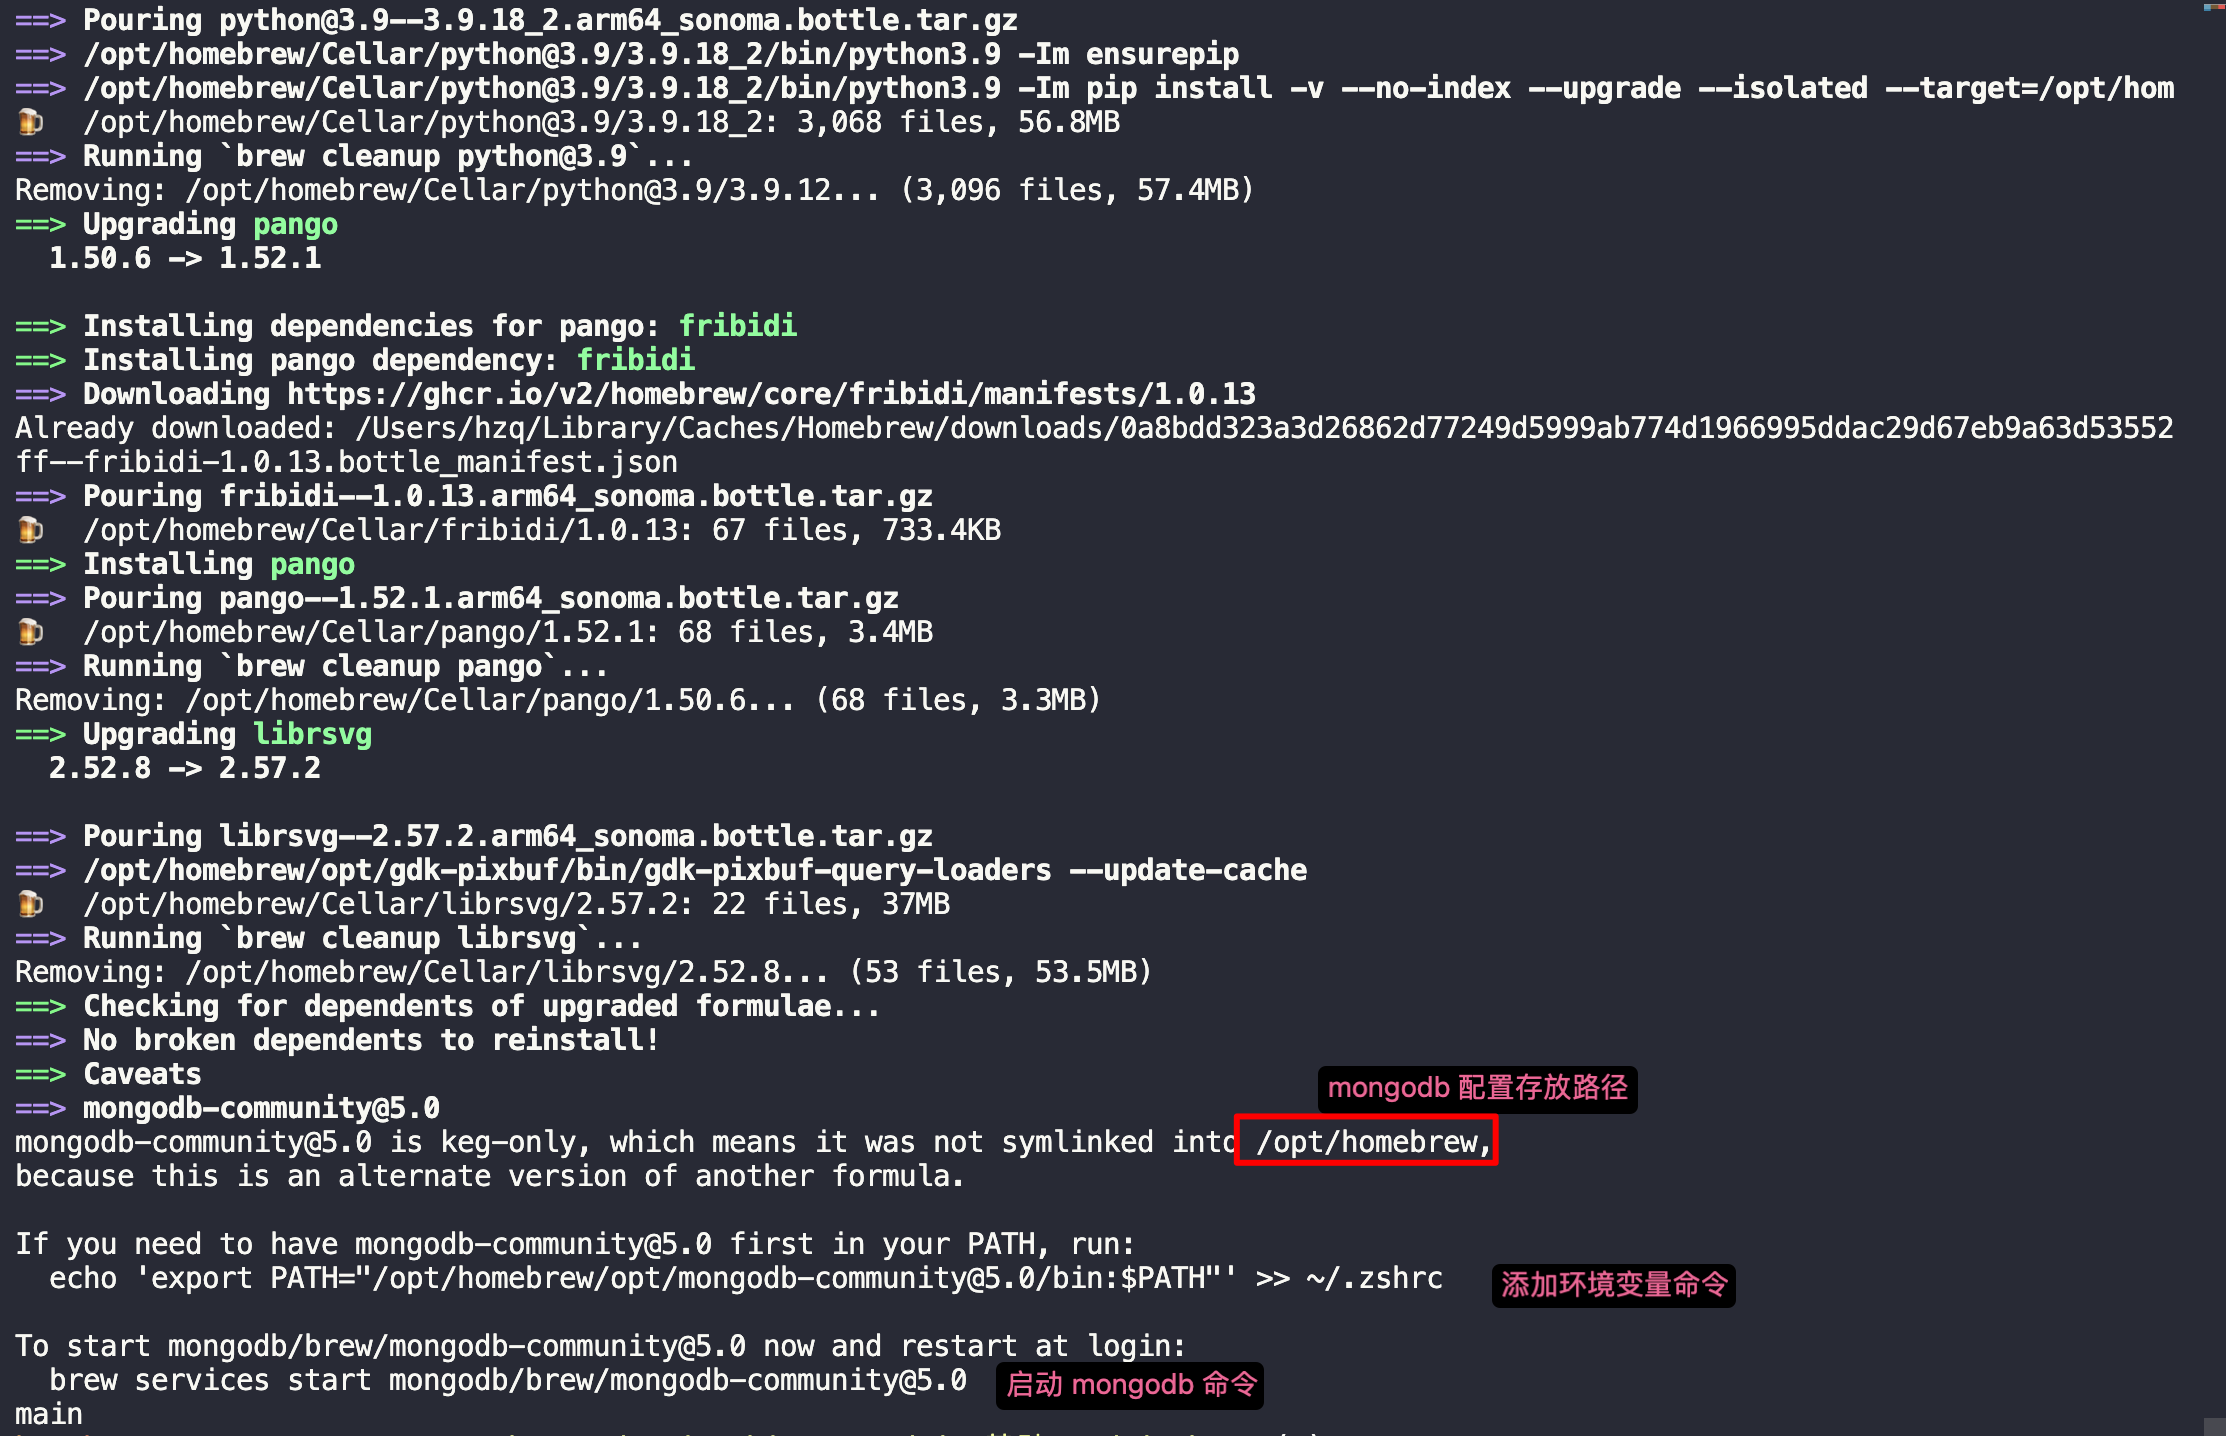
/opt/homebrew下:/var/mongodb内存放了相关的数据;/var/log/mongodb内存放了相关的日志
运行echo 'export PATH="/opt/homebrew/opt/mongodb-community@5.0/bin:$PATH"' >> ~/.zshrc将其注入环境变量,然后再source ~/.zshrc一下,就可以使用mongo、mongod命令了
6、启动 mongodb
1
| brew services start mongodb-community@5.0
|

7、查看启动情况

并且浏览器可打开:http://127.0.0.1:27017 查看

8、停止 mongodb
1
| brew services stop mongodb-community@5.0
|

压缩包安装流程(次推方式)
流程比较麻烦,brew 安装不成功时可以用这种方式
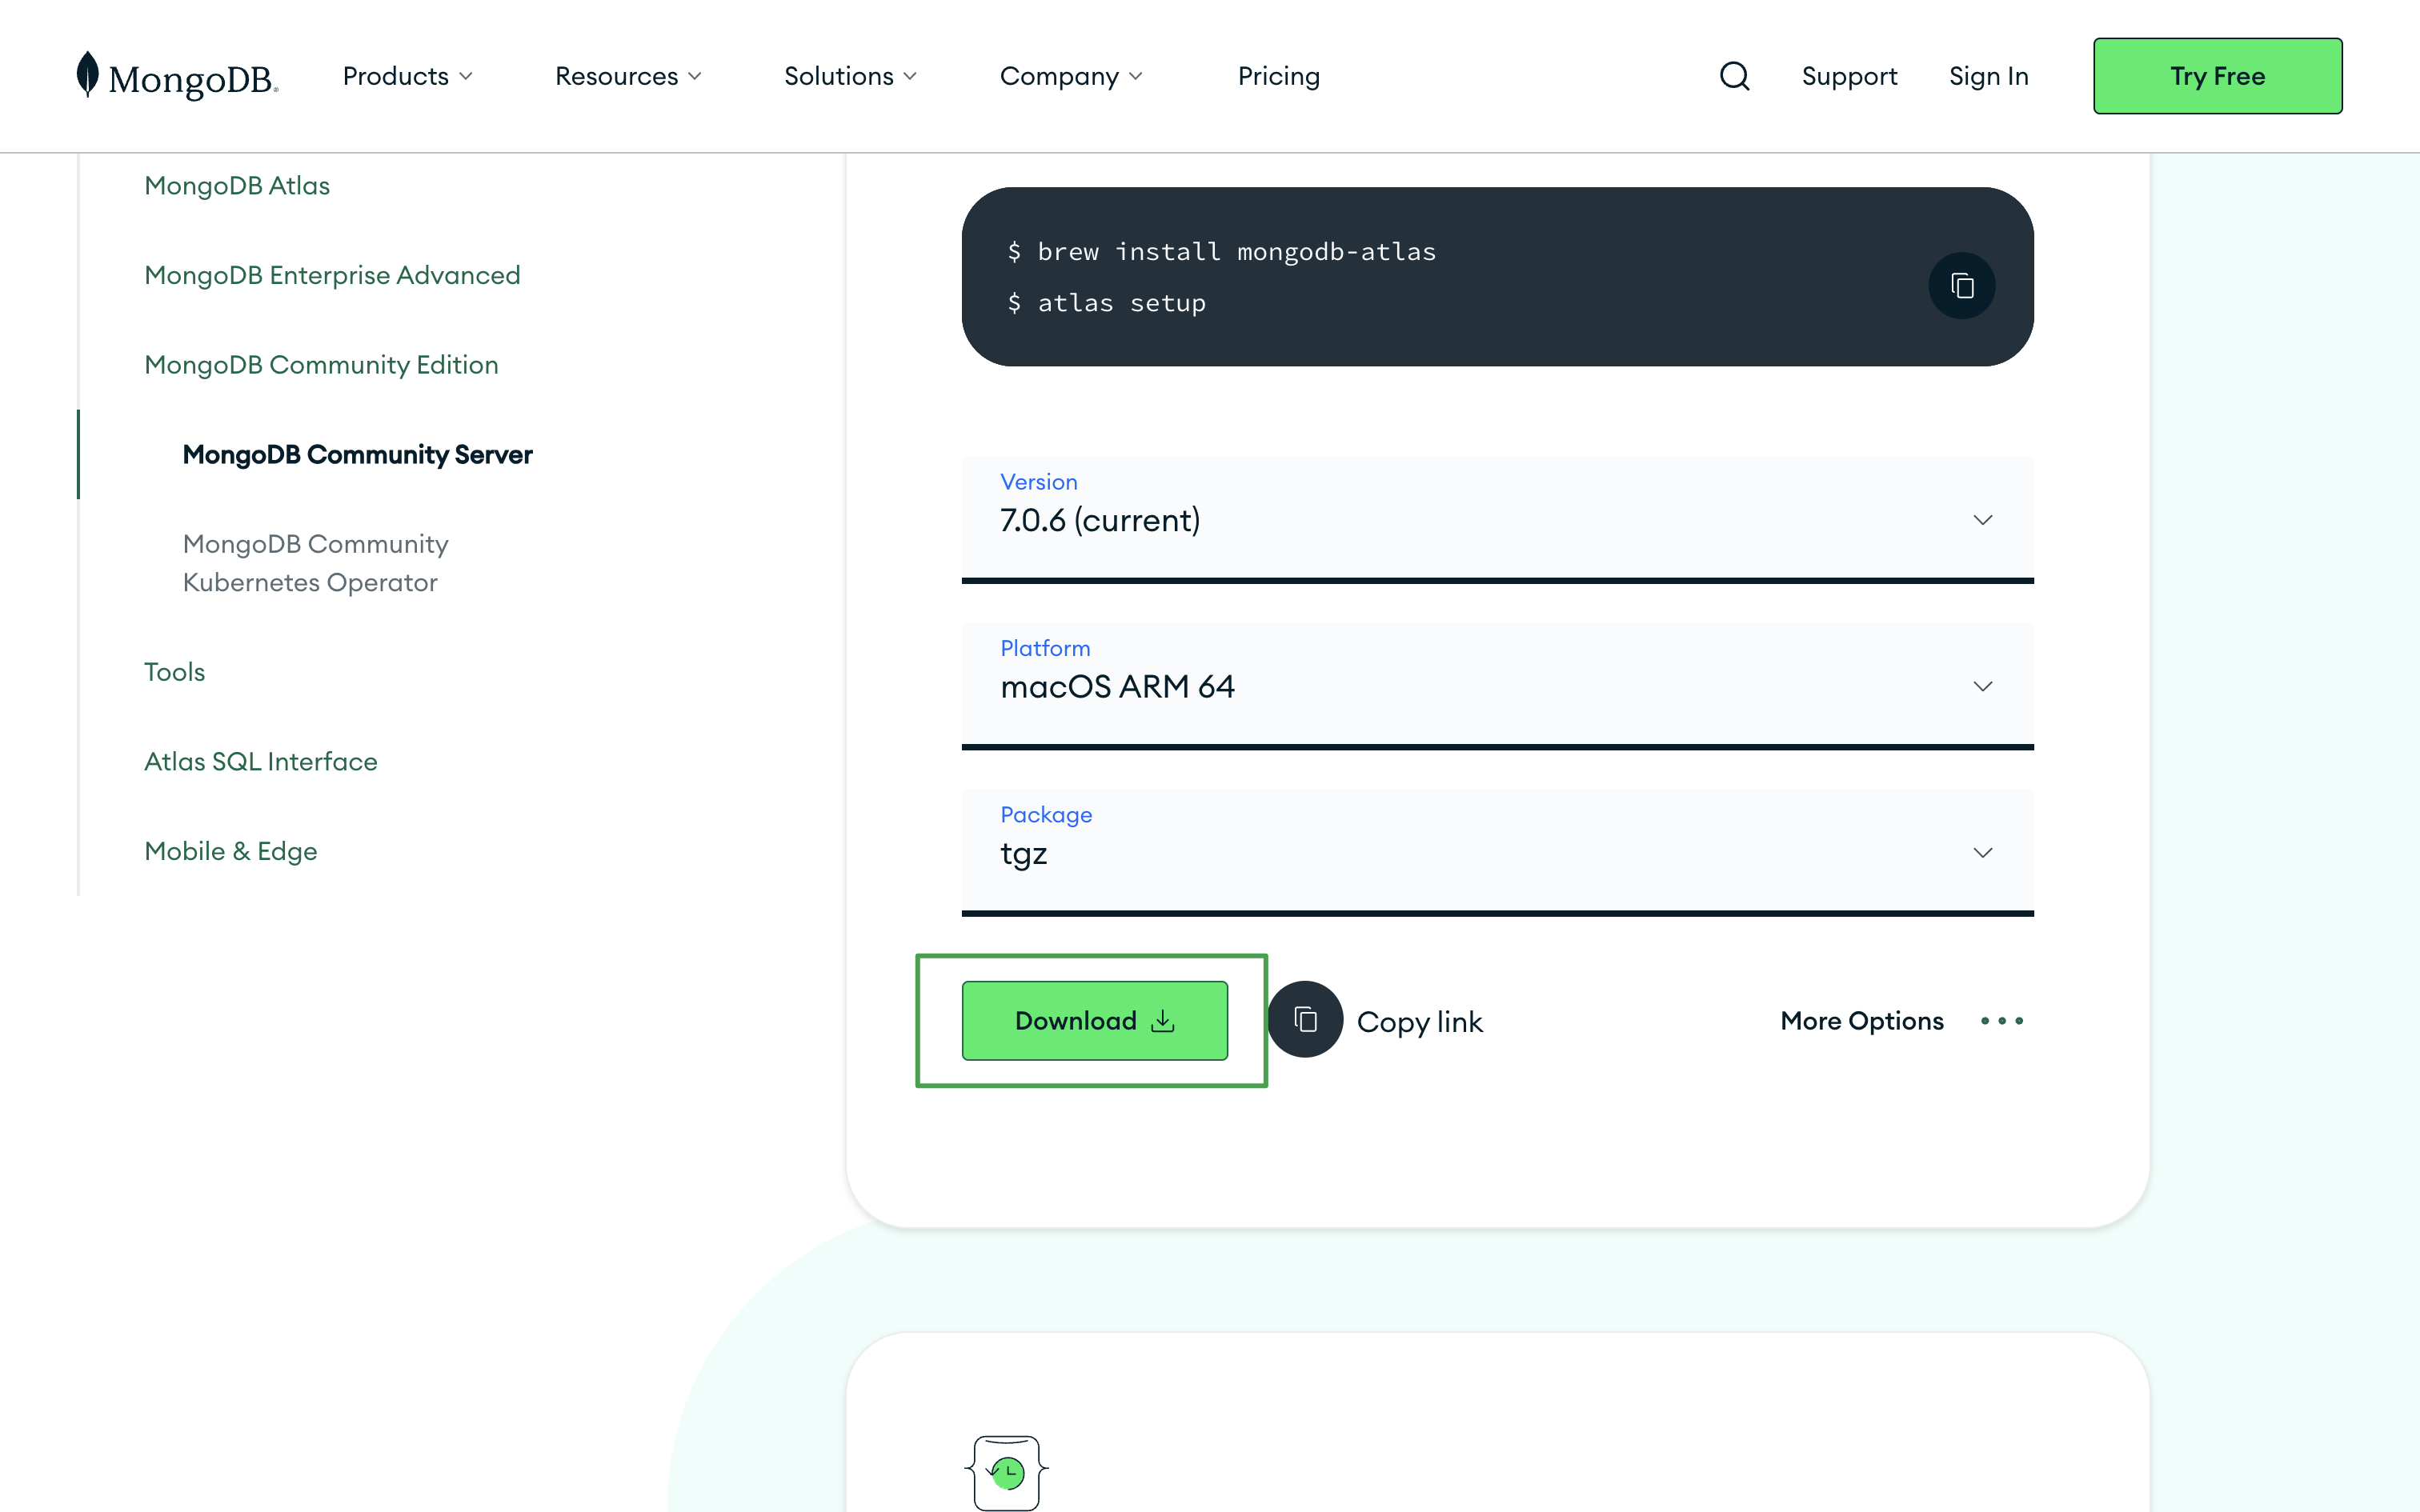
1、去官网下载压缩包:https://www.mongodb.com/try/download/community
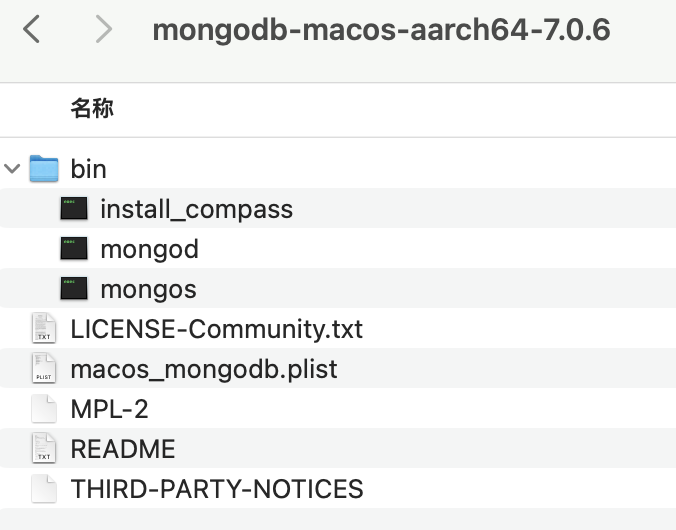
2、解压下载的压缩包,解压后如下
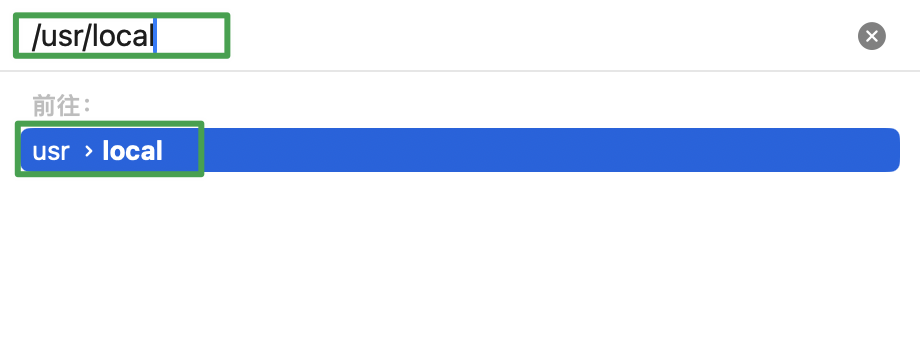
3、进入/usr/local,打开在“访达”,快捷键:cmd+shift+g,输入/usr/local
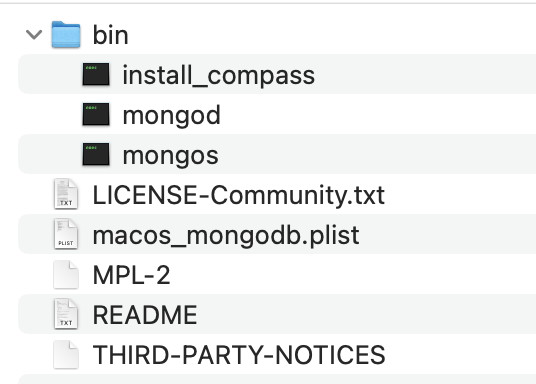
4、新建文件夹mongodb,然后将解压后里面的所有文件拷贝过来
5、配置环境变量,打开你的.bash_profile or .zshrc等
1
2
3
| open -e ~/.bash_profile
open -e ~/.zshrc
|
5.1、最末尾输入下面配置,我的是.zshrc,然后保存并关闭
1
| export PATH="$PATH:/usr/local/mongodb/bin"
|
6、然后任意打开终端,输入source ~/.bash_profileorsource ~/.zshrc
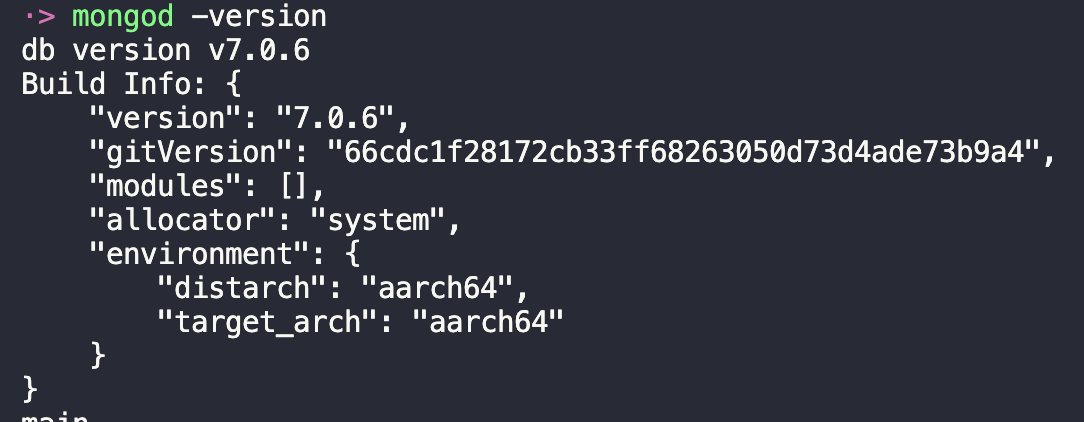
7、终端内继续输入mongod -version,正常情况可以看到有打印
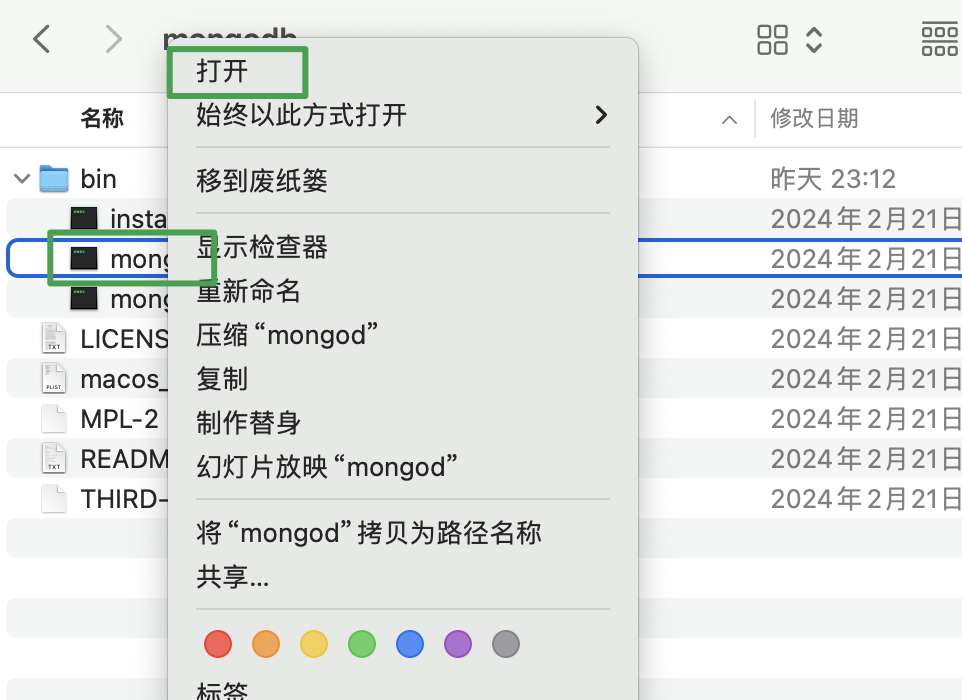
8、若出现异常情况,比如提示xxx不安全,则“访达”进入/usr/local/mongodb/bin文件夹,找到mongod,然后右键 -> 打开,之后一路都点ok
9、第 8 步完成后,再次进行第 7 步
10、找个目录,新建存放数据与日志的文件夹
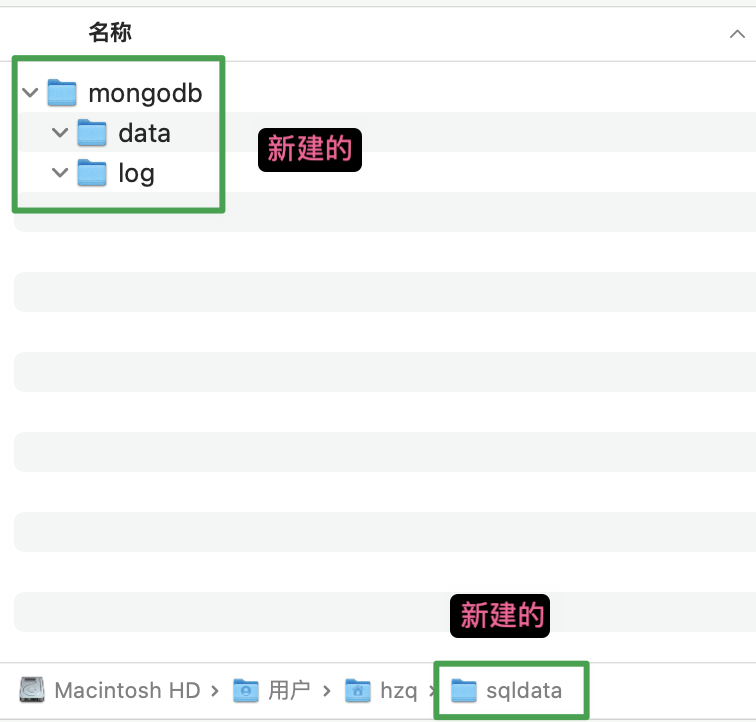
11、更改文件读写权限,打开任意终端,直接输入下面的命令,需要输入你的电脑密码
1
2
| sudo chown -R $(whoami) /Users/hzq/sqldata/mongodb/data
sudo chown -R $(whoami) /Users/hzq/sqldata/mongodb/log
|
12、启动 mongodb,打开任意终端,输入下面的命令
1
2
3
4
| mongod --dbpath /Users/hzq/sqldata/mongodb/data --logpath /Users/hzq/sqldata/mongodb/log/mongo.log
|

13、查看启动情况:打开任意终端,输入下面的命令,看到启动的进程 ID 是 34030
1
| ps aux | grep -v grep | grep mongod
|

14、查看启动情况:浏览器打开 http://127.0.0.1:27017,看到这个说明启动成功

15、停止服务,直接终端内conrtol + c可终止
16、若无法终止,可终端输入下面的命令
可视化工具
官方工具(推荐安装)
不支持 SQL 查询
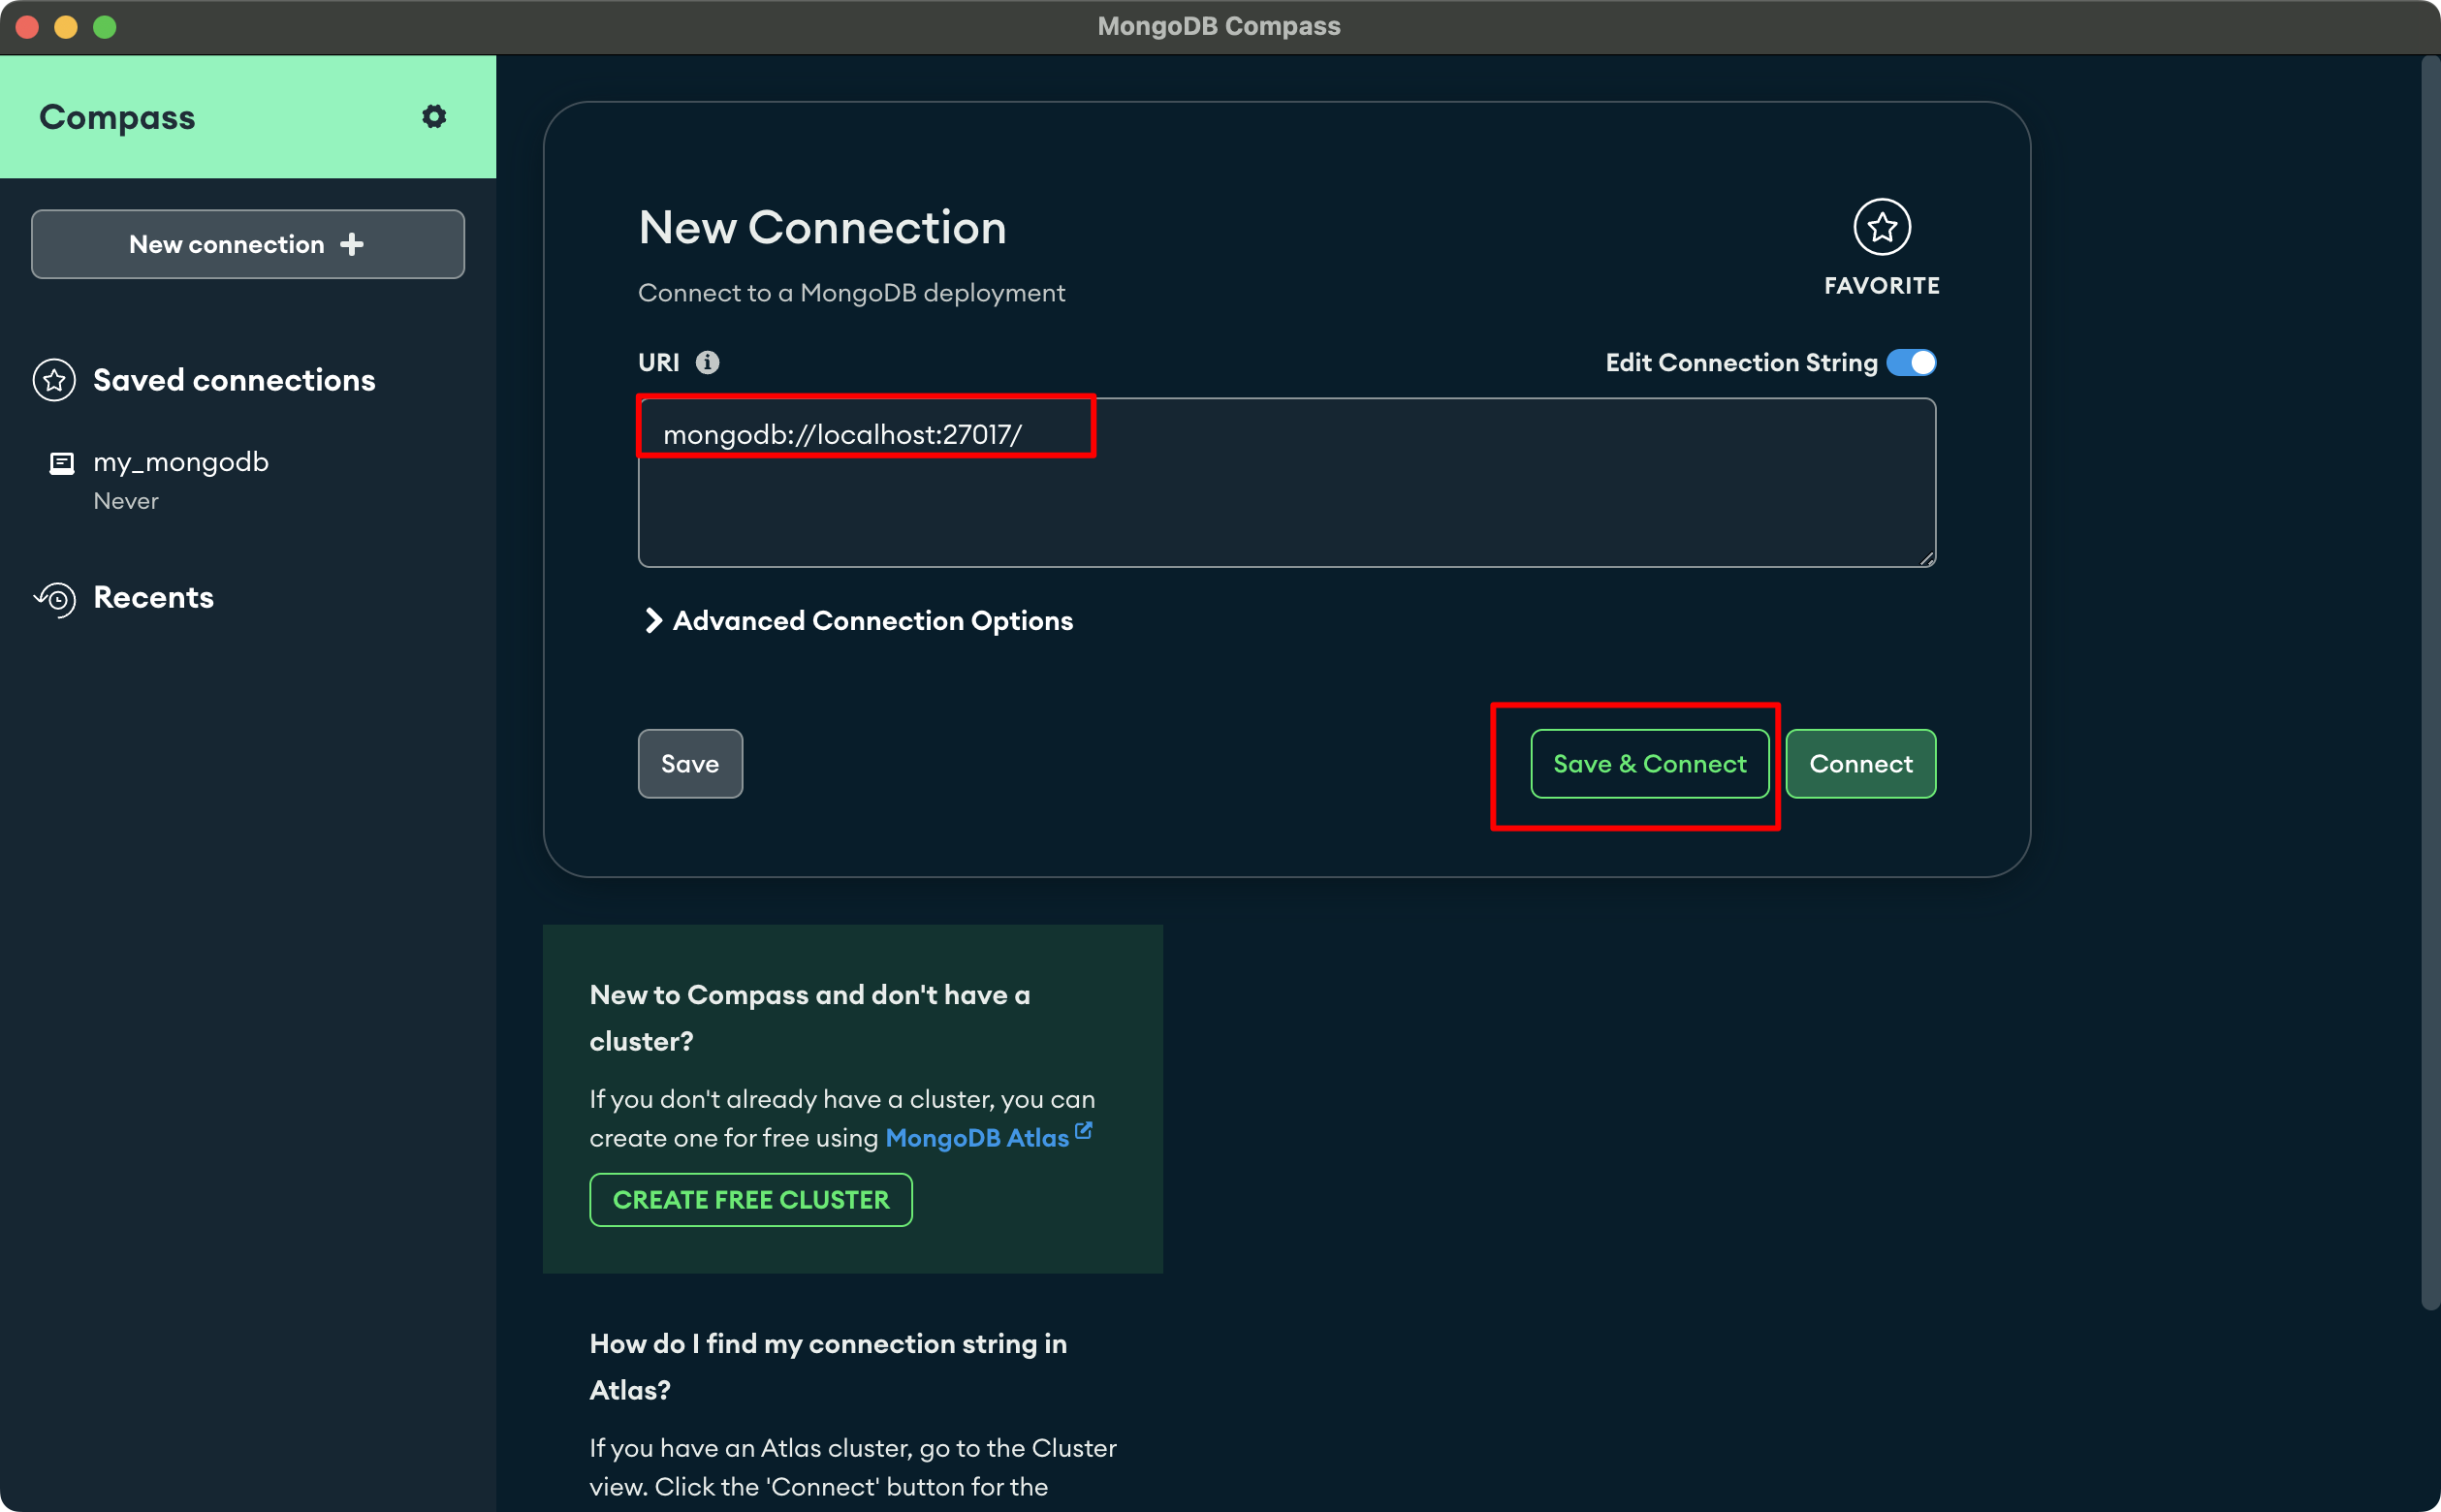
1、下载官方工具:官网下载地址,然后安装、打开,进入主页面
2、连接(先命令行启动 mongodb 哦)
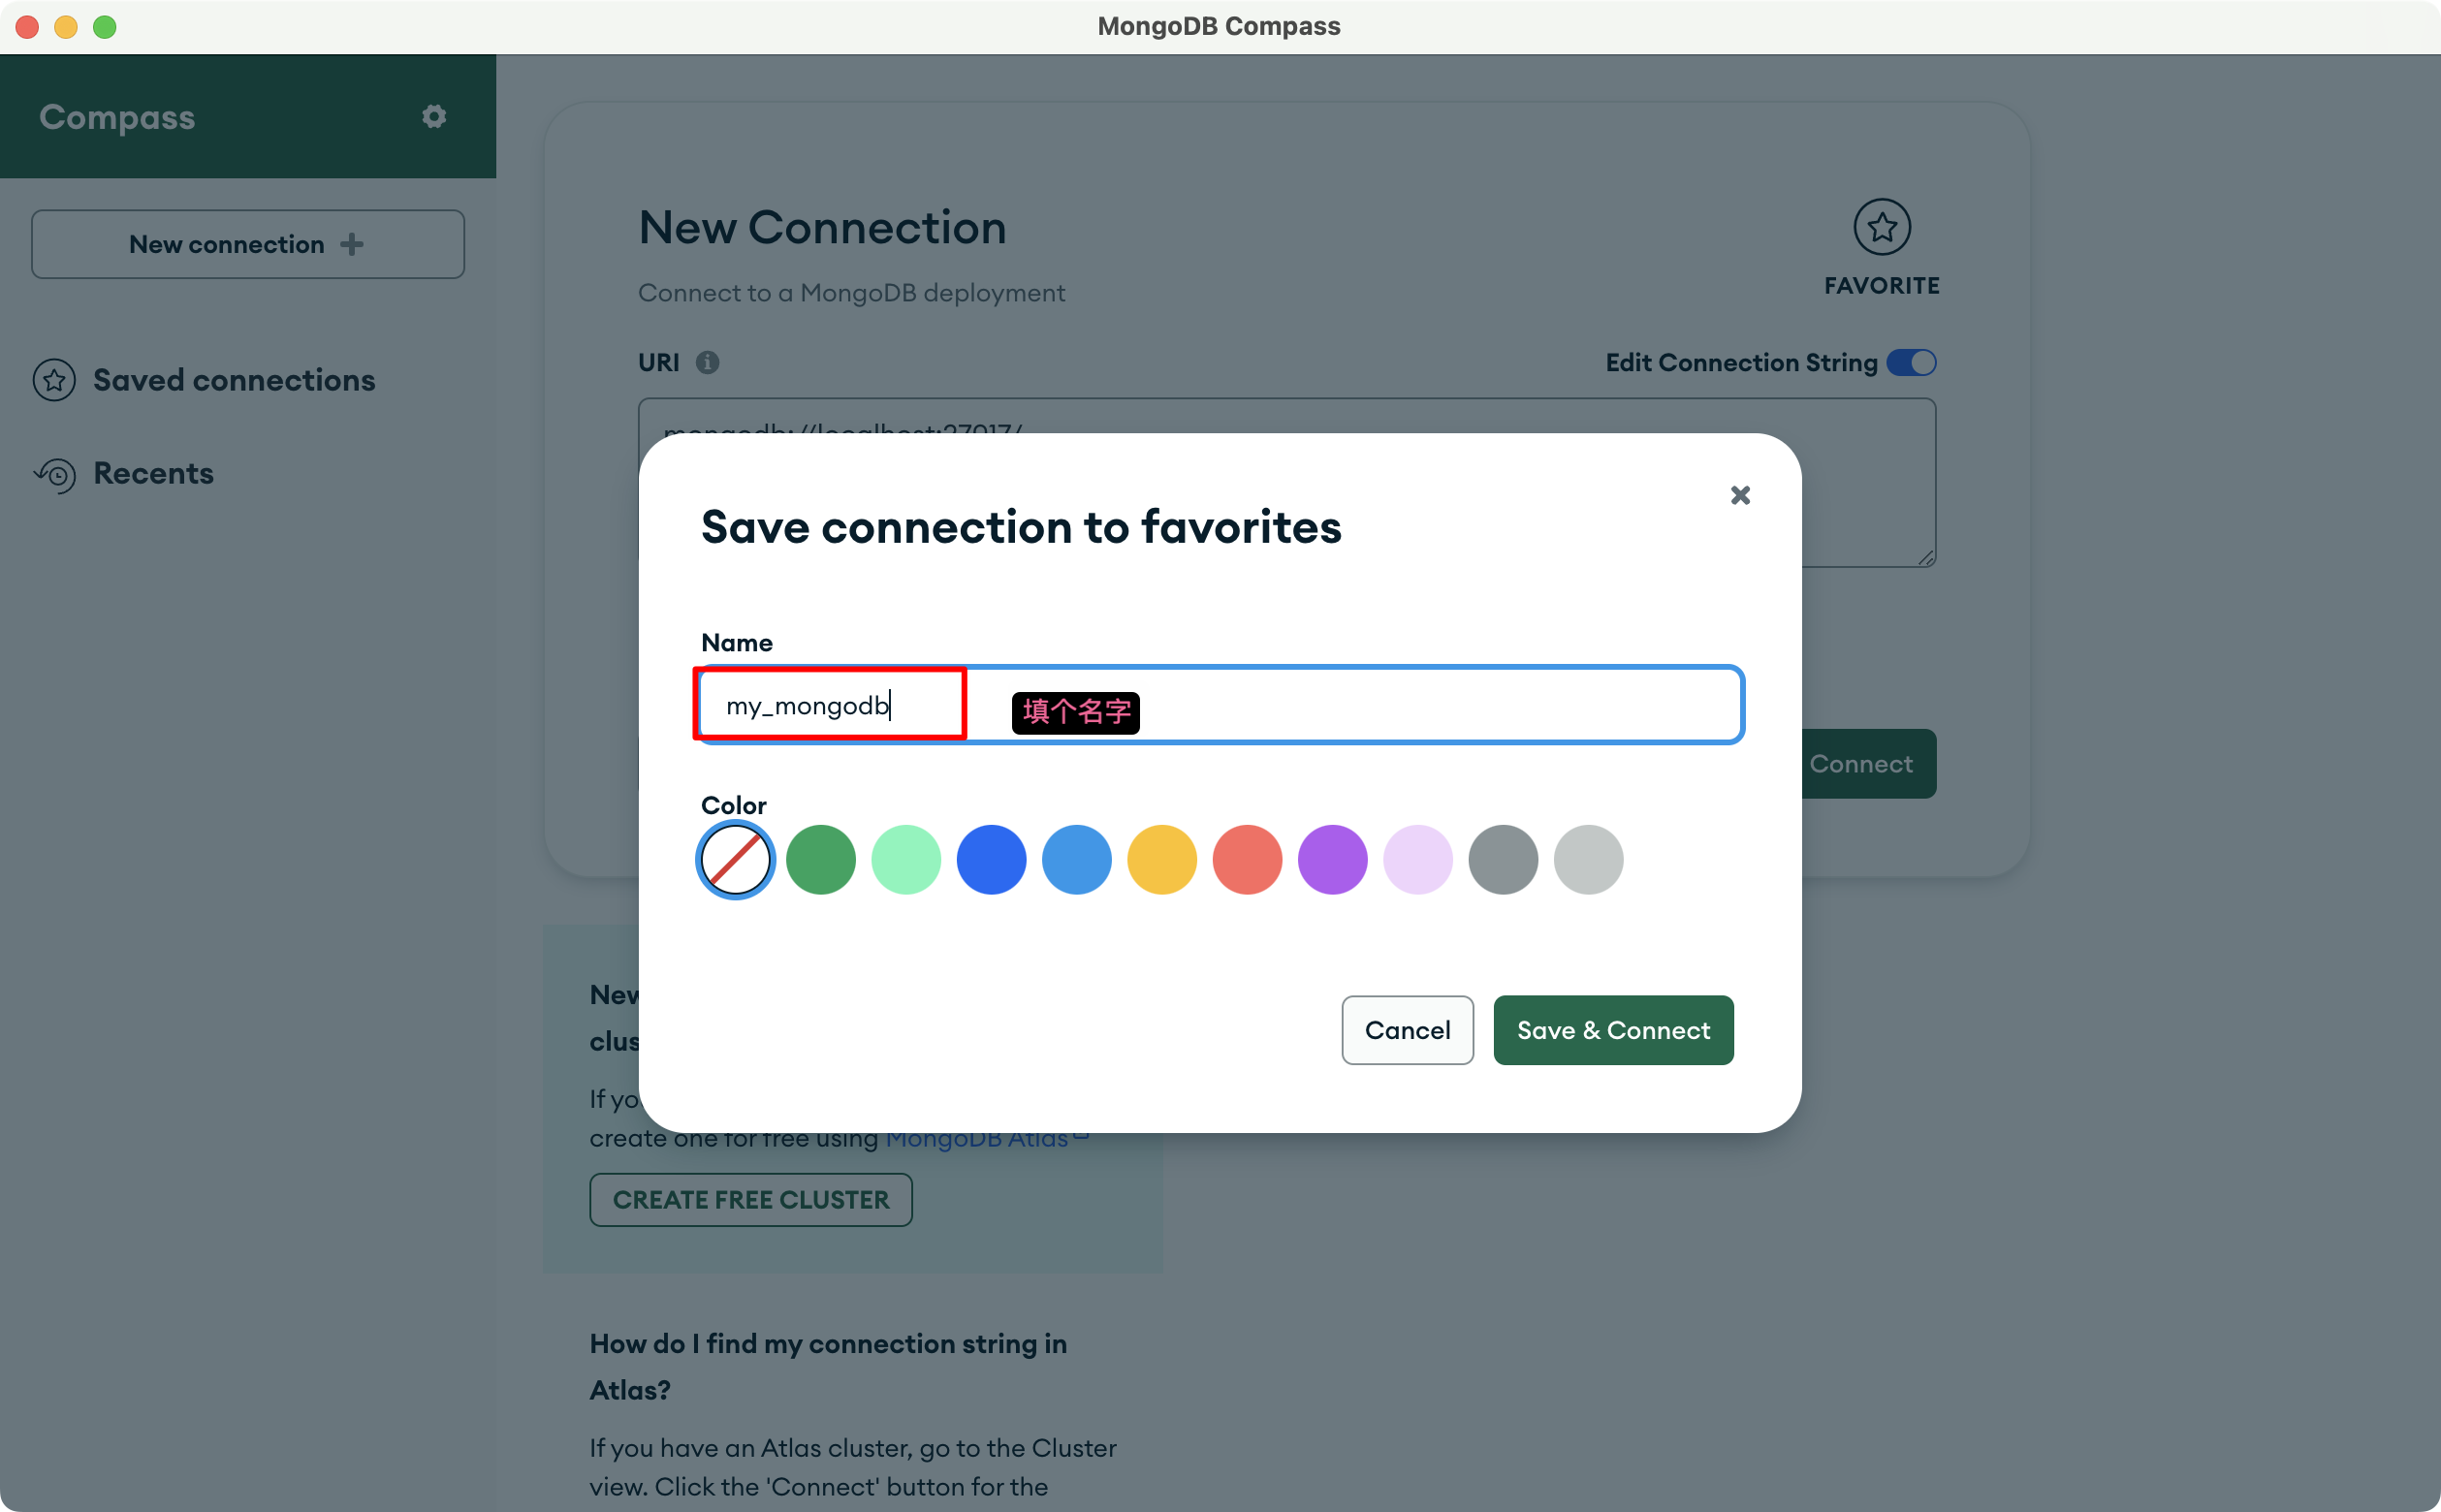
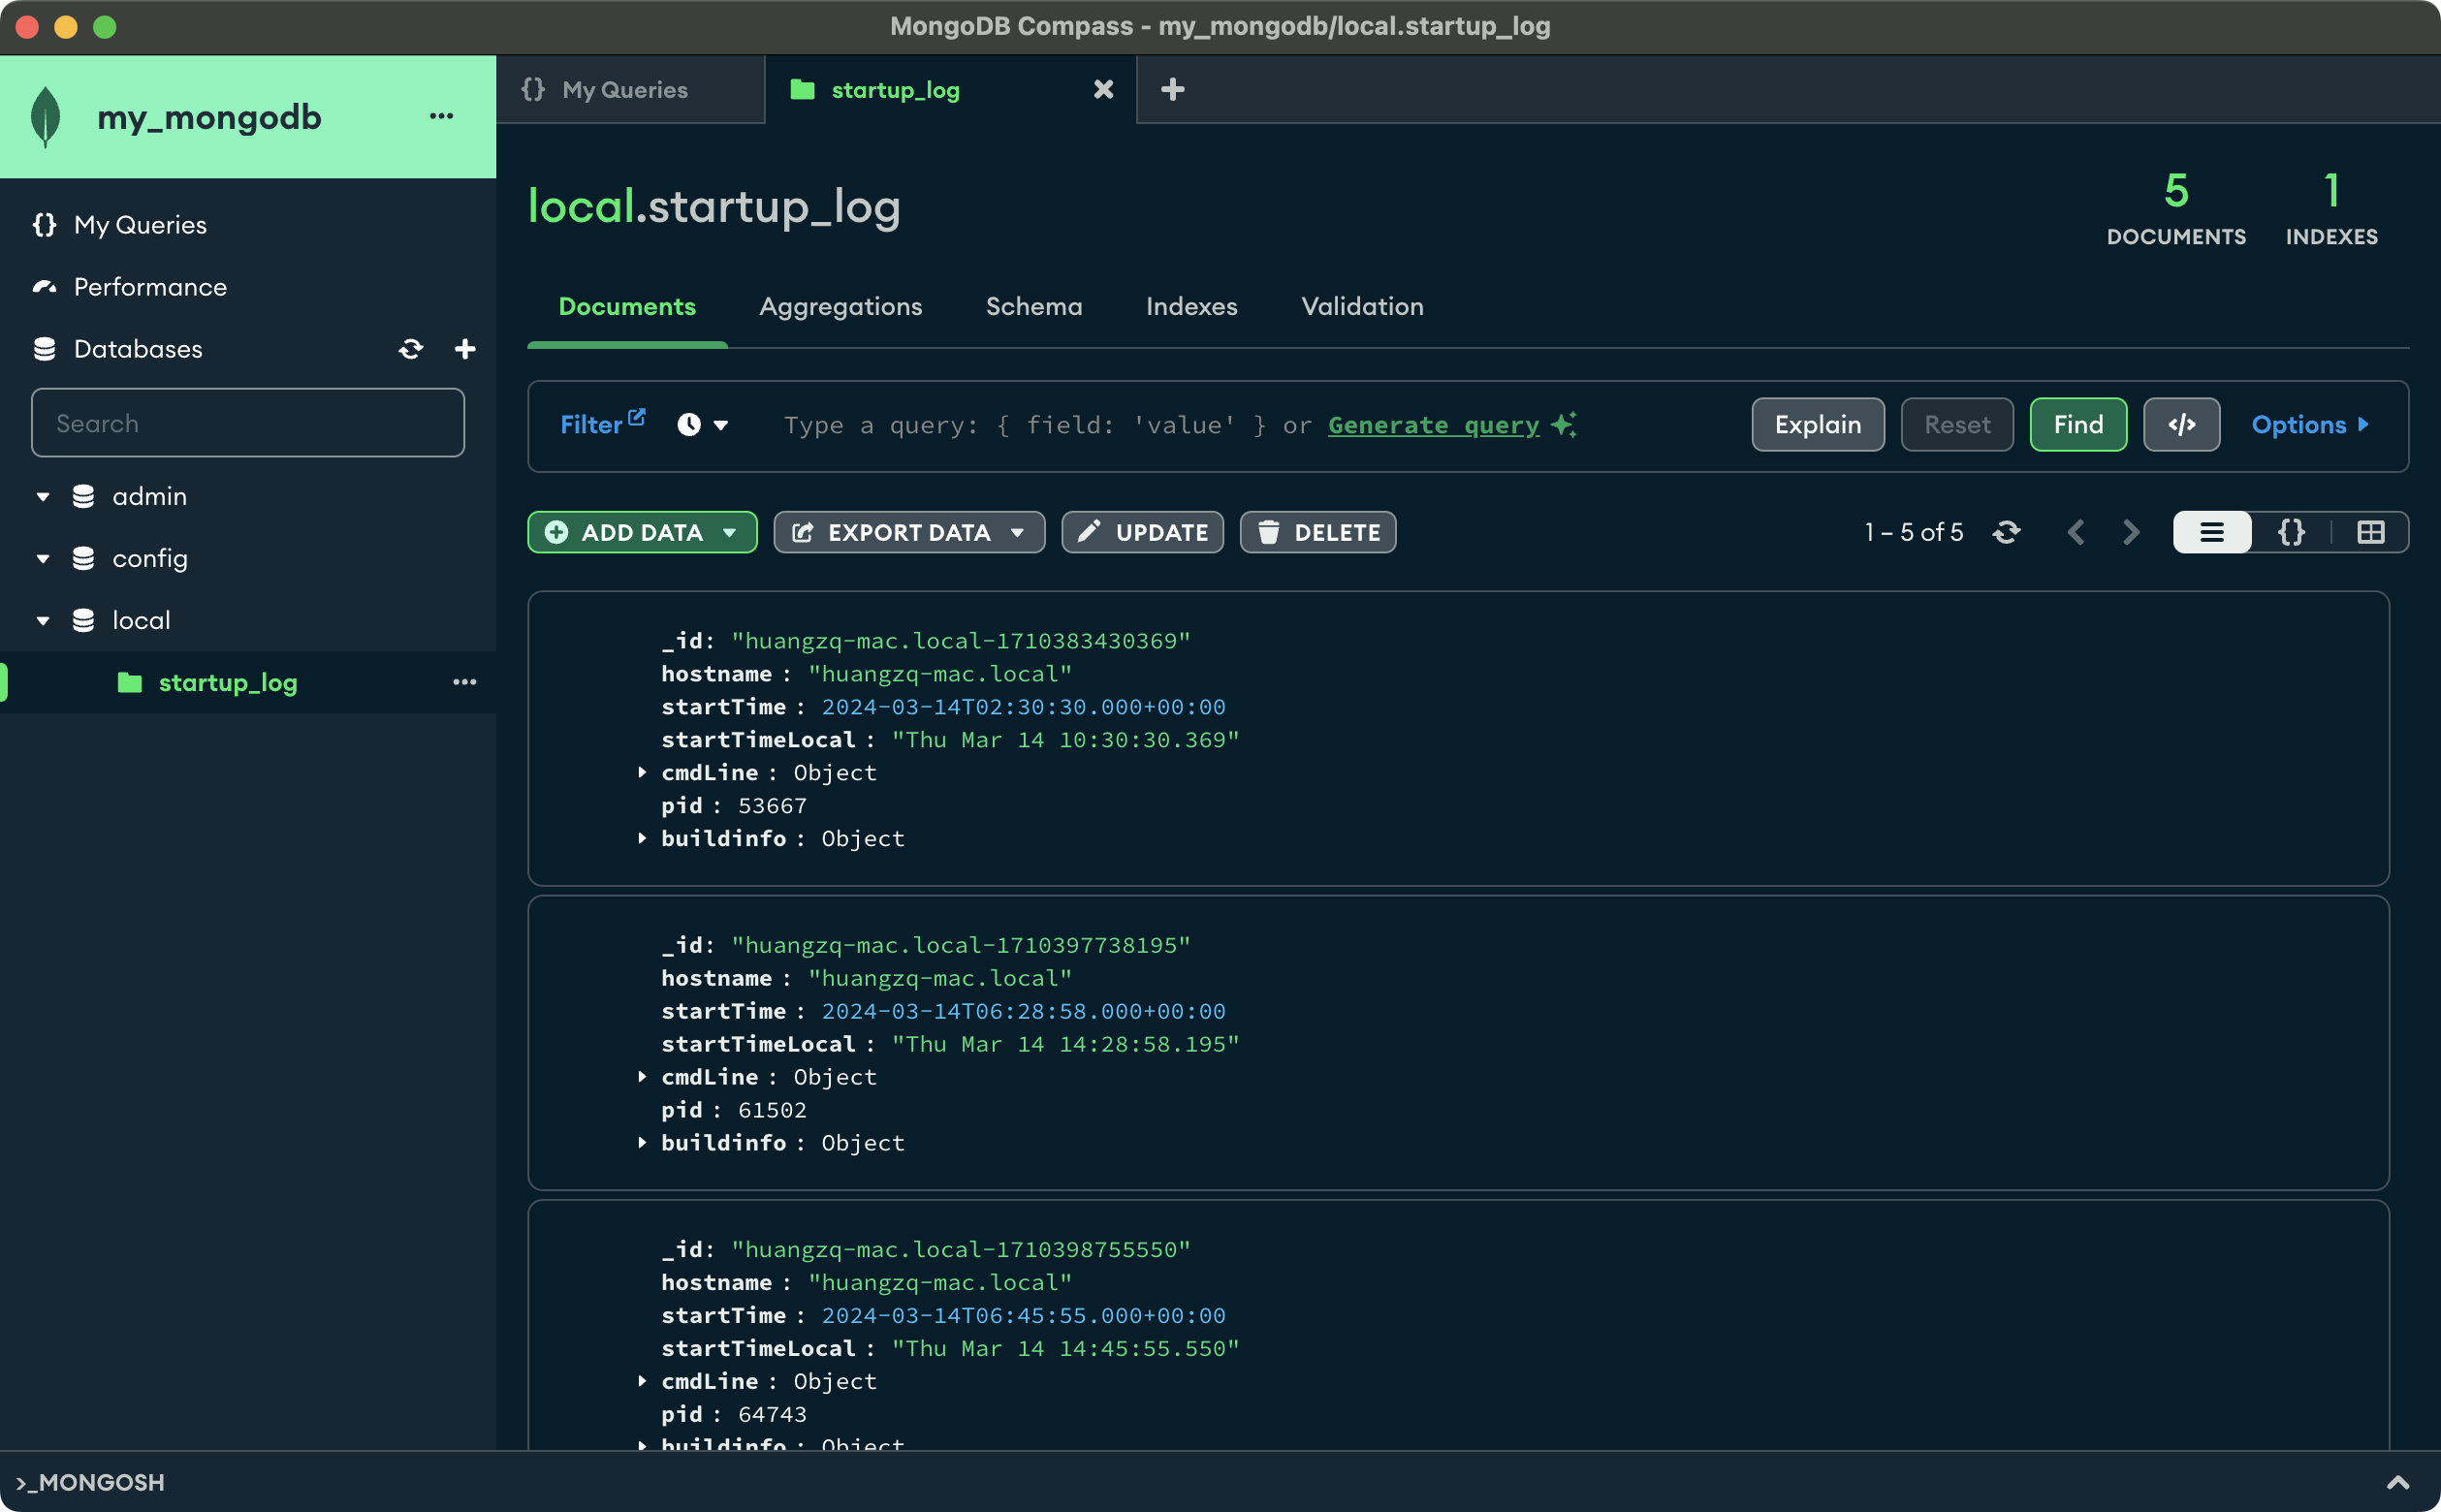
3、连接后长这个样子
其他工具
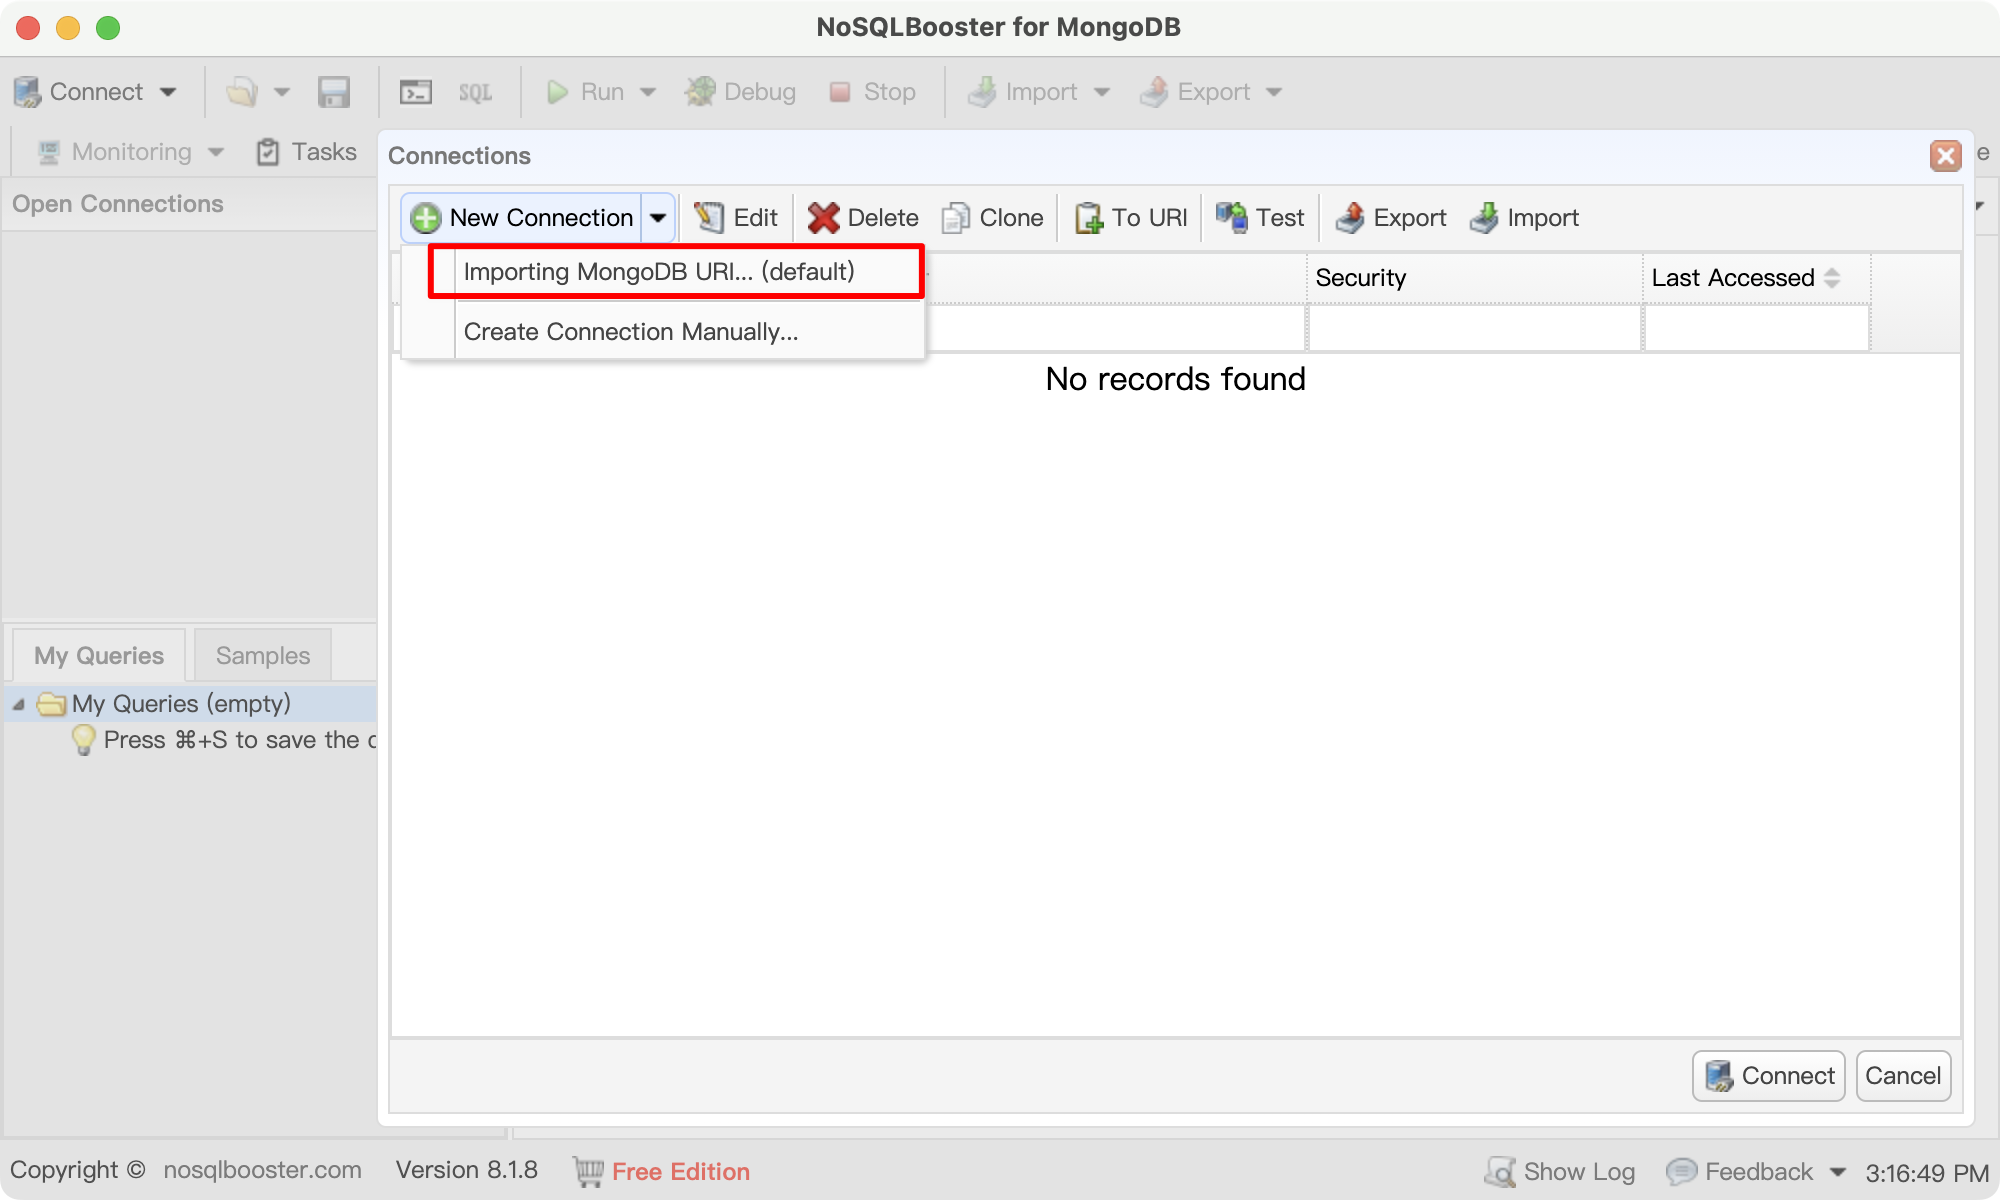
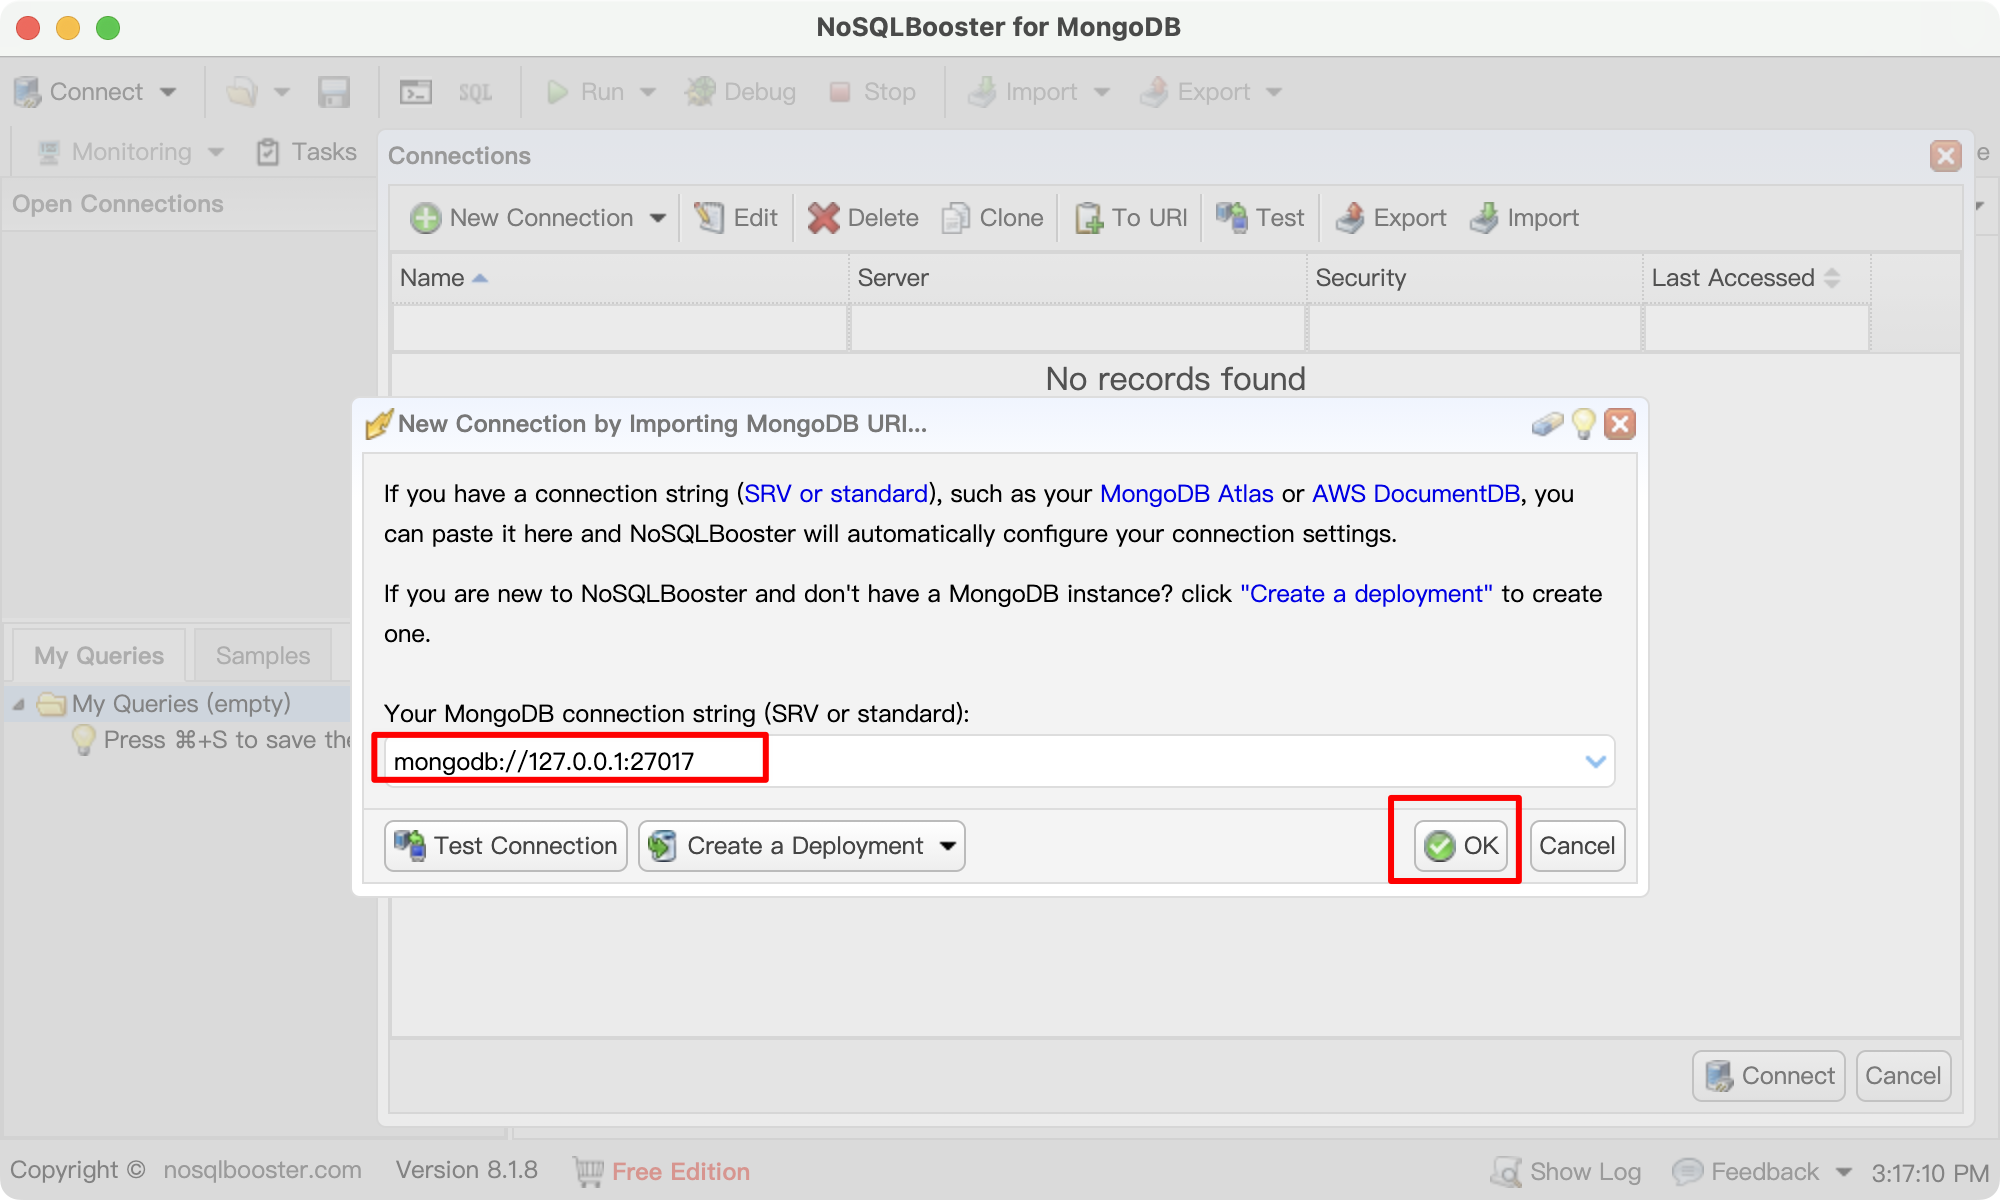
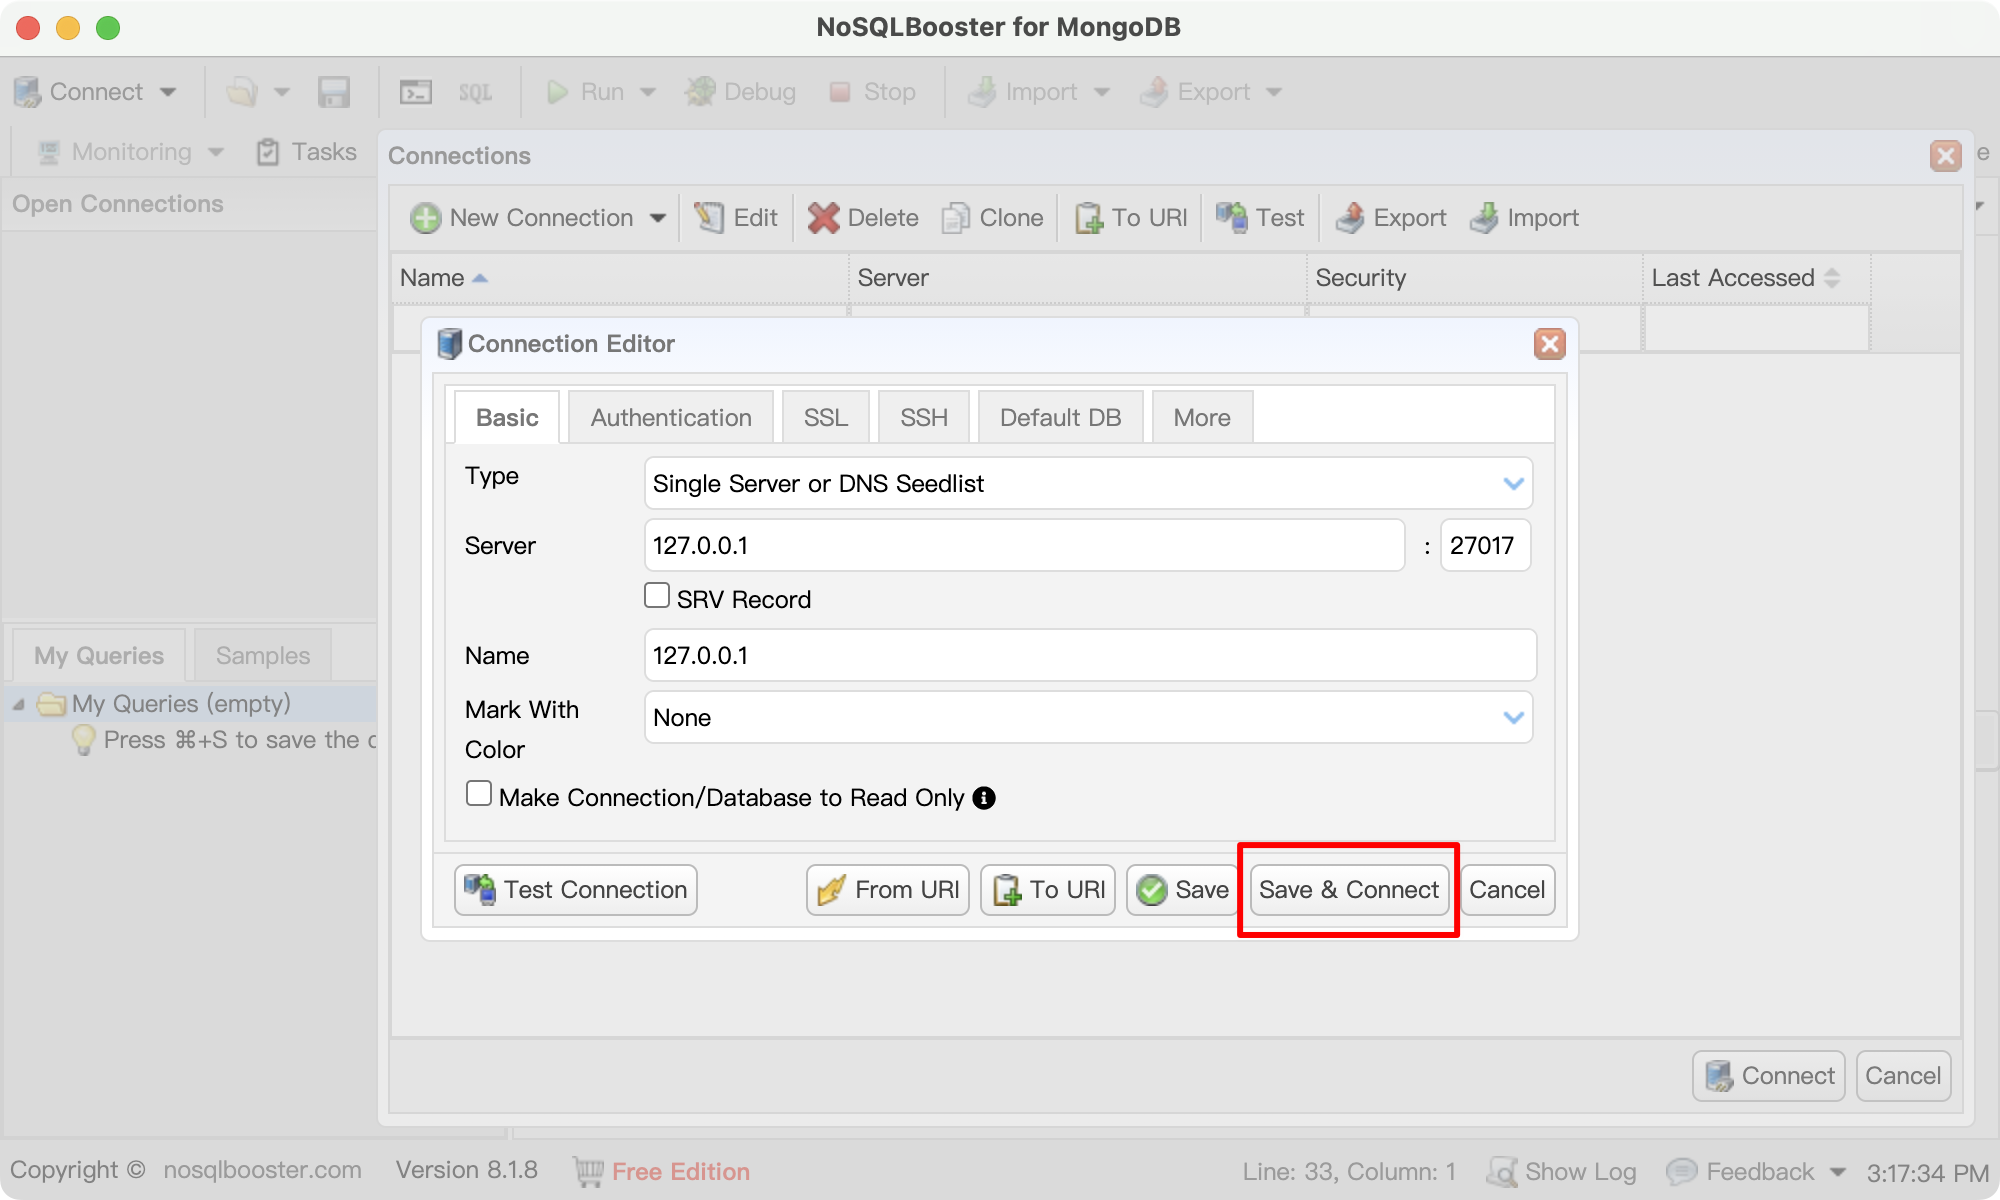
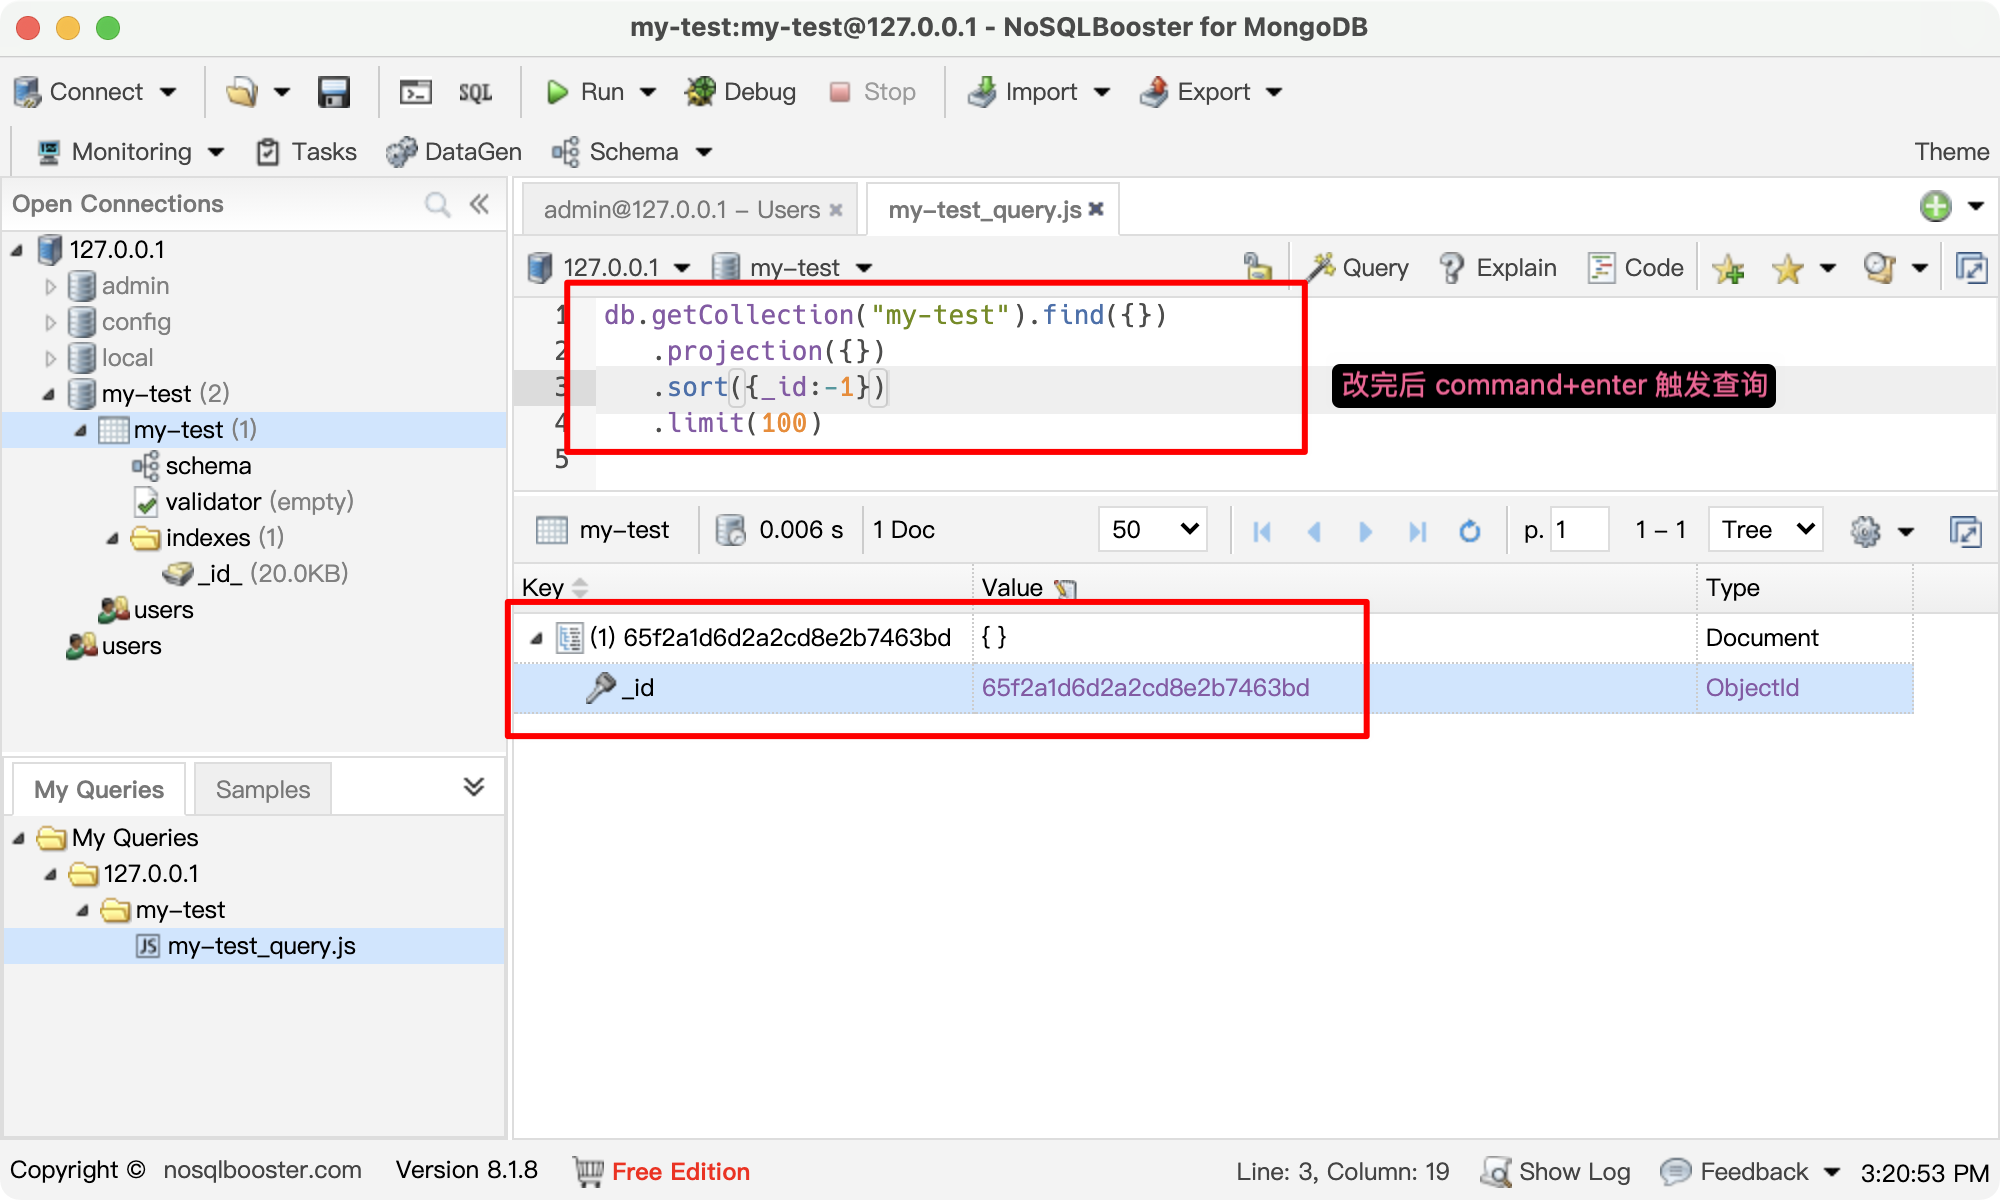
NoSQLBooster(推荐安装)
支持 SQL 查询
1、NoSQLBooster 下载地址:官网下载地址,然后安装、打开,进入主页面
2、连接
MongoDB for VS Code
VScode 插件
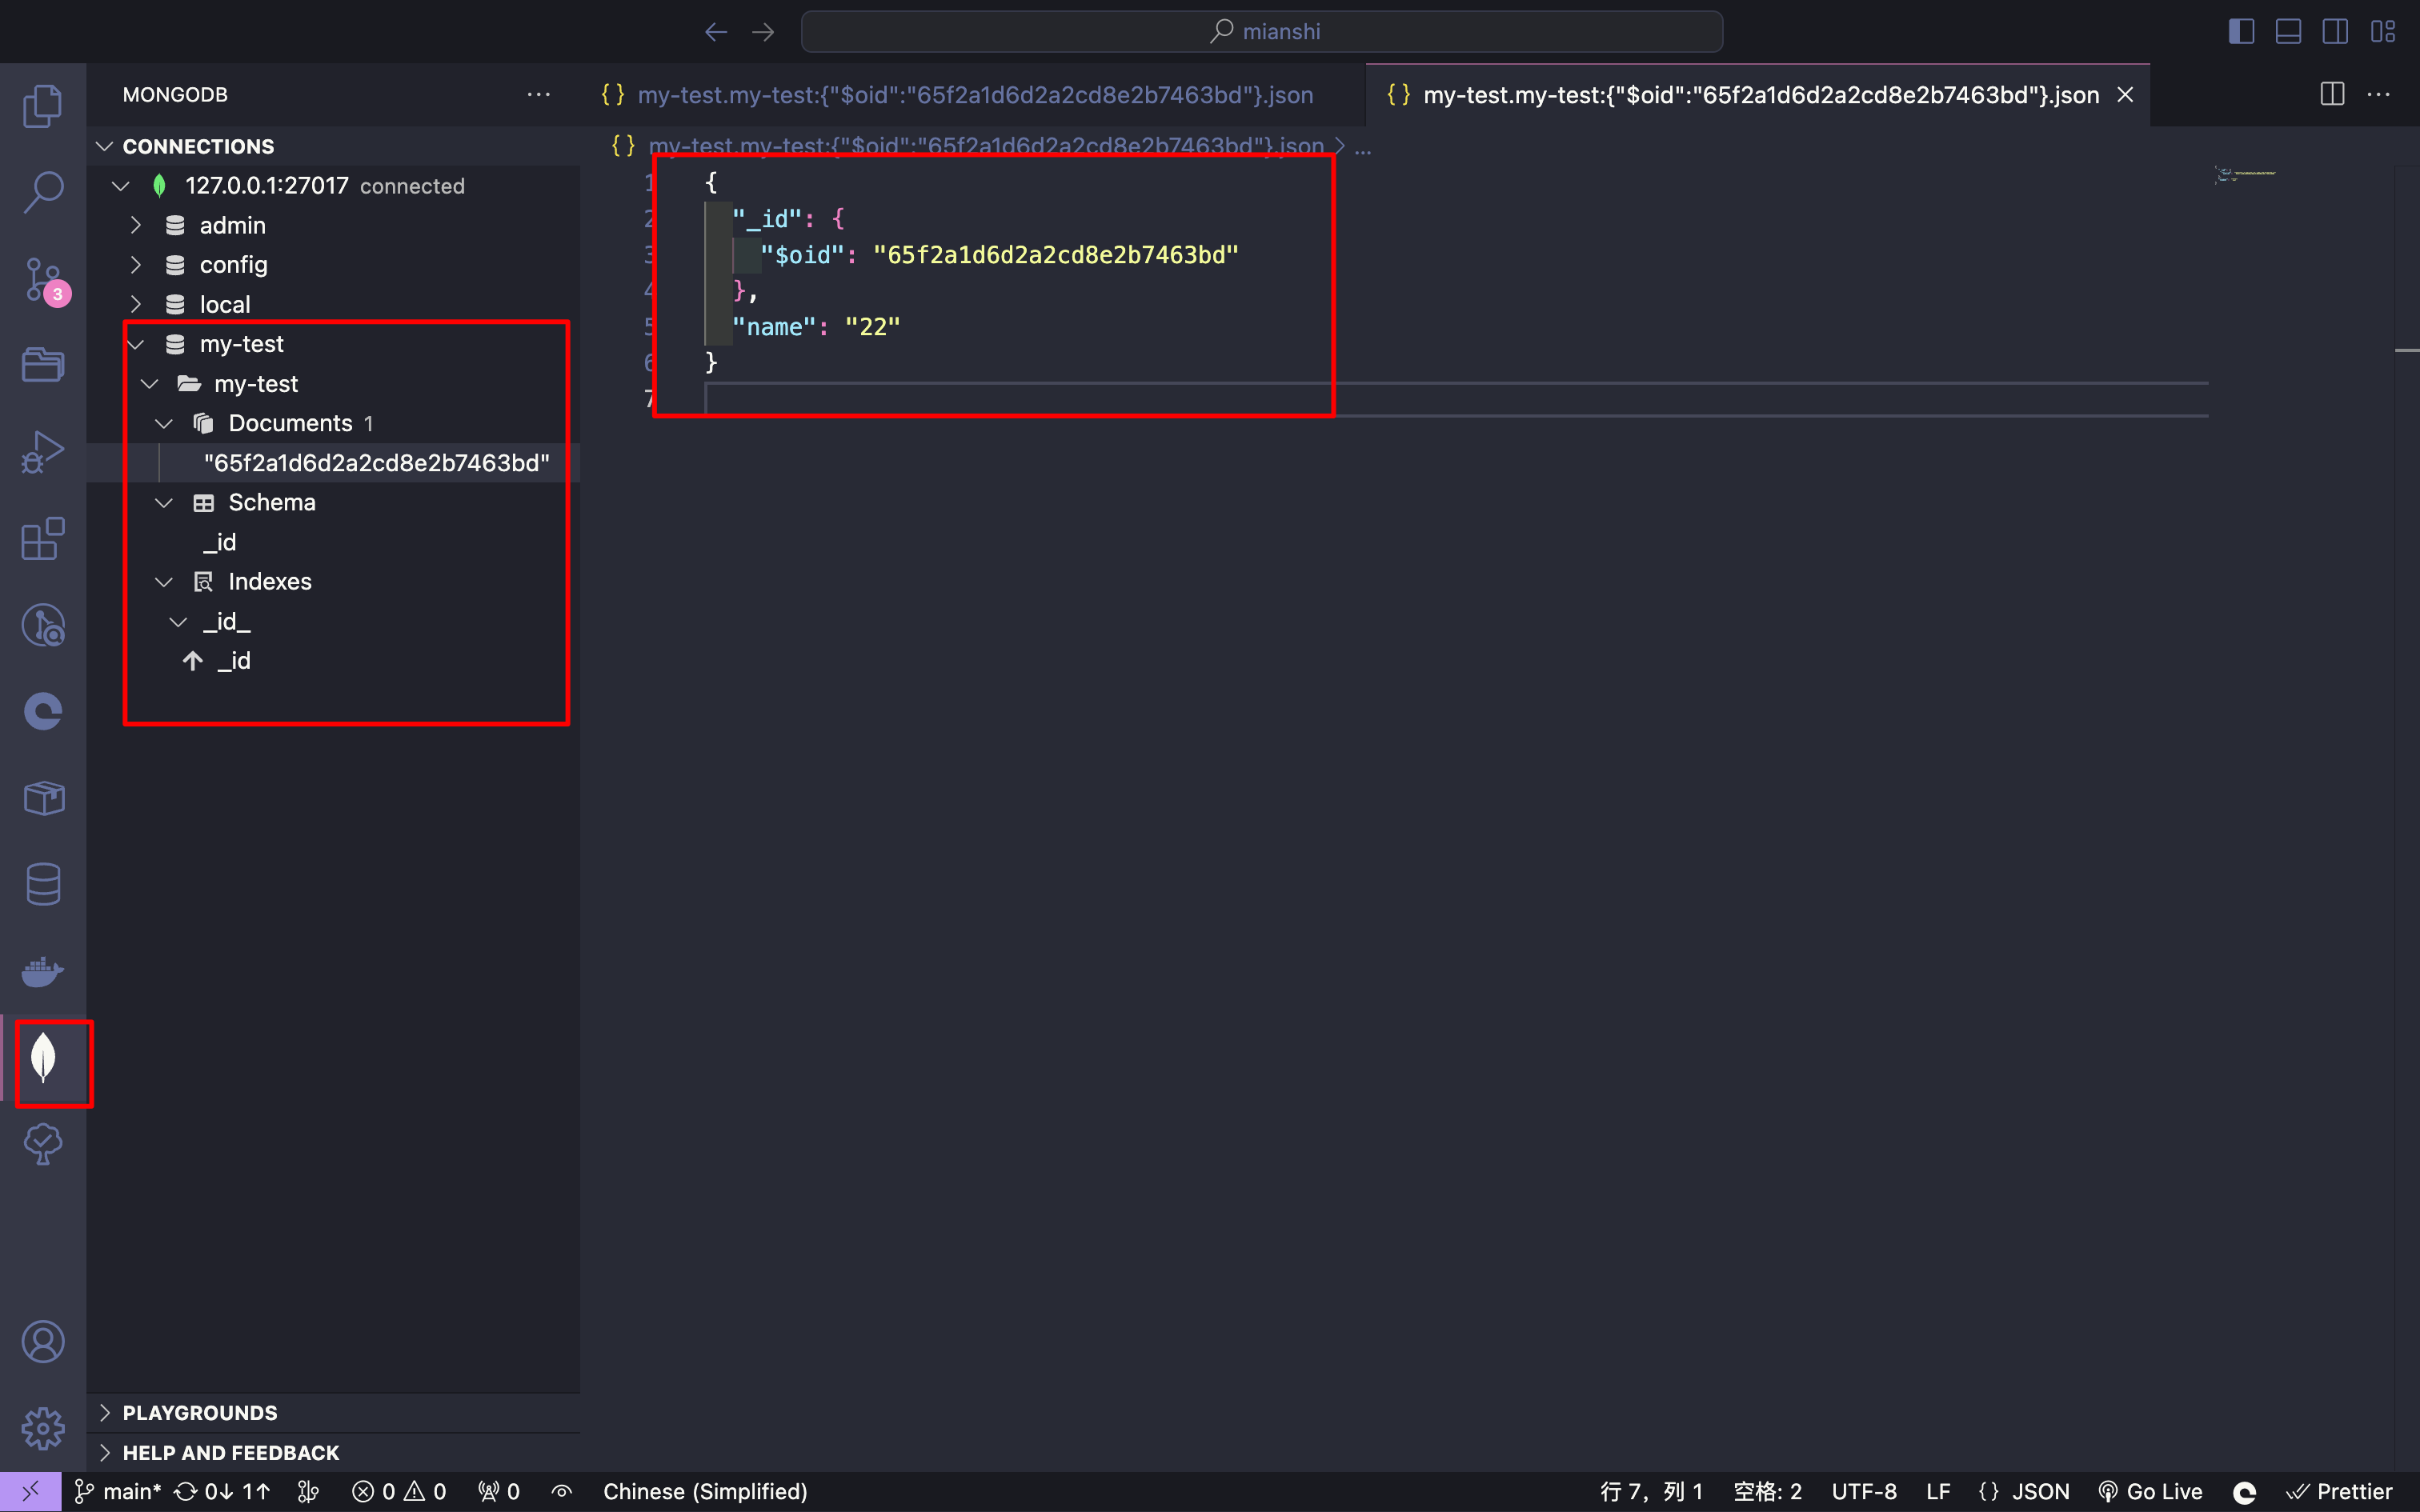
1、安装插件,创建连接,效果如下:
mongodb 增删改查(TODO)